The complete guide to microbial cleaning
Discover how microbial cleaning uses beneficial bacteria to maintain cleanliness in your Toronto home. Learn what microbial cleaners are, how they work, when to use them, and why this innovative cleaning approach might be the sustainable solution you've been looking for.
In recent years, a new category of cleaning products has been gaining attention among environmentally conscious homeowners: microbial cleaners. If you've seen products labeled as "probiotic cleaners," "enzymatic cleaners," or "bacterial cleaners" on store shelves and wondered what they're all about, you're not alone.
The concept might seem counterintuitive at first. After all, haven't we spent decades trying to kill bacteria in our homes? Why would we intentionally introduce bacteria as part of our cleaning routine?
The answer lies in understanding that not all bacteria are harmful. In fact, beneficial bacteria play crucial roles in many aspects of our lives, from our digestive health to composting our organic waste. Microbial cleaning harnesses these helpful microorganisms to clean and maintain surfaces in ways that traditional chemical cleaners simply can't match.
Whether you're living in a downtown condo, a family home in the suburbs, or renting an apartment, understanding microbial cleaning can help you make informed decisions about maintaining a clean, healthy, and environmentally friendly home.
Let's explore what microbial cleaning actually is, how it works, what it's useful for, and whether it might be the right choice for your household.
What exactly is microbial cleaning?
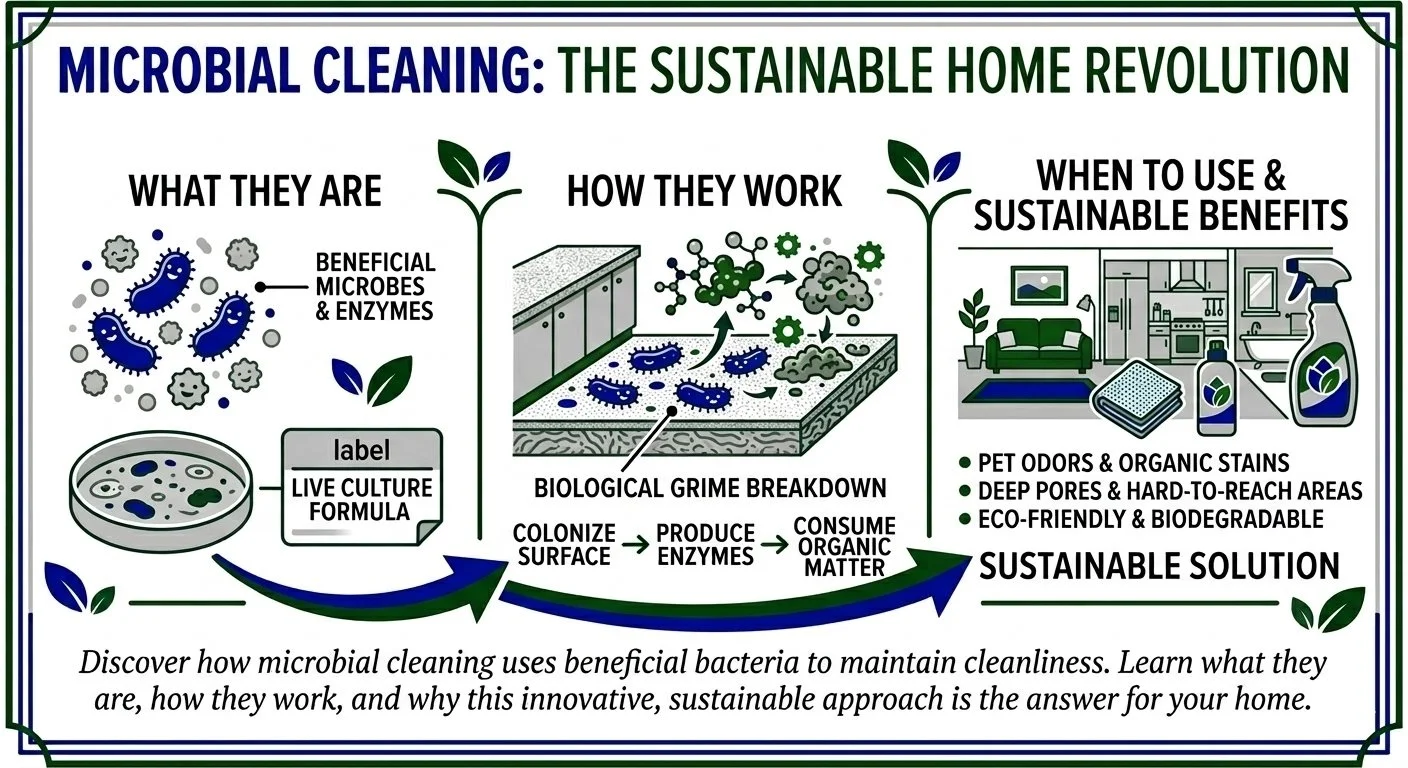
Microbial cleaning refers to cleaning products and methods that use living microorganisms — primarily bacteria and their enzymes—to break down dirt, organic matter, and odour-causing compounds.
There are two main categories of microbial cleaning products you'll encounter:
Enzymatic cleaners contain enzymes, which are proteins that act as biological catalysts. These enzymes are produced by microorganisms but the cleaners themselves may not contain living bacteria. Instead, they contain concentrated enzymes that break down specific types of organic matter. Different enzymes target different substances: proteases break down proteins (like blood or food stains), lipases break down fats and oils, amylases break down starches, and cellulases break down plant-based materials.
Probiotic or bacterial cleaners contain live beneficial bacteria, often along with the enzymes these bacteria produce. When applied to a surface, these bacteria don't just clean once and disappear — they continue to colonize the area, producing enzymes and competing with harmful bacteria for resources. This creates an ongoing cleaning effect that can last for days after application.
The fundamental difference between microbial cleaning and traditional chemical cleaning is the mechanism of action. Chemical cleaners work through immediate chemical reactions — they break apart dirt and kill microorganisms on contact. Microbial cleaners, on the other hand, work biologically and often more slowly, using natural processes to break down organic matter at a molecular level.
Think of it this way: traditional cleaners are like a power washer that blasts everything away immediately. Microbial cleaners are more like having a team of microscopic workers that continue cleaning long after you've walked away, and in some cases, keep working for days.
This doesn't mean microbial cleaners replace all other cleaning methods — they're one tool in your cleaning toolkit, particularly well-suited for specific applications that we'll explore throughout this guide.
How does microbial cleaning actually work?
To understand how microbial cleaning works, it helps to think about what these products are actually doing at a microscopic level.
When you apply an enzymatic cleaner to a surface, you're depositing enzymes that immediately begin breaking down organic compounds. Each enzyme is highly specific — it only works on certain types of molecules. A protease enzyme, for instance, will break protein chains into smaller peptides and amino acids, but it won't affect fats or carbohydrates. This specificity is actually an advantage because it means the enzymes can target exactly the type of soil or stain you're dealing with.
The breakdown process happens through a mechanism that's remarkably elegant. The enzyme binds to its target molecule, breaks it apart, releases the fragments, and then moves on to break down another molecule. A single enzyme can perform this action thousands of times, which is why enzymatic cleaners can be effective even at relatively low concentrations.
Probiotic cleaners add another layer to this process. When you apply a probiotic cleaner, you're introducing millions of beneficial bacteria to the surface. These bacteria do several things simultaneously:
Produce enzymes continuously, creating a sustained cleaning effect rather than a one-time application. As long as the bacteria remain active on the surface, they keep producing the enzymes needed to break down organic matter.
Consume the organic material that the enzymes have broken down. This is important for odour control because many unpleasant smells come from organic compounds. By consuming these compounds, the bacteria eliminate the source of the odour rather than just masking it with fragrance.
Compete with potentially harmful bacteria for space and resources. This is called competitive exclusion. Surfaces in your home are never truly sterile — they're always colonized by some form of microorganism. The question is whether those microorganisms are beneficial or potentially problematic. By establishing populations of beneficial bacteria, probiotic cleaners can help prevent harmful bacteria from gaining a foothold.
This last point is particularly important to understand because it represents a fundamental shift in thinking about cleanliness. Traditional cleaning aims to create a sterile environment by killing all microorganisms. Microbial cleaning instead aims to create a balanced microbial ecosystem dominated by beneficial organisms.
The effectiveness of microbial cleaners depends on several factors. Temperature matters — most enzymes and bacteria work best at room temperature, which is why these cleaners are ideal for typical indoor conditions. Time is also crucial — microbial cleaners generally need more contact time than chemical cleaners to do their work. While a chemical disinfectant might work in seconds, an enzymatic cleaner might need 10-15 minutes, and probiotic cleaners work best when left to dry naturally rather than being wiped away immediately.
Moisture and pH also play roles. Enzymes and bacteria need some moisture to function, and they work best in relatively neutral pH conditions. This is why microbial cleaners are formulated to create optimal conditions for the microorganisms to do their work.
What microbial cleaning is genuinely useful for
Microbial cleaners excel in certain applications where their unique properties provide advantages over traditional cleaning methods. Understanding these specific uses will help you determine whether these products have a place in your home.
Pet odour and stain removal is perhaps the most popular application for enzymatic cleaners. If you have dogs or cats, you've likely dealt with urine accidents on carpets, upholstery, or floors. Pet urine contains uric acid crystals that are extremely difficult to remove with traditional cleaners — they may seem to disappear when wet but return as the area dries, bringing the odour back with them. Enzymatic cleaners specifically break down these uric acid crystals at the molecular level, permanently eliminating the odour rather than just masking it. This is particularly valuable for pet owners living in condos or apartments where lingering pet odours can be problematic for other tenants.
Drain maintenance is another excellent application. The biofilm and organic buildup that accumulates in drains — hair, soap scum, food particles, grease — is exactly what microbial cleaners are designed to address. Regular use of enzymatic drain cleaners can help prevent clogs and eliminate the musty odours that sometimes emanate from drains, especially in older homes where plumbing systems may have decades of accumulated buildup. These cleaners work continuously, slowly breaking down organic matter in pipes without the harsh chemicals that can damage plumbing or harm the environment when they enter the wastewater system.
Grease trap and septic system maintenance also benefits significantly from microbial products. For residents with septic systems, bacterial additives can help maintain healthy microbial populations in the tank, improving waste breakdown and system function. The bacteria in these products enhance the natural decomposition process that septic systems rely on.
Carpet and upholstery cleaning with enzymatic products can be particularly effective for organic stains — food, beverage spills, vomit, or other biological materials. These cleaners penetrate deep into fibres and continue working over time, breaking down staining compounds that traditional cleaners might leave behind. For families with young children or for anyone who's ever dealt with a stubborn wine or coffee stain, this prolonged action can make the difference between a permanent stain and complete removal.
Waste bins and composters benefit enormously from microbial cleaners. Enzymatic sprays designed for garbage bins can help break down the residue that accumulates, reducing odours without introducing harsh chemicals that might contaminate the organic waste stream.
Hard-to-reach areas where soil can accumulate but regular cleaning is difficult — behind appliances, in tight bathroom corners, or in grout lines — can benefit from probiotic cleaners that continue working after application. Since these products keep producing enzymes and breaking down organic matter over time, they can help maintain cleanliness in areas that don't get frequent attention.
Sports equipment and gym bags often develop stubborn odours from sweat and bacteria. Enzymatic cleaners specifically break down the proteins and organic compounds in sweat, eliminating odours at their source. This is particularly useful for families with active kids or adults who regularly use athletic gear.
Automotive interiors, especially cloth seats and carpets that have absorbed spills or developed odours, respond well to enzymatic treatment. The ability of these cleaners to penetrate fabrics and continue working makes them ideal for car cleaning tasks.
What microbial cleaning is not designed for
While microbial cleaners have genuine benefits for specific applications, it's equally important to understand their limitations and what they're not designed to do.
Microbial cleaners are not disinfectants in the traditional sense. If you need to kill harmful bacteria, viruses, or other pathogens — for instance, after handling raw meat in your kitchen or during flu season — enzymatic or probiotic cleaners are not the appropriate choice. While probiotic cleaners may reduce harmful bacteria through competitive exclusion over time, they don't provide the immediate pathogen kill that you get from disinfectants. This is particularly important for households to understand during cold and flu season or when dealing with potential foodborne illness concerns.
They're not designed for inorganic soils. Enzymatic cleaners break down organic matter — proteins, fats, carbohydrates. They don't work on mineral deposits, rust, soap scum (which is largely inorganic), or hard water stains. For these cleaning challenges, you'll still need traditional acidic cleaners or other chemical solutions.
Microbial cleaners are not fast-acting solutions for general cleaning. If you need to quickly wipe down your kitchen counters before dinner guests arrive, a spray-and-wipe enzymatic cleaner isn't your most efficient choice. These products work best with time — from 15 minutes to several hours. They're not ideal for routine quick cleaning tasks where immediate results are needed.
They typically don't provide visible cleaning power for greasy surfaces. While enzymes can break down fats and oils, this happens slowly and at a molecular level. For a stovetop covered in cooking grease or a greasy range hood, you'll get faster, more satisfying results with a traditional degreaser. The enzymatic approach is better suited for maintaining drains or breaking down grease over time rather than tackling heavy visible grease deposits.
Microbial cleaners don't work well in conditions that are too hot, too cold, or chemically extreme. The enzymes and bacteria in these products are living or biological molecules that denature (break down) at high temperatures and become inactive when frozen. Similarly, they don't function well in highly acidic or alkaline conditions. This means they're not appropriate for use with very hot water, in ovens, or in combination with strong chemical cleaners.
They won't remove physical debris or dirt. If your floor is covered in crumbs and visible dirt, an enzymatic spray won't make that disappear. You still need to sweep, vacuum, or physically remove debris. Microbial cleaners work on the microscopic level — breaking down organic residues and odour-causing compounds — not on visible dirt and particles.
These products are also not a replacement for proper ventilation and moisture control. If you have a mould problem in your home, the solution isn't a probiotic cleaner — it's fixing the underlying moisture issue. While some microbial products claim to help with mould, they don't address the root cause, which is excess humidity or water infiltration.
Understanding these limitations helps you use microbial cleaners appropriately as part of a comprehensive cleaning strategy rather than expecting them to replace all other cleaning methods.
The science behind microbial cleaning: What research tells us
The concept of using beneficial microorganisms for cleaning isn't new, but the commercial development of consumer products is relatively recent. Understanding what scientific research actually tells us about microbial cleaning can help you separate evidence-based benefits from marketing hype.
Enzymatic cleaners have the strongest scientific backing. The use of enzymes for cleaning has been well-established for decades, particularly in laundry detergents where they've been a standard ingredient since the 1960s. Research consistently shows that proteases, lipases, and amylases effectively break down their target organic compounds. This isn't controversial science — it's well-understood biochemistry. When you use an enzymatic pet stain remover, you're applying technology that has decades of research and practical application supporting it.
The evidence for probiotic cleaners is more nuanced and still developing. Several studies have shown that beneficial bacteria can colonize surfaces and compete with potentially harmful bacteria, which is the theoretical basis for these products. Research in healthcare settings has demonstrated that probiotic cleaning systems can reduce the presence of certain pathogens on surfaces, though results have been mixed and more research is needed.
One area where the science is particularly interesting is in the concept of the "home microbiome." Just as we now understand that our bodies are home to trillions of beneficial microorganisms, researchers are discovering that our homes have their own microbial ecosystems. Some research suggests that homes with more diverse microbial populations — including plenty of bacteria from the natural environment — may actually be healthier than homes where we attempt to maintain sterile conditions.
This research challenges the traditional notion that "cleaner" means "more sterile." Instead, it suggests that a balanced microbial ecosystem might be preferable to a constantly disinfected environment, particularly for immune system development in children. However, it's important to note that this research is still evolving, and the implications for cleaning practices aren't entirely clear yet.
Studies on enzymatic drain cleaners have shown they can effectively reduce organic buildup in pipes when used regularly. This maintenance approach — preventing buildup rather than clearing severe clogs — appears to be where these products are most effective. They're not a substitute for a plumber's snake when you have a complete blockage, but they can help prevent reaching that point.
Research has also confirmed what we know about enzyme specificity. A protease designed to break down blood won't help with a grease stain, and a lipase won't remove protein-based stains. This means the most effective enzymatic cleaners contain multiple types of enzymes to address various organic compounds.
What the research doesn't show is that microbial cleaners are universally superior to traditional cleaning methods for all applications. The scientific literature doesn't support replacing all your cleaning products with enzymatic or probiotic alternatives. Rather, it shows that these products have specific valuable applications where their unique properties provide advantages.
For anyone evaluating microbial cleaning products, the key is to look for products that make specific, scientifically defensible claims rather than vague promises about being "better" or "more natural." Products that clearly state what enzymes they contain and what those enzymes target are more trustworthy than those making broad, unsupported claims.
Environmental advantages of microbial cleaning
For environmentally conscious people, understanding the environmental impact of microbial cleaning products is crucial for making informed choices that align with your values.
The potential environmental benefits of microbial cleaners are significant. These products are generally biodegradable because they're based on biological rather than synthetic chemical processes. The enzymes and bacteria break down naturally, and when these products enter wastewater system through your drains, they're typically less harmful to aquatic ecosystems than traditional chemical cleaners.
Traditional cleaning chemicals can persist in the aquatic environment and harm fish and other wildlife. Enzymatic and probiotic cleaners, in contrast, break down into harmless components relatively quickly.
For homes with septic systems, microbial cleaners can actually be beneficial to the system rather than harmful. Traditional antibacterial cleaners can kill the beneficial bacteria that septic systems depend on to function properly. Enzymatic cleaners and bacterial additives support the biological processes that make septic systems work.
The reduced packaging and concentration of some enzymatic products can also provide environmental benefits. Some probiotic cleaning concentrates can be diluted to make multiple litres of cleaning solution, reducing plastic packaging waste compared to buying multiple bottles of ready-to-use traditional cleaners.
However, there are important caveats to consider. Not all products marketed as "natural" or "enzymatic" are created equal. Some contain enzymes or beneficial bacteria along with traditional chemical ingredients, synthetic fragrances, or other additives that may reduce the environmental benefits. Reading ingredient lists is crucial.
The production of enzymatic and probiotic cleaners also has environmental costs. Growing bacterial cultures requires resources, and the manufacturing processes, while potentially less toxic than producing synthetic chemicals, still require energy and inputs. The environmental benefit comes primarily in the use and disposal phase rather than production.
There's also the question of efficacy and resource use. If an enzymatic cleaner requires more product, more water, or more time and effort to achieve the same result as a traditional cleaner, the environmental calculation becomes more complex. The most environmentally friendly cleaning method is often the one that works efficiently, reducing the need for repeated applications or excessive water use.
For anybody serious about environmental impact, microbial cleaners can be part of a green cleaning strategy, but they should be evaluated alongside other factors: reducing overall product consumption, choosing concentrated formulas, avoiding single-use products, and selecting items with minimal packaging.
It's also worth noting that truly sustainable cleaning often involves the simplest methods: vinegar and water for windows, baking soda for scrubbing, and good old-fashioned elbow grease for many other tasks. Microbial cleaners have their place, but they're not automatically more environmentally friendly than basic, time-tested cleaning methods.
The most honest assessment is that enzymatic and probiotic cleaners can be more environmentally friendly than conventional chemical cleaners for specific applications where they're genuinely effective, but they're not a magic solution to all environmental concerns about household cleaning.
Choosing and using microbial cleaners effectively
If you've decided that microbial cleaners might be useful for specific applications in your home, here's what you need to know about selecting and using them effectively.
When shopping for enzymatic or probiotic cleaners, look for products that clearly state what enzymes they contain and what those enzymes are designed to break down. A pet stain remover should list proteases and possibly ureases (for breaking down urea in urine). A drain cleaner should contain lipases for fats and proteases for hair and organic matter. Transparency about ingredients is a good sign that a product is legitimate rather than just capitalizing on the "natural" cleaning trend.
Check for third-party certifications when possible. Products certified by organizations like EcoLogo or Green Seal have been independently verified to meet specific environmental and performance standards. These certifications provide some assurance that the product does what it claims.
Avoid products with added synthetic fragrances or harsh chemical additives. One of the benefits of enzymatic cleaners is that they're gentler on your indoor environment, but this advantage is lost if the product is loaded with artificial scents or other potentially problematic ingredients. Remember that truly effective odour removal comes from breaking down odour-causing compounds, not masking them with perfume.
When using enzymatic or probiotic cleaners, follow these guidelines for best results:
Give them time to work. Unlike spray-and-wipe chemical cleaners, enzymatic products need contact time with the soil or stain they're meant to break down. Follow product directions for application time — usually at least 10-15 minutes for enzymatic cleaners. For probiotic cleaners, allowing the product to air dry rather than wiping it away immediately lets the bacteria establish themselves on the surface.
Use appropriate amounts. More isn't always better, but you do need enough product to thoroughly saturate the affected area, especially for stain removal. For a pet urine spot on carpet, for instance, you need to get the enzymatic cleaner down to the carpet pad where the urine has soaked in, not just treat the surface.
Apply to clean surfaces when possible. For best results with probiotic cleaners, apply them to surfaces that have already been cleaned of visible soil. This gives the beneficial bacteria the best chance to colonize the area without competing with heavy organic buildup.
Store products properly. Enzymatic cleaners should be stored at room temperature — extreme heat or cold can damage the enzymes. Check expiration dates, as enzymes do lose activity over time. Probiotic cleaners containing live bacteria are even more sensitive to storage conditions.
Don't mix microbial cleaners with disinfectants or harsh chemicals. If you've just bleached a surface, don't immediately apply a probiotic cleaner — the bleach will kill the beneficial bacteria. Similarly, don't mix enzymatic cleaners with very acidic or alkaline products, as this can denature the enzymes.
Be patient with results. For some applications like drain maintenance or ongoing odour control, you won't see dramatic immediate results. The benefit comes from consistent use over time as the enzymes work to prevent buildup or the bacteria establish beneficial populations.
For Toronto-specific considerations, remember that our seasonal temperature variations can affect these products. In winter, if your home's temperature drops significantly (perhaps in a basement or mudroom), enzymatic cleaners may work more slowly. Conversely, they work very effectively at typical comfortable room temperatures, which is where most of us keep our homes.
Cost considerations and value assessment
Price is often a concern when considering microbial cleaning products, as they're frequently more expensive than traditional cleaners. Understanding the value proposition helps you make informed decisions about when these products are worth the investment.
Quality enzymatic and probiotic cleaners typically cost more per bottle than conventional cleaning products available at grocery stores or big-box retailers. A specialized enzymatic pet stain remover might cost $15-25 for a bottle that would last for several applications, while a general-purpose chemical cleaner might cost $5-8 for a similar-sized bottle.
However, several factors can offset this higher initial cost:
Enzymatic cleaners are often highly concentrated, meaning you dilute them before use. A single bottle might make multiple litres of working solution, making the per-use cost more comparable to traditional cleaners.
For specific problems — particularly pet odours or drain maintenance — enzymatic products may actually save you money in the long run. If an enzymatic pet cleaner permanently removes a urine odour that would otherwise require professional carpet cleaning or even carpet replacement, the $20 bottle is a bargain. If regular use of an enzymatic drain cleaner prevents a $200 plumber's call to clear a blocked drain, it pays for itself many times over.
Probiotic cleaners that continue working for days after application could potentially reduce cleaning frequency. If you're maintaining surfaces with beneficial bacteria that continuously produce enzymes and compete with harmful bacteria, you might be able to clean less frequently while maintaining the same level of actual cleanliness.
Some enzymatic products can replace multiple traditional cleaning products. A good multi-enzyme cleaner might work as a general cleaner, stain remover, and odour eliminator, potentially reducing the total number of products you need to purchase and store.
That said, it's important to be realistic about value:
Don't replace all your cleaning products with expensive enzymatic alternatives if they're not necessary for your specific needs. If you don't have pets, don't regularly deal with organic stains, and don't struggle with drain odours, you may not benefit from enzymatic cleaners at all.
For routine general cleaning, simple and inexpensive solutions like vinegar and water or basic soap solutions often work just as well as expensive enzymatic products and cost far less.
Generic or store-brand enzymatic cleaners can be significantly cheaper than name-brand products while containing similar enzymes. Compare ingredient lists rather than just brand names when shopping.
Consider making your own solutions for some applications. For drain maintenance, for instance, a simple routine of hot water, baking soda, and vinegar can be effective and costs virtually nothing, though it works through different mechanisms than enzymatic cleaners.
The best value approach is targeted use: employ enzymatic or probiotic cleaners for specific applications where they excel and where the alternatives are either ineffective or more expensive, while using simpler, cheaper methods for routine general cleaning.
Common misconceptions about microbial cleaning
As microbial cleaning products have gained popularity, several misconceptions have emerged that are worth addressing directly.
“Microbial cleaners will make your home sterile or kill all germs.”
This is actually the opposite of what probiotic cleaners do. They introduce beneficial bacteria rather than creating a sterile environment. While enzymatic cleaners break down organic matter, they're not disinfectants. If your goal is to kill pathogens, you need a disinfectant, not a microbial cleaner.
“These products are "all-natural" and therefore completely safe and non-toxic.”
While many enzymatic and probiotic cleaners are derived from biological sources, "natural" doesn't automatically mean safe for all uses or people. Some people may be allergic to specific enzymes or bacterial strains. Additionally, many commercial products contain other ingredients beyond the enzymes or bacteria, and these may not all be natural. Always read ingredient lists and follow safety instructions.
“Microbial cleaners will work instantly like chemical cleaners.”
This is perhaps the most common source of disappointment with these products. People expect the immediate visible results they're used to from traditional cleaners. Microbial cleaners work differently—they need time, and their effects may not be immediately visible even though important cleaning is happening at the molecular level.
“You should replace all your cleaning products with enzymatic or probiotic alternatives.”
This isn't practical or necessary. Microbial cleaners excel in specific applications but aren't ideal for everything. A balanced cleaning approach uses different products for different purposes based on what works best for each specific cleaning challenge.
“If you use probiotic cleaners, you never need to clean again because the bacteria keep working forever.”
While probiotic bacteria can persist on surfaces and continue producing enzymes for some time, they don't eliminate the need for regular cleaning. Populations eventually decline, and you still need to remove visible soil and debris through traditional cleaning methods.
“More expensive products are always better or more effective.”
Price doesn't always correlate with efficacy in enzymatic cleaners. Some expensive products are paying for marketing and packaging rather than superior formulations. Conversely, some very cheap products may contain insufficient enzymes to be effective. The key is looking at actual ingredients and concentrations rather than price tags.
“Enzymatic cleaners will fix serious plumbing clogs or septic system failures.”
While these products can help with maintenance and prevention, they're not miracle workers. A severely clogged drain needs mechanical clearing. A failing septic system needs professional repair. Enzymatic products work best as preventive maintenance, not emergency fixes.
“All ‘enzyme cleaners’ or ‘probiotic cleaners’ are the same.”
There's significant variation in product formulation, enzyme types and concentrations, bacterial strains used, and overall effectiveness. Generic grouping of all enzymatic products together ignores these important differences.
If you’re evaluating whether to try microbial cleaners, understanding these misconceptions will help you set realistic expectations about what these products can and can't do.
Making microbial cleaning work in your home
If you've decided that microbial cleaners have a place in your home, here's how to integrate them effectively into your cleaning routine.
Start with specific problem areas rather than trying to overhaul your entire cleaning approach at once. If you have a dog and periodically deal with accidents, begin with an enzymatic pet stain and odour remover. If your drains tend to develop odours or slow slightly, try an enzymatic drain maintainer. This targeted approach lets you evaluate effectiveness for your specific needs without significant investment.
Establish realistic expectations and give products adequate time to work. If you're treating a pet stain, understand that you might need to apply the product multiple times for complete odour removal, especially if the stain is old or has soaked deep into carpet padding. If you're maintaining drains, consistent weekly use over a month will give you better results than a one-time application.
Create a cleaning system that uses different methods for different purposes. You might use vinegar and water for windows and mirrors, a simple all-purpose cleaner for countertops and general surfaces, enzymatic cleaners for specific stain and odour issues, and traditional disinfectants when you actually need to kill pathogens (like after handling raw meat in the kitchen).
Keep records of what works and what doesn't for your specific situation. Homes vary widely and what works in one environment might not work as well in another. If an enzymatic drain cleaner keeps your bathroom drain fresh and flowing, note that success. If a probiotic surface cleaner doesn't seem to make any difference in your home, that's useful information too.
Consider the seasonal patterns in your home. During humid summers, you might find that microbial cleaners work particularly well. In the dry winter months when you're running the heat and indoor humidity drops, you might need to adjust your approach.
Be mindful of combining products and cleaning methods. If you're using probiotic cleaners to establish beneficial bacterial populations, don't immediately disinfect surfaces afterwards — you'll kill the bacteria you just applied. Similarly, if you've used a harsh chemical cleaner, wait before applying enzymatic products, as the residual chemicals might interfere with enzyme function.
Store products according to directions and use them before expiration dates. Enzymatic and probiotic cleaners have a shelf life. Check dates when purchasing, especially if buying from smaller retailers where products might sit on shelves longer, and don't stock up on so much that products expire before you use them.
Educate other household members about how to use these products correctly. If your partner or roommate is used to spray-and-wipe cleaning, they need to understand that enzymatic cleaners require different application methods. Brief everyone in your household on which products to use for what purposes and how to use them effectively.
Monitor your results over time. For maintenance applications like drain care, assess whether you're seeing the benefits you expected. Are your drains staying fresh and clear? If so, the product is working. If you're still experiencing problems, you might need to adjust your approach or try a different product.
The future of microbial cleaning
The microbial cleaning category is still evolving, and understanding where it might be heading can help you make forward-thinking decisions about these products.
Research is ongoing into more targeted and effective bacterial strains and enzyme formulations. As scientists better understand the specific mechanisms of soil breakdown and odour elimination, we're likely to see more specialized products designed for very specific applications. This could mean even more effective solutions for particular cleaning challenges.
The concept of managing your home's microbiome — rather than trying to sterilize it — is gaining scientific support. Future cleaning approaches might focus more on establishing beneficial microbial ecosystems in our homes rather than attempting to eliminate all bacteria. This represents a fundamental shift in thinking about domestic hygiene.
We may see broader adoption of probiotic cleaning systems in institutional and commercial settings, which could eventually influence residential products. Healthcare facilities, schools, and office buildings are experimenting with these systems, and as evidence accumulates about their effectiveness, residential applications may expand.
Regulation and standardization of microbial cleaning products is likely to improve. Currently, the lack of clear standards makes it difficult for consumers to compare products or verify claims. As the market matures, we may see better testing protocols, clearer labelling requirements, and more reliable third-party certifications.
Integration with other green cleaning technologies might create hybrid approaches that combine the best of multiple methods. We might see products that use enzymes for organic soil breakdown along with plant-based surfactants for general cleaning, creating more versatile solutions.
Greater transparency about ingredients and mechanisms of action is likely as consumers become more educated and demanding. The days of vague "proprietary enzyme blend" listings may give way to detailed disclosure of exactly which enzymes are included and what they're designed to break down.
Staying informed about these developments means you can make increasingly sophisticated choices about cleaning products that align with your health, environmental, and practical priorities.
The bottom line: Is microbial cleaning right for you?
After exploring what microbial cleaning is, how it works, and what it's useful for, the question remains: should you incorporate these products into your home's cleaning routine?
The answer depends on your specific circumstances and needs.
Microbial cleaners are worth considering if you deal with persistent pet odours or stains, experience slow or smelly drains, want to reduce harsh chemical use in your home, have specific applications where their prolonged action provides benefits, or are interested in supporting a more balanced home microbiome rather than attempting sterility.
They're probably not necessary if you don't deal with the specific issues they're designed to address, if you're satisfied with simple, inexpensive cleaning methods that work for your needs, if you're looking for fast-acting solutions for routine cleaning, or if your budget doesn't accommodate higher prices for specialized products.
The most sensible approach for most households is a selective strategy: use microbial cleaners where they genuinely excel—particularly for organic stains and odours, drain maintenance, and specific ongoing cleaning challenges—while continuing to use whatever methods work effectively for your other cleaning needs.
As the founder of EcoEthical Cleaning, I've integrated microbial cleaning products into every service I provide, where appropriate, across Toronto's Harbourfront District and surrounding neighbourhoods. Harnessing the same natural processes outlined in this guide, the products I use break down grease, grime, and organic matter without harsh chemicals — leaving your home genuinely clean at a microscopic level. If you're ready to put the science to work in your own space, reach out today for a free, no-obligation estimate.
What to know about the fragrances in your household cleaners
Discover the truth about fragrances in household cleaners and why that "fresh" scent might be doing more harm than good. Learn about the health risks of synthetic fragrances, their environmental impact, and how marketing has convinced us that clean has a smell—when it actually doesn't.
If you've ever walked down the cleaning aisle at your local grocery store, you've likely been hit with an overwhelming wall of scent. Ocean breeze. Mountain fresh. Lavender fields. Spring rain. The options seem endless, and the marketing promises are enticing: these fragrances will make your home smell clean, feel fresh, and be more inviting.
That "fresh linen" scent wafting through your home after you've wiped down the counters? It's not cleanliness you're smelling — it's a complex cocktail of synthetic chemicals that could be affecting your health and the environment in ways you never imagined.
As we become increasingly conscious about what we bring into our homes, it's time to take a closer look at the fragrances lurking in our household cleaners and why they might be doing more harm than good.
What does clean actually smell like?
Let's start with a fundamental truth: cleanliness is odourless.
When you properly clean a surface (removing dirt, bacteria, grease, and grime) what you're left with is simply the natural scent of that material. A truly clean countertop smells like... nothing. A properly cleaned bathroom smells neutral. Freshly mopped floors shouldn't announce themselves from across the house.
The association between "clean" and "scented" is entirely manufactured. It's a marketing construct that's been so thoroughly embedded in our culture over the past several decades that we've collectively forgotten this basic reality. Think about it: before the mid-20th century and the explosion of synthetic chemistry in consumer products, people cleaned their homes with simple ingredients like vinegar, baking soda, and soap. These products cleaned effectively, without lingering artificial scents.
The equation of fragrance with cleanliness is so powerful that many of us feel like we haven't actually cleaned unless we can smell that telltale scent afterwards. We've been conditioned to believe that if it doesn't smell "fresh," it isn't truly clean. This perception is precisely what cleaning product manufacturers have spent billions of dollars cultivating.
The marketing machine behind scented cleaners
The fragrance industry and household cleaning product manufacturers have executed one of the most successful marketing campaigns in modern history. They've convinced millions of consumers that scent equals cleanliness, and they've done it so effectively that many of us don't even question the assumption.
Walk through any cleaning product advertisement, and you'll notice the patterns. Flowing curtains billowing in an ocean breeze. Sun-drenched meadows. Crisp mountain air. These are carefully crafted narratives designed to tap into our emotions and our desire for a fresh, healthy home environment.
The marketing language is equally calculated. Products promise to "eliminate odours," "refresh your home," and "bring the outdoors in." They use words like "pure," "natural," and "fresh" even when the ingredients are entirely synthetic. The labels feature images of lavender, lemons, and pine trees, creating a visual association with nature that the actual product formulation doesn't support.
Here in Toronto, where many of us live in condos or homes without immediate access to outdoor spaces, these marketing messages can be particularly appealing. The promise of bringing that "cottage country pine" or "ocean breeze" into our urban dwellings taps into our desire for connection with nature. But what we're actually bringing into our homes is far from natural.
Companies also leverage our trust in cleanliness as a form of care. The advertisements often feature families, children playing on freshly cleaned floors, and parents who want the best for their loved ones. The subtext is clear: if you care about your family, you'll choose products that make your home smell this particular way. It's a powerful emotional appeal that has little to do with actual cleaning efficacy.
What's particularly insidious about this marketing is that it's self-reinforcing. Once consumers are conditioned to associate scent with clean, they'll actually doubt whether their home is clean if it doesn't smell a certain way. This creates a cycle where people feel compelled to continue buying scented products, even if they're experiencing negative health effects, because the alternative feels like accepting a "less clean" home.
What's actually in those fragrances?
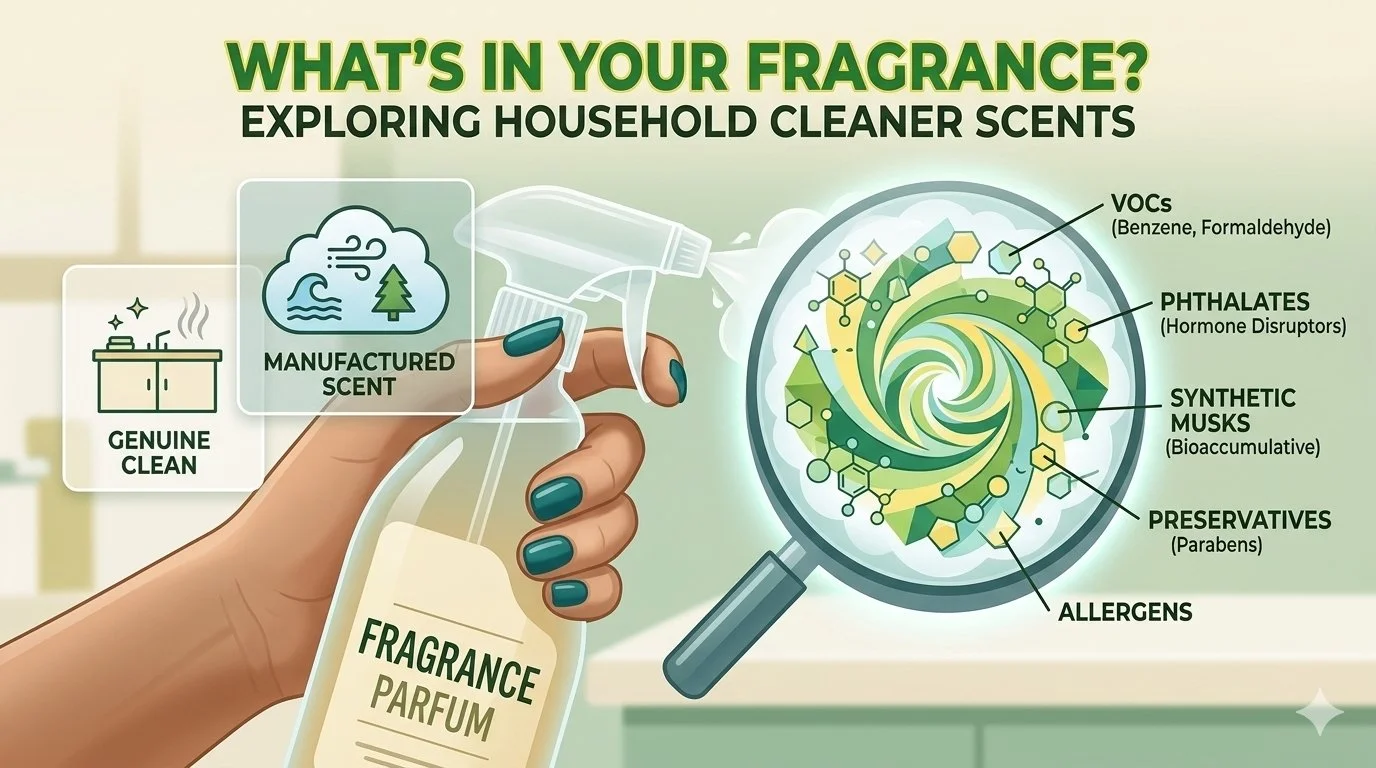
When you see "fragrance" or "parfum" listed on a cleaning product label, you might assume it's a single ingredient. In reality, that one word can represent a mixture of dozens or even hundreds of different chemicals, many of which you'll never know about.
This is where things get particularly concerning for Canadian consumers. While we have regulations through Health Canada regarding product safety, current labelling laws don't require manufacturers to disclose the specific components of their fragrance blends. These formulations are protected as "trade secrets," which means companies can include a wide range of synthetic chemicals without listing them individually on the label.
So what exactly goes into these mystery mixtures? Research has identified thousands of different chemicals used in fragrance formulations, but some of the most common categories include:
Phthalates are frequently used to make scents last longer. These chemicals have been linked to hormone disruption, reproductive issues, and developmental problems in children. Despite growing concerns, they're still widely used in many household products available on Toronto store shelves.
Synthetic musks are another common ingredient, designed to add depth and longevity to fragrances. Studies have found these compounds in human blood, breast milk, and body fat, raising concerns about bioaccumulation and long-term health effects.
Volatile organic compounds (VOCs) are chemicals that easily evaporate into the air. Many fragrance ingredients fall into this category, including substances like benzene, formaldehyde, and toluene—all of which have known health risks. When you spray that scented cleaner, you're releasing these VOCs into your indoor air, where they can linger for hours or even days.
Preservatives like parabens are often added to fragrance mixtures to prevent bacterial growth. However, parabens are endocrine disruptors that can mimic estrogen in the body and have been found in breast cancer tumours, though the connection remains under investigation.
Allergens are abundant in synthetic fragrances. The International Fragrance Association has identified 26 known fragrance allergens, but cleaning products can contain these without specific disclosure on Canadian labels. For Toronto residents dealing with allergies or sensitivities, this lack of transparency makes it nearly impossible to avoid problematic ingredients.
What makes this particularly troubling is that many of these chemicals haven't been thoroughly tested for safety, especially in combination with one another. While individual compounds might be present in small amounts, we're exposed to multiple fragranced products throughout the day—cleaners, laundry detergents, air fresheners, personal care products—and the cumulative effect of this chemical exposure is largely unknown.
The European Union has banned all CMR (Carcinogenic, Mutagenic, Reprotoxic) chemicals in personal care and household products, many of them fragrance ingredients. In Canada, our regulations are significantly less stringent, meaning products on our shelves may contain substances that aren't allowed in other developed countries.
Health risks associated with synthetic fragrances
The health implications of regular exposure to synthetic fragrances in household cleaners are more significant than many homeowners realize. While the cleaning product industry maintains that their formulations are safe, a growing body of research suggests otherwise.
Respiratory issues are among the most commonly reported problems. When you spray a scented cleaner, you're creating an aerosol of chemical compounds that you then inhale. For people with asthma, this can trigger attacks. One study found that individuals with asthma reported cleaning products as one of their top triggers. Even for those without pre-existing conditions, regular exposure to scented cleaners has been associated with the development of adult-onset asthma, particularly among professional cleaners and people who use these products frequently.
The impact on indoor air quality is substantial. Toronto homes, especially during our cold winters when windows stay closed for months, can develop particularly poor air quality when scented cleaners are used regularly. Research has shown that using household cleaning products can release as many volatile organic compounds into the air as driving a car—a startling comparison that highlights just how much these products affect the air we breathe in our homes.
Headaches and migraines are frequently triggered by synthetic fragrances. Many people report that exposure to scented cleaners leads to headaches, dizziness, or nausea. For those with chemical sensitivities or fragrance sensitivities, the effects can be debilitating, making it difficult to be in spaces where these products have been recently used.
Skin irritation and allergic reactions are also common. Contact with scented cleaning products can cause rashes, itching, and dermatitis. Because fragrances can contain dozens of potential allergens, identifying the specific cause of a reaction can be extremely difficult, leaving sufferers struggling to find products that won't irritate their skin.
The hormone disruption caused by many fragrance chemicals is particularly concerning for families with children. Endocrine-disrupting chemicals can interfere with normal hormone function, potentially affecting development, reproduction, and metabolism. While the full extent of these effects is still being studied, the precautionary principle suggests we should be cautious about regular exposure, especially for vulnerable populations like pregnant women and young children.
Neurological symptoms have also been reported. Some fragrance chemicals can cross the blood-brain barrier, and studies have linked exposure to issues with cognitive function, mood changes, and even neurodevelopmental problems in children exposed during critical developmental windows.
For Toronto residents living in multi-unit buildings, there's an additional concern: you may be exposed to your neighbours' cleaning products through shared ventilation systems. This means even if you choose fragrance-free products for your own home, you might still be breathing in chemicals from products used elsewhere in your building.
Perhaps most troubling is the emerging research on long-term health effects. Because many of these chemicals accumulate in the body over time and we're exposed to them chronically throughout our lives, researchers are only beginning to understand the potential long-term consequences. Some studies have suggested links between regular use of scented cleaning products and increased risks of certain cancers, though more research is needed to establish definitive causal relationships.
Environmental impact of fragranced cleaning products
The effects of fragranced household cleaners extend far beyond the walls of your home. These products have significant environmental implications that impact our local waterways, wildlife, and broader ecosystem.
When you pour scented cleaning products down your drain, those chemicals don't simply disappear. They enter the wastewater system and eventually make their way to water treatment facilities. While these facilities are designed to remove many contaminants, they weren't built to handle the complex cocktail of synthetic fragrance chemicals we're now sending through them regularly. Many of these compounds pass through the treatment process largely unchanged.
Once in the aquatic environment, these substances can have serious effects on fish and other wildlife. Studies have shown that synthetic musk compounds — common in fragranced products — accumulate in fish tissue and can affect their reproduction and development. These chemicals have been detected in fish in the Great Lakes, demonstrating that our consumer choices are directly impacting our local ecosystem.
Phthalates and other fragrance ingredients are also problematic for aquatic life. Research has shown these chemicals can act as endocrine disruptors in fish, amphibians, and other aquatic organisms, potentially affecting entire populations. When these chemicals enter the food chain, they can accumulate at higher concentrations as you move up trophic levels, ultimately affecting the birds and mammals (including humans) who consume fish.
The production of synthetic fragrances also has environmental costs. Manufacturing these chemicals requires petroleum-based ingredients and energy-intensive processes. The carbon footprint of producing, packaging, and transporting these products contributes to climate change — an issue that Toronto and all Canadian cities are grappling with as we work toward our emissions reduction targets.
Air pollution is another concern. The volatile organic compounds released when you use scented cleaners don't just affect your indoor air quality, they also contribute to outdoor air pollution. Once these VOCs are released into the atmosphere, they can react with other pollutants to form ground-level ozone and particulate matter, both of which are harmful to human health and the environment. In a city like Toronto, where air quality is already challenged by vehicle emissions and industrial activity, adding to the VOC load through unnecessary fragrance chemicals seems particularly unwise.
The packaging of scented cleaning products adds another environmental burden. Most of these products come in plastic bottles, contributing to the enormous amount of plastic waste our society generates. While Toronto has recycling programs, the reality is that much plastic isn't recycled and ends up in landfills or, worse, in our waterways and natural spaces.
There's also the issue of persistence. Many synthetic fragrance chemicals are designed to last, that's why your cleaning product promises "long-lasting freshness." But this persistence means these chemicals stick around in the environment for extended periods, accumulating in sediments, soils, and living organisms. We're creating a legacy of chemical contamination that will affect our local environment for years to come.
In order to protect our natural spaces, ravines, parks, and waterfront — understanding this connection between our cleaning product choices and environmental health is crucial. Every time we choose a heavily fragranced cleaner, we're contributing to the chemical burden on our local ecosystem.
Making the switch to fragrance-free cleaning
The good news is that you don't need synthetic fragrances to have a genuinely clean home. Making the transition to fragrance-free cleaning is easier than you might think, and many people who've made the switch report feeling better and noticing improvements in their health.
Start by reading labels carefully. In Canada, look for products labeled "fragrance-free" rather than "unscented." These terms aren't identical — unscented products may still contain fragrance chemicals used to mask the smell of other ingredients, whereas fragrance-free means no fragrance chemicals have been added at all. Certified products with eco-labels like EcoLogo or Green Seal have been independently verified to meet specific environmental and health standards.
Simple, effective alternatives are readily available at stores or can be made at home. White vinegar is an excellent all-purpose cleaner that kills many types of bacteria. Mixed with water, it's perfect for cleaning countertops, windows, and floors. Yes, it smells while wet, but that scent dissipates quickly, leaving no residual odour.
Baking soda is another powerhouse cleaner. It's mildly abrasive, making it great for scrubbing, and it naturally neutralizes odours rather than masking them with synthetic scents. You can use it on just about everything — from kitchen sinks to bathtubs.
Castile soap, available at many health food stores and some mainstream retailers, is a versatile plant-based soap that cleans effectively without synthetic additives. It can be diluted for various cleaning tasks around your home.
For those who miss having some scent but want to avoid synthetic fragrances, there are safer options. A few drops of pure essential oils can be added to homemade cleaners — but use them sparingly and choose high-quality, pure oils. Be aware that many essential oils are toxic to pets, can cause sensitivities in some people, and they're not necessary for cleaning effectiveness. If you do use them, less is more.
When shopping for commercial cleaning products, look for brands that prioritize transparency. Some companies now list all their ingredients, including fragrance components, on their labels or websites. These brands recognize that consumers have a right to know what they're bringing into their homes.
The transition period might feel strange at first. You've likely spent years associating an artificial scent with cleanliness, so a home that simply smells neutral may initially feel less clean to you. Give yourself time to adjust. Within a few weeks, most people find that they prefer the absence of synthetic scents and become more sensitive to them when encountering scented products elsewhere.
If you live in a condo or apartment with shared laundry facilities, consider requesting that your building switch to fragrance-free cleaning products in common areas. Many buildings are becoming more aware of chemical sensitivities and are willing to make changes when residents voice their concerns.
What about "natural" and "green" fragrances?
As awareness of synthetic fragrance issues grows, many cleaning product manufacturers have responded by marketing their products as "natural," "plant-based," or "green." While this might sound reassuring, it's important to approach these claims with a critical eye.
The term "natural" is largely unregulated in Canada when it comes to cleaning products. A product can be marketed as natural even if it contains predominantly synthetic ingredients, as long as some component is derived from natural sources. This greenwashing is rampant in the cleaning product industry, and consumers need to be aware that marketing claims don't always reflect reality.
Some products advertise "naturally derived fragrances" or "essential oil blends." While these are indeed different from purely synthetic fragrances, they're not necessarily safer or better for everyone. Natural fragrances can still contain allergens and irritants. Essential oils are highly concentrated plant compounds, and some can cause skin sensitization, respiratory issues, or other adverse reactions. They can also pose a risk to any pets in your home. The fact that something comes from a plant doesn't automatically make it safe for everyone.
Additionally, some "natural" fragrances are produced using processes that are far from environmentally friendly. The essential oil industry has its own set of environmental and ethical concerns, from unsustainable harvesting practices to the enormous amount of plant material required to produce small quantities of oil.
Products labeled "green" or "eco-friendly" may be better in some ways—perhaps they're biodegradable or come in recycled packaging—but they can still contain problematic fragrance ingredients. These environmental claims don't necessarily address health concerns related to fragrance chemicals.
The key is to look beyond marketing buzzwords and examine the actual ingredient list. If a product lists "natural fragrance" or "parfum" without disclosing what that fragrance consists of, you're still dealing with a lack of transparency that makes it impossible to make an informed decision about potential health effects.
For people with chemical sensitivities, fragrance allergies, or respiratory conditions, even "natural" fragrances can be problematic. The safest choice is still fragrance-free products, regardless of whether the fragrance would be natural or synthetic.
This doesn't mean all products marketed as green or natural are deceptive—many genuinely are better choices. But it does mean you need to do your homework, read labels carefully, and perhaps research brands before purchasing. Look for third-party certifications, complete ingredient disclosure, and a company track record of transparency.
Creating a healthier home environment
Beyond switching to fragrance-free cleaners, there are several other steps homeowners and tenants can take to create a healthier indoor environment.
Improve ventilation whenever possible. Even during Toronto's cold winters, opening windows for brief periods can significantly improve indoor air quality. If you live in a newer, tightly sealed home or condo, consider using your exhaust fans regularly, particularly when cleaning.
Consider an air purifier with a HEPA filter and activated carbon, which can help remove airborne particles and some chemical compounds. This can be particularly useful for residents living in high-traffic areas or near major roadways where outdoor air quality might also be a concern.
Reduce the number of scented products in your home overall. It's not just cleaners—air fresheners, scented candles, plug-in fragrances, and even some personal care products all contribute to your total chemical exposure. Creating a low-fragrance home environment can make a noticeable difference in how you feel.
Be mindful of what you're bringing into your space. When possible, choose furniture, mattresses, and other home goods that are made without added fragrances or harmful chemicals. That "new furniture smell" is actually off-gassing of chemicals—not something you want to be breathing in your home.
If you're sensitive to fragrances, don't hesitate to advocate for yourself. This might mean requesting that visitors to your home avoid wearing heavily scented products, or asking your workplace to consider fragrance-free policies. Toronto is becoming increasingly aware of these issues, and many public spaces and workplaces are implementing scent-free policies.
Educate your family members, roommates, or household members about why you're making these changes. When everyone understands the reasoning behind choosing fragrance-free products, they're more likely to support and maintain these healthier practices.
The bottom line: You deserve transparency
At the heart of the fragrance issue is a fundamental question of transparency and consumer rights. You have the right to know what chemicals you're bringing into your home and exposing your family to. The current system, where hundreds of potentially harmful ingredients can be hidden under the single word "fragrance," is simply not acceptable.
As we become more health-conscious and environmentally aware, we're seeing increased demand for product transparency. This consumer pressure is slowly beginning to change the market. Some companies are now voluntarily disclosing their fragrance ingredients, recognizing that transparency builds trust with customers.
But we shouldn't have to rely on voluntary corporate goodwill. Stronger regulations requiring full ingredient disclosure for all household products would give Canadian consumers the information they need to make informed choices about their health and their environment.
Until those regulations exist, voting with your wallet remains one of your most powerful tools. By choosing fragrance-free products and supporting companies that prioritize transparency and safety, you're sending a clear message to the industry that these values matter to consumers.
Remember: a truly clean home doesn't need to smell like anything. That neutral, fresh scent of genuinely clean spaces is far healthier and more honest than any synthetic fragrance trying to convince you otherwise. When you eliminate unnecessary fragrances from your cleaning routine, you're not sacrificing cleanliness — you're actually creating a healthier, safer environment for yourself and your family.
Your home should be your sanctuary, a place where you can breathe easily and feel safe. By understanding the truth about fragrances in household cleaners and making informed choices, you're taking an important step toward creating the healthy home environment you deserve.
As the founder of EcoEthical Cleaning, I've built my practice around everything you just read — and fragrance-free cleaning is only the beginning. Every ethically-sourced product I bring into your home is made from natural ingredients, and chosen with your family's health in mind. If you're ready to reclaim some time without compromising on what goes into your air and onto your surfaces, I'd love to help. Reach out today for a free, no-obligation estimate. Proudly serving Toronto’s Harbourfront District and surrounding neighbourhoods.
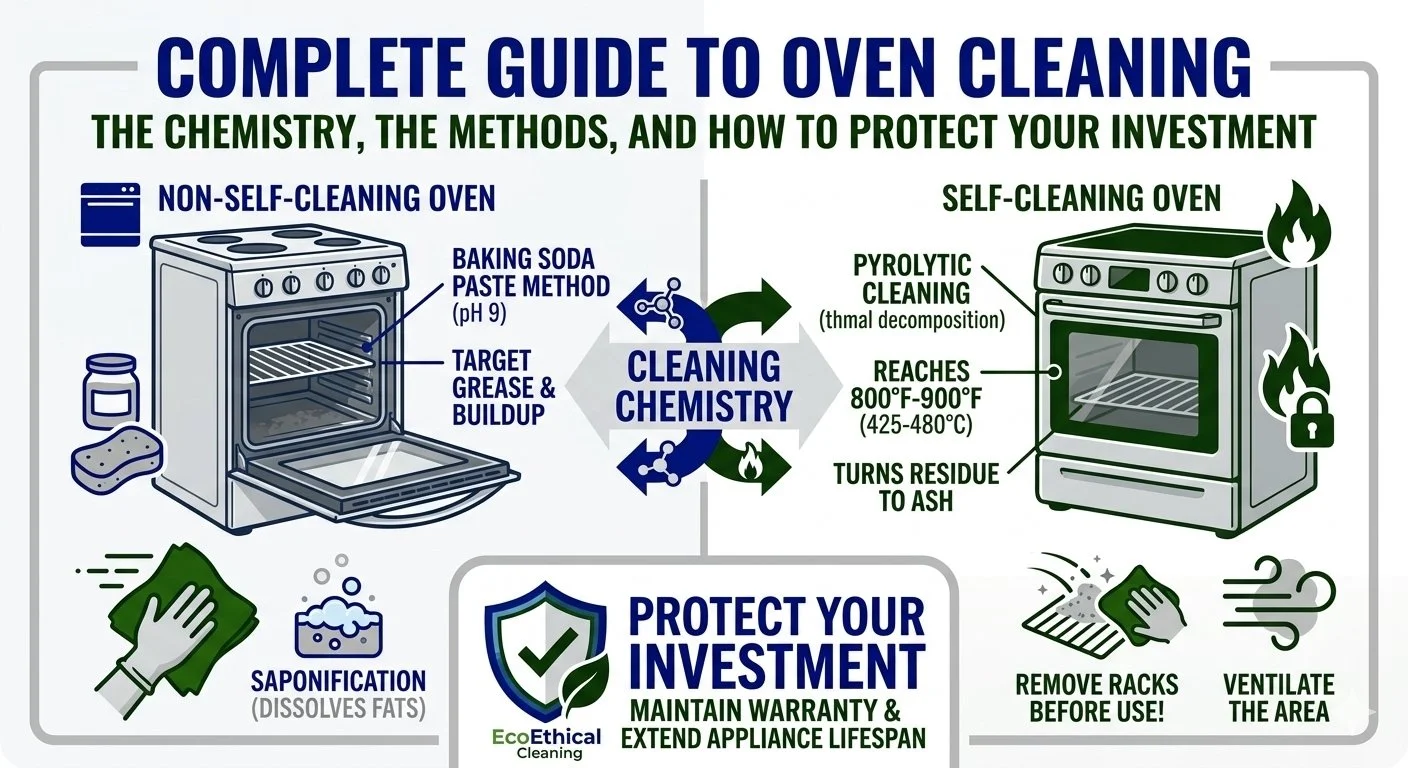
Complete guide to oven cleaning: The chemistry, the methods, and how to protect your investment
Oven cleaning requires understanding chemistry, appliance construction, and warranty protection. Learn the science behind how alkaline cleaners work through saponification, why self-cleaning ovens need different care than standard models, what components you can safely remove, and which cleaning methods protect your investment. This comprehensive guide covers everything Toronto homeowners need to know about maintaining their ovens without voiding warranties or causing damage.
Oven cleaning sits at the intersection of chemistry, appliance care, and household safety. Whether you own a self-cleaning model or a standard oven, understanding how different cleaning methods work — and more importantly, what can damage your appliance — makes the difference between maintaining your investment and voiding your warranty.
This comprehensive guide explains the science behind oven cleaning products, clarifies the critical differences between self-cleaning and non-self-cleaning ovens, and provides detailed guidance on what you can safely clean and what components should never be removed or exposed to certain chemicals.
Understanding oven construction and warranty considerations
Before discussing cleaning methods, it’s important to understand what you're working with, and what's at stake if you damage it.
What's covered by oven warranties
Most oven warranties cover functional components like heating elements, igniters, thermostats, burners, control boards, and oven sensors. However, warranties typically exclude cosmetic items including racks, hinges, shelves, door glass, and interior thermal shells.
More importantly, warranties can become void when:
Commercial oven cleaners are used on self-cleaning oven interiors
Unauthorized repair providers service the appliance
Components are improperly removed or modified
Cleaning products damage heating elements or sensors
The oven hasn't been properly maintained per manufacturer guidelines
Self-cleaning vs. non-self-cleaning ovens: fundamental differences
The construction of your oven determines what cleaning methods are safe to use.
Self-cleaning ovens have:
Special heat-resistant porcelain enamel coating on interior walls
Reinforced door locks that engage during cleaning cycles
Additional insulation to contain extreme heat
Temperature sensors that monitor the cleaning cycle
Non-self-cleaning ovens have:
Standard porcelain enamel or painted interior finish
Basic door seals without high-temperature locks
Standard insulation
Cannot withstand the extreme temperatures of a self-clean cycle
This fundamental construction difference means that self-cleaning ovens require different care than standard ovens, particularly regarding what chemicals you can use.
Newer vs. older ovens: removable components
Oven design has evolved significantly, affecting what you can safely remove for cleaning.
Older ovens (pre-2010):
Heating elements typically bolt to the oven back
Can usually be carefully unbolted and moved forward for cleaning behind them
Oven racks were heavy-duty steel, designed for high heat
Door often removable via simple hinge clips
Simpler electronic controls, easier to avoid during cleaning
Newer ovens (2010-present):
Many have hidden heating elements beneath the oven floor
"Continuous clean" or catalytic liners that shouldn't be scrubbed
Specialized racks with coatings that can't handle self-clean cycle heat
More complex door removal systems
Sensitive electronic control panels and displays
What should NOT be removed without professional help:
Heating elements - bake (lower) or broil (upper) elements
Temperature sensors
Door gaskets or seals
Control panel components
Interior light covers (unless the manual specifically states they are removable)
Catalytic liner panels
Removing components you shouldn't can void warranties and create safety hazards. When in doubt, consult your oven's manual or contact the manufacturer.
The chemistry of oven cleaning: how products actually work
Understanding the science behind oven cleaning helps you choose appropriate methods and avoid damaging your appliance.
The problem: baked-on grease and carbonized food
When you cook, especially at high temperatures, fats and oils polymerize — they transform from liquid oils into hard, solid substances bonded to oven surfaces. This process intensifies each time you use the oven, creating layers of increasingly difficult buildup.
Additionally, sugars caramelize and proteins denature, creating carbonized deposits that resist simple soap and water.
How alkaline cleaners work: saponification
Most commercial oven cleaners contain sodium hydroxide (NaOH), also known as caustic soda or lye. The primary cleaning action is saponification — converting fats and oils into soap.
When sodium hydroxide contacts grease, it causes a chemical reaction that transforms the baked-on fats into water-soluble soap-like substances. The reaction works because sodium hydroxide is highly alkaline (pH 14), and this extreme alkalinity breaks apart the molecular bonds in fats.
The process involves:
Hydroxide ions (OH⁻) break down the ester bonds in fats
This produces fatty acid salts and glycerol
The resulting soap is water-soluble and easily wiped away
The same reaction works on proteins and carbonized material, though less effectively than on fats.
Why this matters: Understanding saponification explains why alkaline cleaners work so effectively, but also why they're dangerous. The same chemical property that dissolves baked-on grease can also damage human skin and certain oven components.
Why oven cleaners require specific pH levels
Commercial oven cleaners maintain pH levels between 11 and 14:
pH 11-12: Effective for light to moderate buildup
pH 13-14: Required for severe, carbonized buildup
The higher the pH, the more aggressive the cleaner — but also the more dangerous to humans and potentially damaging to certain oven finishes.
The role of solvents in oven cleaners
Beyond alkaline ingredients, commercial oven cleaners contain organic solvents like:
Ethylene glycol: Helps dissolve polar molecules
Methylene chloride: Dilutes greasy grime
Monoethanolamine: Acts as a surfactant, helping the solution spread evenly
These solvents attack different components of oven soil than alkaline cleaners do, providing comprehensive cleaning action.
How high-heat pyrolytic cleaning works
Self-cleaning ovens use pyrolysis (thermal decomposition) to clean. When oven temperatures reach 800-900°F (425-480°C), organic materials (food, grease, carbon deposits) burn off and reduce to ash.
The chemistry:
Organic compounds break down at high temperature
Carbon bonds rupture, releasing carbon dioxide and water vapour
What remains is fine white or grey ash (primarily calcium carbonate and metal oxides)
This ash is easily wiped away with a damp cloth
Why this method works: Pyrolysis achieves what chemical cleaners cannot — complete breakdown of carbonized material. However, it requires specialized oven construction to safely contain these extreme temperatures.
How steam cleaning works
Steam-clean cycles use water and moderate heat (around 250-400°F / 120-200°C) to soften baked-on food.
The process:
Water placed in the oven bottom vaporizes
Steam condenses on cooler oven surfaces
Moisture penetrates and softens dried food particles
Softened debris can be wiped away
Limitation: Steam cleaning is effective only for light, recent soiling — not for carbonized, long-term buildup.
Self-cleaning ovens: proper use and protection
Self-cleaning ovens require specific care to maintain their specialized coating and ensure safe operation.
How the self-clean cycle works
The self-clean cycle heats the oven to approximately 800°F to 900°F (425-480°C) for 1.5 to 3 hours, depending on the soil level. At these temperatures, food residue incinerates into ash. The oven door automatically locks when internal temperature reaches 600°F (315°C) to prevent oxygen from entering the cavity and causing fire. The door remains locked until the oven cools to a safe temperature.
What NEVER to use in self-cleaning ovens
Commercial oven cleaners (containing sodium hydroxide): Never use commercial oven cleaners inside a self-cleaning oven's interior. Residue from oven cleaners will damage the inside of the oven during a self-cleaning operation. The extreme heat of the self-clean cycle causes oven cleaner residue to emit dangerous fumes and permanently damage the special porcelain enamel coating.
Even cleaners marketed as "safe for self-cleaning ovens" should be used with caution and rinsed completely before running a self-clean cycle.
Why this damages the oven: The porcelain enamel in self-cleaning ovens is formulated specifically for high-heat cleaning. Chemical residues alter this coating's properties, causing:
Discolouration and staining
Coating breakdown and flaking
Reduced effectiveness of future self-clean cycles
Release of toxic fumes during cleaning
Abrasive scrubbers: Metal scrapers, steel wool, and wire brushes damage the interior walls and make the self-cleaning process less effective. The porcelain enamel coating, once scratched, loses its smooth, non-stick properties and allows food to adhere more easily.
Remove the oven racks
Removing oven racks before self-clean cycles is crucial but often overlooked.
The intense heat of self-cleaning cycles can warp, discolour, and permanently damage oven racks. More critically, racks can expand and contract during the cycle, potentially damaging or completely ruining the porcelain oven cavities that the racks slide into — the grooves on the oven's side walls.
Exception: Some newer ovens have racks specifically designed to remain in place during self-clean cycles. Check your manual — if the racks aren't explicitly labelled "self-clean safe," remove them.
How to clean racks separately:
Remove racks before starting self-clean cycle
Soak them in hot water with dish soap, or place them in an air-tight bag and spray with a food-safe degreaser, and let sit for 4-6 hours
Scrub with non-abrasive brush or sponge
For stubborn buildup: create paste of baking soda and water, apply, let sit overnight, then scrub
Proper preparation for self-clean cycles
Before starting a self-clean cycle:
Remove everything:
All oven racks (unless the oven manual specifies they're self-clean safe)
Oven thermometer
Any cookware, foil, or liners
Food debris large enough to catch fire
Wipe up heavy spills: The self-clean cycle works best on baked-on residue, not large spills or chunks of food. Clean up everything you can manually, and let the self-clean cycle handle the rest.
Ensure ventilation:
Turn on range hood and set to highest setting
Open windows in kitchen and adjacent rooms
Consider using an air purifier during the cycle
Keep children and pets away from the kitchen
Never leave completely unattended: Check periodically for excessive smoke or unusual smells that might indicate a problem.
After the self-clean cycle
Once the cycle completes and the oven has cooled (the door will unlock automatically):
Wipe away white or grey ash with a damp cloth
Clean the door and areas around the gasket with mild detergent
The gasket itself should only be wiped gently, never scrubbed
Inspect for any damage to interior surfaces
How often to use self-clean cycles
Self-cleaning cycles should be used 2-3 times per year maximum. Overuse of the self-cleaning function may wear out heating elements or damage thermal fuses — the safety devices that prevent overheating.
Between self-clean cycles, spot-clean with baking soda paste or mild detergent to reduce buildup.
Steam-clean cycles: A gentler alternative
Many newer ovens offer steam-clean cycles as a less intensive option.
When to use steam clean:
Light, recent spills
Routine maintenance between deep cleans
When self-clean cycle isn't warranted
The process:
Add 1 cup of water to the oven bottom (or follow manual's specific instructions)
Start steam-clean cycle (usually 20-60 minutes)
After cycle completes, wipe interior with damp cloth
For stubborn spots, rub detergent into residue before starting cycle
Benefits:
Faster than self-clean (under 1 hour vs. 3+ hours)
Uses less energy
Lower temperatures mean less smoke and fumes
Safer for more frequent use
Limitations:
Only effective for light soiling
Won't handle carbonized, baked-on buildup
May require multiple cycles for moderate messes
Non-self-cleaning ovens: safe manual cleaning methods
Non-self-cleaning ovens require different approaches — and fortunately, you have more flexibility in product choices.
The safest, most eco-friendly method: baking soda paste
Baking soda (sodium bicarbonate) is mildly alkaline and works through a gentler version of the same chemical process as commercial cleaners — it breaks down fats and food residues without harsh corrosiveness.
The formula:
Mix ½ cup baking soda with 3 tablespoons water
Adjust ratio to create spreadable paste (consistency of toothpaste)
Application process:
Remove oven racks and set aside
Spread paste over entire interior, avoiding heating elements
Pay special attention to particularly greasy areas
Let sit overnight (12+ hours) to allow chemical reaction to complete
Use damp cloth to wipe away dried paste
Repeat if necessary for stubborn spots
Why this works: Baking soda's alkalinity (pH around 9) is sufficient to begin saponification of fats without the dangerous corrosiveness of sodium hydroxide cleaners. The longer dwell time compensates for its lower chemical strength.
When commercial cleaners are appropriate
For non-self-cleaning ovens with severe buildup, commercial cleaners may be necessary. However, choose carefully and use safely.
If using commercial oven cleaner:
Read and follow manufacturer’s instructions
Choose products with lower caustic soda content when possible (to minimize risks to personal safety, the oven, and the environment)
Always wear rubber gloves and safety goggles
Ensure excellent ventilation (open windows, use fans)
Keep children and pets away from the area
Follow product dwell time precisely — don't leave on longer than directed
Rinse thoroughly with clean water
Consider wearing a carbon filter mask if sensitive to fumes
Application for commercial cleaners:
Protect surrounding areas with newspaper or drop cloth
Remove everything from oven
Apply cleaner evenly, avoiding heating elements and sensors
Close oven door and let sit for time specified on label
Wipe away cleaner with damp sponges or cloths
Rinse multiple times with clean water
Turn oven on low (around 200°F / 95°C) for 10-15 minutes to burn off any remaining residue
Air out kitchen thoroughly
What to avoid on standard ovens
Even though non-self-cleaning ovens are more tolerant of various cleaners, some things still cause damage:
Never use:
Steel wool or metal scrapers (scratch the finish)
Harsh abrasive powders (damage enamel coating)
Bleach (doesn't break down grease effectively and is too harsh)
Ammonia (fumes are dangerous, less effective than alkaline cleaners)
Cleaning oven doors and glass
Oven door glass requires special attention because grease and condensation accumulate on both interior and exterior surfaces.
For exterior glass:
Glass cleaner or vinegar-water solution (1:1 ratio)
Wipe with clean, soft cloth
Buff dry for streak-free finish
For interior glass:
Create baking soda paste
Apply to glass, avoiding rubber gasket
Let sit 15-30 minutes
Scrub gently with non-abrasive sponge
Wipe clean with damp cloth
For between-the-glass cleaning: consult manual for disassembly instructions
Never scrub the door gasket (the rubber seal around the door). Clean it only by wiping gently with a damp cloth. Aggressive cleaning damages the seal, affecting oven efficiency and safety.
What you can and cannot remove for cleaning
Knowing what's safe to remove prevents warranty voidance and safety hazards.
Safe to remove (with care):
Oven racks: All models allow rack removal. To remove:
Wait for oven to cool completely
Pull rack forward until it stops
Lift front of rack slightly while pulling
Guide rack out of oven
Oven door (many models): Many oven doors can be removed for easier cleaning, but the process varies significantly by brand and model.
Common removal process:
Open door to first stop position (about 45 degrees)
Locate hinge locks or clips on both sides
Move locks to unlocked position
Close door slightly
Lift door up and out
Critical: Always consult your specific oven's manual before attempting door removal. Improper removal can damage hinges or cause the door to fall.
Never remove or disturb:
Heating elements: Both bake elements (bottom) and broil elements (top) are wired directly to the oven's electrical system. Clean around elements, not by removing them.
Temperature sensor: Usually a thin metal probe extending into the oven cavity. This controls oven temperature accuracy. Bending, removing, or cleaning it aggressively can make your oven temperature unreliable.
Door gasket: The rubber or silicone seal around the door should never be removed. Clean only by gentle wiping.
Catalytic liners: Some ovens have special self-cleaning panels on the side walls. These should never be removed or scrubbed—they're designed to clean themselves during oven operation.
Light cover: While some models allow light cover removal, many don't. Check your manual. Forcing removal can crack the cover or damage the mounting system.
Cleaning heating elements safely
You cannot remove heating elements for cleaning, but you can clean around them:
Wait for oven to cool completely
Wipe elements gently with damp cloth
Don't scrub or use chemicals directly on elements
Clean the area beneath and around elements carefully
If food has baked onto elements, run oven at 350°F (175°C) for 30 minutes—this will burn off most residue
Why elements burn clean: Heating elements reach temperatures high enough to carbonize food debris during normal operation. Most buildup burns off on its own.
Maintenance practices that protect your oven
Proper maintenance extends oven lifespan and maintains warranty coverage.
After each use:
Wipe up spills immediately: Fresh spills clean easily. Once they’ve been baked on, they become increasingly difficult to remove with each use of the oven.
Use the oven light to monitor cooking: Opening the door during cooking causes temperature fluctuation and potential spillovers. Use the oven light and window instead.
Place baking sheets under potentially messy dishes: Casseroles, pies, and dishes with liquid ingredients should sit on baking sheets to catch any overflow.
Weekly:
Wipe down interior with damp cloth and mild detergent
Clean door glass inside and out
Wipe control panel with damp cloth (never spray cleaner directly on controls)
Check that vents aren't blocked by grease or debris
Monthly:
Deep-clean oven racks
Check door seal for damage or gaps
Clean beneath and around oven (pull-out drawer or storage area)
Test that oven reaches correct temperature with oven thermometer
Quarterly:
Run self-clean cycle (if applicable)
Or perform thorough manual cleaning with baking soda
Inspect heating elements for damage
Check that oven light works
What voids warranties:
Understanding warranty restrictions helps you avoid costly mistakes:
Actions that void most oven warranties:
Using commercial oven cleaners in self-cleaning oven interiors
Lining oven bottom with aluminum foil (interferes with heat distribution and can damage heating elements)
Making unauthorized modifications or repairs
Failing to follow manufacturer's maintenance guidelines
Using the oven for purposes other than cooking (like storage or space heating)
Physical damage from impacts or dropping items
Always register your oven warranty and keep proof of purchase. If you need repairs, use only authorized service providers to maintain warranty validity.
Special considerations
Hard water and mineral buildup
Water hardness affects steam-clean cycles. Minerals in the water can leave deposits on oven surfaces after steam cleaning.
Prevention:
Use distilled water instead of tap water for steam-clean cycles
Wipe down oven thoroughly after steam-clean cycles
If mineral deposits appear (white, chalky residue), remove with vinegar-water solution
Winter considerations
Cold winters mean:
More oven use for holiday cooking
Kitchen ventilation challenges (can't always open windows)
Temperature fluctuations affecting oven performance
Winter oven care:
Plan self-clean cycles for mild days when you can ventilate properly
Consider breaking large self-clean jobs into smaller, more manageable sessions
Use range hood faithfully to capture moisture and prevent condensation
Small kitchen ventilation
Many condos and older homes have limited kitchen ventilation. This complicates oven cleaning, particularly self-clean cycles.
Solutions:
Run bathroom fan in addition to range hood during self-clean cycles
Use air purifiers with activated carbon filters
Schedule self-clean cycles when you can be away for a few hours but return to ventilate
Consider steam-clean cycles more frequently as alternative to less-frequent self-clean cycles
When to call professionals
Some oven cleaning situations require expert help.
Situations requiring professional oven cleaning:
Extreme buildup from years of neglect
Post-renovation cleaning (construction dust and debris)
Self-clean cycle has failed to clean adequately
Strong, persistent odours that won't clear
You have physical limitations preventing safe manual cleaning
You don't have time for the potentially hours long process manual cleaning requires
Situations requiring appliance repair:
Self-clean cycle won't start or complete
Door won't unlock after self-clean cycle
Heating elements visibly damaged or not glowing red
Error codes appearing on display
Oven not reaching correct temperature
The following situations require immediate professional attention:
Gas smell
Electrical issues or sparking
Choosing a professional oven cleaning service
Look for services that:
Use eco-friendly, non-toxic cleaning methods
Are fully insured
Understand the difference between self-cleaning and standard ovens
Remove oven racks and clean them separately
Protect your floors and surrounding areas
Offer satisfaction guarantees
Creating a sustainable oven cleaning routine
Effective oven maintenance doesn't require harsh chemicals or expensive products.
A sustainable approach:
Tier 1: Prevention (after each use)
Wipe up fresh spills immediately with a damp cloth
Use baking sheets to catch overflow
Keep oven interior as clean as possible through mindful cooking
Tier 2: Light maintenance (every 2-4 weeks)
Quick wipe-down with baking soda paste for any visible blemishes
Clean the door glass inside and out
10-minutes of routine maintenance will keep your oven reasonably clean
Tier 3: Deep cleaning (whenever heavier, baked-on deposits appear)
Run the self-clean cycle (for self-cleaning ovens)
Or do an overnight baking soda paste treatment (for standard ovens)
Deep-clean oven racks separately
Thorough door glass cleaning
Tier 4: Professional help (as needed)
For moves, major buildup, or thorough restoration
Particularly valuable before holidays when oven use increases and free time is limited
This tiered approach prevents buildup, reduces the need for harsh chemicals, and extends oven lifespan.
Common oven cleaning mistakes to avoid
Learning from others' mistakes saves you time, money, and potential oven damage.
Using self-clean cycle with racks inside
This is the most common error. The extreme heat warps metal racks and damages the porcelain coating on rack guides. Damage is permanent and reduces rack lifespan significantly.
Not allowing proper cool-down time
After self-clean cycles, ovens remain extremely hot—sometimes for hours. Forcing the door open risks:
Burns from escaping heat
Damage to door lock mechanism
Injury from sudden release of super-heated air
Wait until the oven automatically unlocks.
Mixing cleaning chemicals
Never mix different cleaning products, especially:
Ammonia + bleach = toxic chloramine gas
Vinegar + bleach = toxic chlorine gas
Commercial oven cleaner + anything else = unpredictable, dangerous reactions
Use one product at a time, rinse thoroughly between products if switching.
Spraying cleaners directly on controls
Liquid seeping into electronic controls can cause these components to fail. Always spray cleaner onto a cloth, then wipe the controls.
Forgetting to rinse thoroughly
Chemical residue left in ovens causes:
Fumes during cooking
Strange tastes in food
Potential health concerns
Damage to oven components from repeated heating of chemical residue
Always rinse multiple times with clean water, then run oven briefly to burn off any remaining traces.
Using commercial cleaners in self-cleaning ovens
This causes permanent damage to the special coating and creates dangerous fumes during the next self-clean cycle.
Lining oven bottom with foil
Many people line oven bottoms with foil to catch spills. This:
Blocks air circulation
Causes uneven heating
Can damage heating elements
Voids most warranties
Use baking sheets on the rack below your food instead.
Conclusions:
Effective oven cleaning requires understanding three key things:
The chemistry of how cleaners work
Your specific oven type and its limitations
What methods protect rather than damage your appliance
For self-cleaning ovens:
Never use commercial oven cleaners inside the cavity
Remove racks before self-clean cycles
Use the feature 2-3 times annually at most
Spot-clean between cycles with baking soda paste and a good rinse afterwards
For standard ovens:
Baking soda paste is safest and most eco-friendly
Commercial cleaners work for severe buildup but require careful use
Clean regularly to prevent extreme buildup
Consider professional help for move-in/move-out situations
For all ovens:
Consult your manual before removing any components
Never remove heating elements or temperature sensors
Maintain regular cleaning to prevent warranty-voiding neglect
Use appropriate products for your oven type
The goal isn't a sterile oven — it's an appliance that functions efficiently, cooks food without imparting strange tastes or odours, and lasts its expected 15-20 year lifespan. Chemical-free methods like baking soda achieve this without harsh fumes, environmental impact, or risk to your oven's specialized coatings.
As the founder of EcoEthical Cleaning, I understand that oven cleaning is one of those tasks many Toronto homeowners prefer to delegate. I use eco-friendly methods appropriate for your specific oven type, protect removable components, and never use chemicals that might void warranties or damage specialized coatings.
Whether you tackle oven cleaning yourself or hire professionals, understanding the science and safety considerations ensures you make informed decisions that protect your investment and your household.
Need professional oven cleaning in Toronto that respects your appliance and your health? EcoEthical Cleaning provides thorough, eco-friendly oven cleaning services throughout the Harbourfront District and surrounding neighbourhoods. Contact me for a free, no obligation estimate.
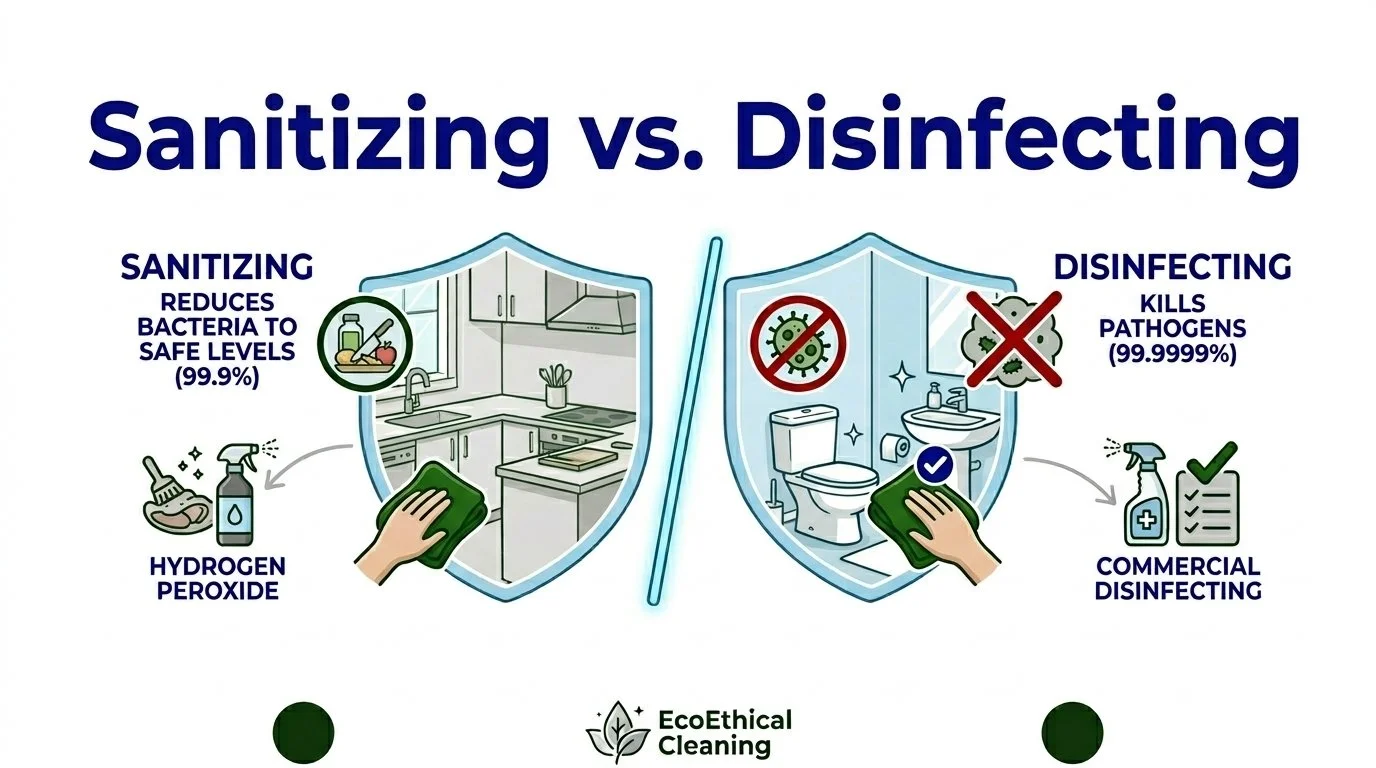
Sanitizing vs. Disinfecting: What's the Difference and When Does Each Actually Matter?
In recent years, household hygiene has taken center stage in our daily routines. Learn the crucial differences between cleaning, sanitizing, and disinfecting—and discover when each approach actually matters for your health. Most of the time, simple cleaning is enough. This science-based guide explains what Canadian public health actually recommends, which methods work for different situations, and how to keep your home appropriately clean without unnecessary chemicals or environmental harm.
In recent years, household hygiene has taken center stage in our daily routines. From high-touch surfaces like doorknobs and light switches to kitchen countertops and shared workspaces, the focus on maintaining a germ-free environment has never been higher. As we move toward more sustainable and long-term wellness habits, the priority is shifting from universal application to targeted hygiene — choosing the right level of clean for the right situation.
Applying the most powerful chemical solution isn't always the most effective strategy. To achieve a healthy balance between safety, environmental impact, and household budget, we must move beyond the "one size fits all" approach to cleaning.
The confusion starts with terminology. "Sanitizing" and "disinfecting" sound similar and are often used interchangeably, but they're actually quite different — with different purposes, different chemical requirements, and different appropriate applications.
Understanding the distinction matters for your health, your home, your budget, and the environment. Using disinfectants when you only need to sanitize means exposing your family to unnecessary chemicals. Not disinfecting when you actually need to could leave dangerous pathogens in place. And doing either when simple cleaning is sufficient wastes time, money, and creates environmental harm.
This guide will explain exactly what sanitizing and disinfecting mean, how they differ from basic cleaning, when each is actually necessary, and how to approach them sustainably. You'll learn what Canadian public health guidelines actually recommend, which methods work for different situations, and how to keep your home appropriately clean without creating other health problems in the process.
Defining the terms: Cleaning, sanitizing, and disinfecting
These three terms represent different levels of germ reduction, each with specific purposes and appropriate applications.
Cleaning
What cleaning does:
Removes visible and tactile soil and grime
Reduces germ count through physical removal
Makes surfaces look and feel clean
Cleaning germ reduction: Removes approximately 80-90% of germs through physical action (wiping, scrubbing)
When cleaning is appropriate: Most everyday situations in healthy households
Sanitizing
What sanitizing does:
Reduces bacteria to acceptable levels
Takes less time and uses less harsh chemicals than disinfecting
Appropriate for most food-contact and high-touch surfaces
Sanitizing germ reduction: Reduces bacteria by 99.9% (3-log reduction) within a short contact (dwell) time, depending on the product
Regulatory standard: In Canada, sanitizers must reduce bacteria by 99.9% to meet Health Canada standards when used as directed
When sanitizing is appropriate: Food preparation surfaces, children's toys, eating surfaces, areas with moderate contamination
Disinfecting
What disinfecting does:
Kills bacteria, viruses, and fungi
Eliminates pathogens that cause disease
Requires stronger chemicals and a longer contact time
Very thorough level of germ elimination
Disinfecting germ reduction: Kills 99.9999% of pathogens (6-log reduction) within 5-10 minutes, depending on the product and targeted organism
Regulatory standard: In Canada, disinfectants must be registered with Health Canada and prove efficacy against specific pathogens when used according to label directions
When disinfecting is appropriate: Situations with high contamination risk, illness in the household, immunocompromised individuals, or specific high-risk surfaces (toilets)
Note: There is a 4th level of germ reduction, sterilizing — which is the complete destruction of all microbial life. Sterilizing is almost always reserved for medical scenarios, making it beyond the scope of this guide.
The key differences: Side-by-side comparison
Understanding how these three approaches differ helps you choose the right one for each situation:
Cleaning
Primary goal: Remove dirt and grime
Germ reduction: 80-90% (removal)
Method: Physical removal
Dwell time: None
Products used: Cleaners, water
Chemical strength: Mild
Appropriate for: Daily maintenance
Environmental impact: Lowest
Cost: Lowest
Sanitizing
Primary goal: Reduce bacteria to safe levels
Germ reduction: 99.9%
Method: Chemical reduction
Dwell time: Typically 30 seconds - 5 minutes
Products used: Sanitizers, mild solutions
Chemical strength: Moderate
Appropriate for: Food areas, high-touch surfaces
Environmental impact: Moderate
Cost: Moderate
Disinfecting
Primary goal: Kill pathogens
Germ reduction: 99.9999%
Method: Chemical killing
Dwell time: Typically 5-10+ minutes
Products used: Disinfectants
Chemical strength: Strong
Appropriate for: High contamination zones (toilets), homes with illness
Environmental impact: Highest
Cost: Highest
Important: You must clean before sanitizing or disinfecting. Dirt, grease, and organic matter interfere with sanitizers and disinfectants, preventing them from working effectively.
When regular cleaning is sufficient
This is actually most of the time in most healthy households. Understanding when simple cleaning is enough prevents unnecessary chemical use.
Daily/Weekly household surfaces in healthy homes
These typically need only regular cleaning:
Floors (vacuum, sweep, damp mop)
Countertops (wiped with soap and water or all-purpose cleaner)
Tables and desks
Dusting surfaces
Appliance exteriors
Windows and mirrors
Most furniture
Why cleaning is enough: These surfaces don't typically harbor dangerous pathogens in healthy households. Regular cleaning removes dirt and reduces germs adequately for health.
When to upgrade to sanitizing: If preparing food, after handling raw meat, or weekly for high-touch surfaces.
When to resort to disinfecting: Only during illness or other high-risk situations.
When sanitizing is the right choice
Sanitizing hits the sweet spot for many household situations: effective germ reduction without the unnecessary chemical exposure of disinfection or risk to the environment.
Food preparation surfaces
When: After preparing food, especially raw meat, poultry, or eggs
Why cleaning is not enough: Raw animal products can carry Salmonella, E. coli, Campylobacter, and other foodborne pathogens. Sanitizing reduces these pathogens to safe levels.
How to do it sustainably:
Option 1: 3% Hydrogen peroxide
Clean surface first with soap and water
Spray hydrogen peroxide, let sit 2-3 minutes
If it is food-grade hydrogen peroxide, allow it to air dry. Non-food-grade hydrogen peroxide (what is found in first aid sections) should be rinsed off any surface that will come into contact with food.
Keep hydrogen peroxide in its original container until ready to use
Option 2: Commercial food-safe sanitizer
Choose products approved for food contact surfaces
Follow label directions for dilution and contact time
Look for eco-certified options when available
Option 3: Very hot water
Water above 77°C (170°F) can sanitize
Suitable for sanitizing via dishwasher
Children's toys and items that go in mouths
When: Regularly for infant/toddler toys, after illness, when visibly soiled
Why cleaning is not enough: Cleaning removes visible dirt but may not adequately reduce pathogens that cause common childhood illnesses (colds, stomach bugs, hand-foot-and-mouth disease).
How to do it sustainably:
Hard plastic toys:
Wash with soap and water first
Sanitize with hydrogen peroxide (as described above)
Or wash in dishwasher on ‘Sanitize’ setting
As with food contact surfaces, food-grade hydrogen peroxide can be left to air dry. Otherwise rinse thoroughly before next use.
Soft toys and fabric items:
Wash in washing machine with hot water
Use hot dryer cycle (the heat provides sanitization)
For items that can't be washed: steam clean or leave in direct sunlight for several hours (ultraviolet rays have sanitizing properties)
Teething toys and pacifiers:
Many can be boiled for 5 minutes (check manufacturer instructions)
Or sanitize with hydrogen peroxide, then rinse thoroughly with clean water
High-touch surfaces in healthy households
When: Weekly or as part of regular cleaning routine
Why cleaning is not enough: High-touch surfaces (door handles, light switches, faucets, etc.) collect bacteria and viruses from hands. Regular cleaning may not adequately reduce germ levels.
How to do it sustainably:
The approach:
Incorporate sanitizing into weekly cleaning routine
Clean first (remove visible dirt)
Then sanitize high-touch surfaces
Sustainable sanitizing methods:
Hydrogen peroxide - safe for most household surfaces
Hot water at a minimum sustained temperature of 66°C (150°F) for a minimum of 20 seconds - most sustainable way to sanitize, but caution required as water at this temperature can cause severe burns
70% Alcohol solution - for surfaces sensitive to heat, moisture, oxidation, or anything mildly acidic
Commercial eco-certified sanitizers
Which surfaces:
Door handles and knobs
Light switches
Faucet handles
Cabinet pulls
Stair railings
Remote controls
Phones and tablets (follow device manufacturer guidance)
Cutting boards after use
When: After every use, especially after raw meat, poultry, or fish
Why cleaning is not enough: Soap and water may not adequately penetrate the knife grooves on a cutting board, where bacteria hide.
How to do it sustainably:
Clean first by scrubbing with soap and hot water
Apply hydrogen peroxide and allow it to sit for 10 minutes, to give it time to penetrate the knife grooves
Rinse non-food-grade hydrogen peroxide
Wipe the surface dry, to prevent the wood from warping and splitting
Plastic, dishwasher-safe cutting boards can be sanitized via dishwasher
Replace cutting boards when they become heavily scored
When disinfecting is actually necessary
Disinfecting uses stronger chemicals and should be reserved for specific high-risk situations where sanitizing isn't sufficient.
Someone in the household is sick
When: During and immediately after illness, particularly with highly contagious conditions
Why disinfecting: Some viruses and bacteria are highly contagious and resistant to sanitizers. Disinfecting kills these pathogens to prevent household spread.
Conditions that warrant disinfection:
Norovirus (stomach flu) - extremely contagious, sanitizers may not kill it
Influenza - spreads easily through respiratory droplets and surface contact
COVID-19 - can survive on surfaces, though surface transmission is less common than airborne
MRSA or any other antibiotic-resistant infections
Which surfaces to disinfect:
Bathroom surfaces (toilets, sinks, faucets, counters)
Door handles and light switches throughout the home
Faucets and cabinet handles
Specific surfaces the sick person touched frequently
Shared items (remote controls, touchscreens, medicine bottles)
How to do it sustainably:
Ensure that the sustainable disinfectant you wish to use has a Drug Identification Number (DIN) and is listed in the Drug Product Database (DPD)
Important: Follow contact time requirements. Spraying and immediately wiping removes the disinfectant before it can work. The surface must stay wet with disinfectant for the time specified by the manufacturer.
After sewage backup or flood contamination
When: After any sewage exposure or flood water containing sewage
Why disinfecting: Sewage contains dangerous pathogens including E. coli, Hepatitis A, rotavirus, and many others. Sanitizing isn't sufficient for this level of contamination.
Approach:
Remove all porous materials that contacted sewage (carpets, drywall, insulation)
Clean hard surfaces thoroughly first
Disinfect with appropriate solution
May require professional remediation
Note: This is a situation where calling professionals is often warranted. Sewage cleanup involves serious health risks.
Immunocompromised household members
When: Someone in the home has a significantly weakened immune system
Why disinfecting: Individuals with compromised immunity are vulnerable to infections from pathogens that don't typically affect healthy people. Additional precautions are necessary.
Who this includes:
Cancer patients undergoing chemotherapy
Organ transplant recipients
People with HIV/AIDS
Those on long-term immunosuppressive medications
Elderly with significantly weakened immune systems
Approach:
Consult with their healthcare provider about specific recommendations
May need to disinfect bathroom surfaces and high-touch areas daily
More frequent than needed in healthy households
Focus on surfaces the vulnerable person contacts
Important: Work with healthcare providers to determine the necessary level of disinfecting. Over-disinfecting creates chemical exposure concerns; under-disinfecting creates infection risk.
Bathroom surfaces after vomiting or diarrhea
When: After incidents of vomiting or diarrhea, even if not from known illness
Why disinfecting: Vomit and diarrhea may contain highly contagious pathogens. Quick disinfection prevents potential spread.
Which surfaces:
Toilet (entire fixture, including exterior and floor around base)
Bathroom sink and counter
All high-touch surfaces (door handles, faucets, light switches, etc.)
Safety note: Wear gloves and wash hands (and reusable gloves) thoroughly after cleaning contamination.
Pet accidents involving diarrhea or vomit
When: After pet diarrhea or vomiting, especially if pet is ill
Why disinfecting: Pets can carry pathogens transmissible to humans (zoonotic diseases), including some that cause serious illness.
Approach:
Safely remove all solid matter
Clean the area thoroughly
Disinfect with pet-safe disinfectant (use as directed)
Note: Routine pet urine accidents on hard floors typically only require cleaning, not disinfection (unless the pet has a urinary tract infection).
The risks of over-disinfecting
Using disinfectants unnecessarily creates several problems:
Chemical exposure:
Disinfectants contain strong chemicals that can cause respiratory irritation, skin irritation, and other health effects
Children are particularly vulnerable to chemical exposures
Chronic exposure to strong disinfectants may have long-term health impacts
Environmental harm:
Disinfectants enter waterways through drains
Many are toxic to aquatic life
Many don't break down quickly in the environment
Antimicrobial resistance:
While less studied than antibiotic resistance, some research suggests the overuse of antimicrobial products may contribute to bacterial resistance
Creates selection pressure for resistant organisms
Immune system concerns:
Some researchers believe excessive disinfection may interfere with normal immune system development in children
"Hygiene hypothesis" suggests some pathogen exposure is beneficial for immune system training
Balance is key: protect against dangerous pathogens without creating a sterile environment
False sense of security:
Disinfecting surfaces doesn't address airborne transmission (the main route for many respiratory illnesses)
Hand hygiene and respiratory etiquette are often more important than surface disinfection
What Canadian public health actually recommends
Health Canada and Public Health Ontario guidelines emphasize:
For healthy households:
Regular cleaning with soap and water is sufficient for most surfaces
Hand hygiene (handwashing) is more important than surface disinfection
Ventilation (open windows, air circulation) matters more than chemical interventions
Reserve disinfection for specific situations (illness, contamination events)
The focus should be:
Regular cleaning to remove dirt and reduce germs
Handwashing frequently and properly
Avoiding touching face
Covering coughs and sneezes
Staying home when ill
Good ventilation
Surface disinfection ranks lower in importance for disease prevention than these behavioral and environmental interventions.
Best practices
Whatever product you choose:
Clean first: Always remove visible dirt before sanitizing or disinfecting. Organic matter interferes with chemical efficacy.
Follow contact time: Product must stay wet on surface for specified time. Spraying and immediately wiping doesn't work.
Use proper dilution: Concentrated products must be diluted according to instructions. More concentrated isn't better and may actually be less effective.
Ensure adequate ventilation: Open windows, use fans, especially when using bleach or strong disinfectants.
Wear gloves: Protects skin from irritation through exposure.
Store safely: Keep all products away from children and pets.
Check expiration dates: Effectiveness decreases with product age. Expired products can not be relied upon to provide adequate disinfection.
Practical scenarios: Choosing the right approach
Let's apply this knowledge to real-world situations:
Scenario 1: Daily kitchen counter maintenance
Situation: Wiping down kitchen counters after preparing daily meals
Right approach: Cleaning
Why: Daily light maintenance of surfaces without contamination doesn't require sanitizing or disinfecting. Cleaning removes crumbs, spills, and reduces germs adequately.
When to sanitize: After preparing raw meat, poultry, or eggs.
Scenario 2: Child's high chair after meals
Situation: Cleaning high chair tray and seat after each meal
Right approach: Cleaning, with periodic sanitizing
Why: Daily cleaning removes food and most germs. Weekly or after messy meals, sanitizing provides extra assurance.
Method:
Wipe with soap and water after each meal
Weekly: Spray with food-grade hydrogen peroxide, let sit 3 minutes, air dry (or rinse with clean water if using non-food-grade hydrogen peroxide)
Or wash removable parts in dishwasher’s sanitation cycle (if safe to do so)
Scenario 3: Bathroom surfaces
Situation: Weekly bathroom cleaning in a healthy household
Right approach:
Cleaning for low-touch items (mirrors, shelves, floors)
Sanitizing for high-touch items (counters, sinks, faucets, door knobs, light switches)
Disinfecting for toilets and surrounding area
Why: Bathrooms need regular cleaning. Toilets and adjacent areas come into direct contact with harmful pathogens from human waste and need disinfecting to remove these often more resilient germs
Method:
Clean all surfaces first
Disinfect toilet bowl and exterior, flush handle, adjacent surfaces
Sanitize remaining high-touch areas
Scenario 4: Child's daycare sends note about stomach flu outbreak
Situation: Several kids at daycare have norovirus; your child is healthy but was exposed
Right approach:
Increased sanitizing of high-touch surfaces
Upgrade to disinfecting if child develops symptoms
Scenario 5: Pets
Situation: Pet has an accident in the home
Right approach:
Cleaning to remove pet waste
Disinfect the area after cleaning
Why: Like human waste, pet waste contains unsafe pathogens requiring disinfection.
Method:
Clean pet waste with enzymatic pet cleaner or soap and water
Disinfect with an appropriate product
Wash hands thoroughly after dealing with pet waste
Teaching children about hygiene without creating anxiety
Balancing cleanliness education with appropriate attitudes helps children develop healthy relationships with hygiene.
What to teach
Emphasize handwashing:
Most important hygiene practice
Before eating, after bathroom, after playing outside, after touching pets
Proper technique:
Wet
Lather
Scrub for 20 seconds
Rinse
Dry
Explain basic cleanliness:
Food shouldn't stay on surfaces where bacteria can grow
Bathroom surfaces need regular cleaning
Living spaces should be kept clean and tidy
Age-appropriate germ concepts:
Germs exist and some can make us sick
Cleaning and handwashing help remove germs
Our bodies are good at fighting most germs
Many germs are good for us and help fight against the bad ones
What to avoid
Don't create germophobia:
Excessive focus on eliminating germs creates anxiety
Constant disinfecting teaches that everything is dangerous
Don't over-promise:
You can't eliminate all germs (nor should you want to)
Hand sanitizer doesn't replace handwashing
Being "too clean" may not be healthier
Model a balanced approach:
Children learn by watching
If you're constantly disinfecting and anxious about germs, they'll adopt that attitude
Show that normal living involves some exposure, and that's okay
The bottom line: Rational, science-based hygiene
The key takeaways for maintaining a healthy home:
1. Understand the hierarchy:
Cleaning → removes dirt and most germs → sufficient for most daily situations
Sanitizing → reduces bacteria to safe levels → appropriate for food surfaces, moderate risk areas
Disinfecting → kills pathogens → necessary for illness, contamination, high-risk situations
2. Reserve stronger interventions for situations that warrant them:
Don't sanitize when cleaning is sufficient
Don't disinfect when sanitizing is sufficient
3. Focus on what matters most:
Handwashing prevents more illness than surface disinfection
Ventilation (opening windows) reduces airborne transmission
Staying home when sick prevents spread better than disinfecting afterward
Covering coughs and sneezes (with elbows, not hands) matters more than sanitizing surfaces
4. Use chemicals purposefully, not routinely:
Every disinfectant has an environmental and health impact
Use them only when the benefits outweigh the costs
In healthy households, that's less often than product marketing suggests
5. Trust the science:
Canadian public health guidelines don't recommend routine disinfection for healthy households
Regular cleaning + handwashing + smart practices = adequate protection
Over-sanitizing/disinfecting doesn't necessarily make you healthier and may lead to other problems
The goal isn't a sterile home. It's a home that's clean enough to be healthy, maintained in a way that's sustainable for your family and the environment.
Looking for cleaning services that understand the difference between clean, sanitized, and disinfected — and apply each appropriately? As an independent cleaner and founder of EcoEthical Cleaning, I bring science-based, sustainable practices to every Toronto home I serve. Contact me for a free, no-obligation estimate. Proudly serving Toronto’s Harbourfront and surrounding neighbourhoods.
Sources & Further Reading
Public Health Ontario, "Best Practices for Environmental Cleaning for Prevention and Control of Infections"
Centers for Disease Control and Prevention (CDC), "When and How to Clean and Disinfect Your Home"
Journal of Hospital Infection, "Factors Affecting the Efficacy of Disinfection and Sterilization"
Bohaychuk VM, Gensler GE, King RK, Manninen KI, Sorensen O, Wu JT, Stiles ME, McMullen LM. “Occurrence of pathogens in raw and ready-to-eat meat and poultry products collected from the retail marketplace in Edmonton, Alberta, Canada”. J Food Prot. 2006 Sep;69(9):2176-82. doi: 10.4315/0362-028x-69.9.2176. PMID: 16995521.
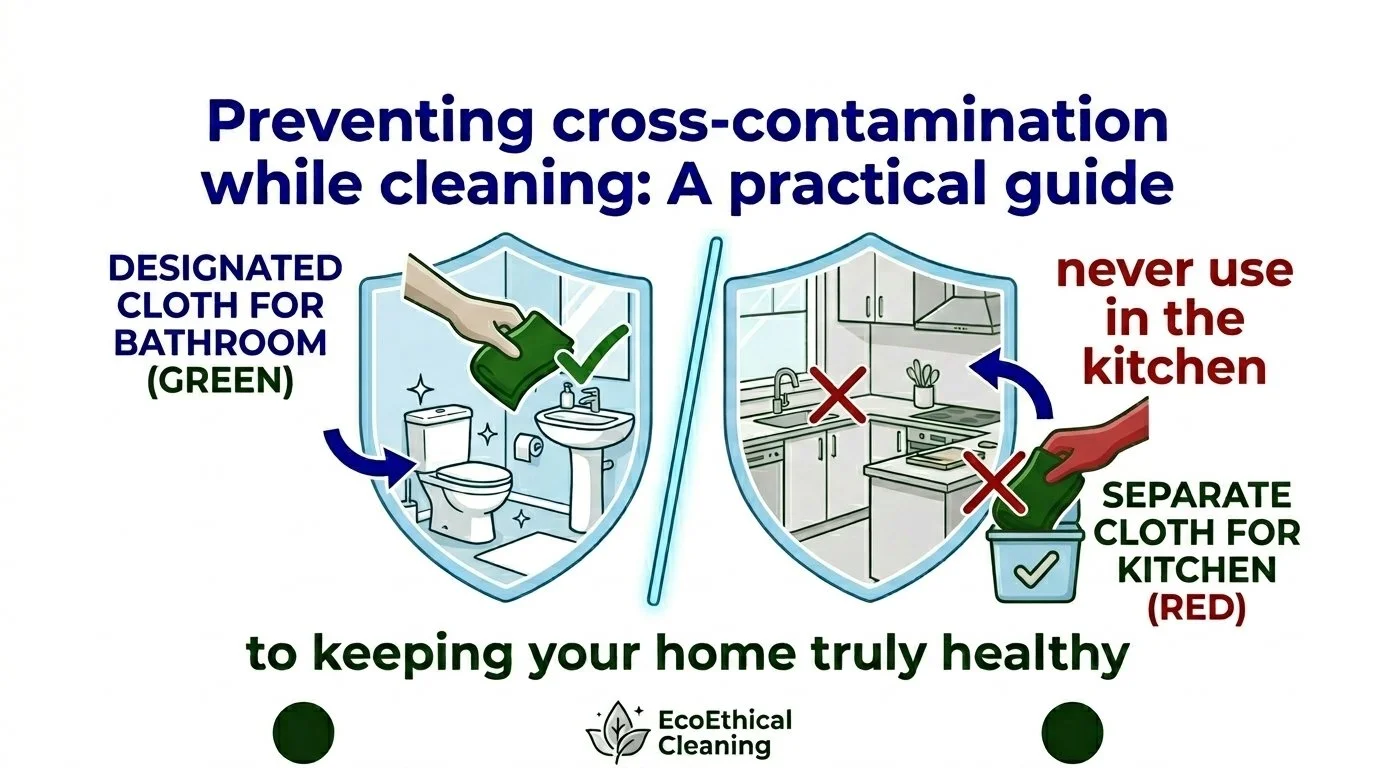
Preventing cross-contamination while cleaning: A practical guide to keeping your home truly healthy
Your cleaner just finished. Everything sparkles. But here's what you didn't see: the same cloth that wiped your toilet just cleaned your kitchen counters. The vacuum that cleaned your bathroom floor is now on your bedroom carpet. The mop water from the bathroom was used throughout your entire home. You've just paid someone to spread fecal bacteria, viruses, and pathogens everywhere. This is cross-contamination—the transfer of harmful microorganisms from one area to another—and it's standard practice for many cleaning services. Learn what it is, why it's dangerous, and what protocols help to prevent it.
Your cleaner just finished your home. The bathroom sparkles. The kitchen gleams. Everything looks spotless.
But here's what you didn't see: the same cloth that wiped your toilet was just used on your kitchen counters. The vacuum that cleaned your bathroom floor also ran across your living room carpet. The mop bucket that started in the bathroom finished in the kitchen — with the same water.
You've just paid someone to spread bacteria, viruses, and fecal matter throughout your entire home.
This is neither an exaggeration or worst-case scenario. It's standard practice for many cleaning services — and many homeowners have no idea it's happening.
Cross-contamination is one of the most overlooked problems in residential cleaning. While your home might look clean, it could actually be less hygienic than before the cleaner arrived.
This comprehensive guide will explain exactly what cross-contamination is, how it happens during cleaning, why it's dangerous, and most importantly — how to prevent it. You'll learn what questions to ask cleaning services, what practices to look for, and how professional protocols should actually work.
Because a truly clean home isn't just about removing visible dirt. It's about not spreading invisible dangers in the process.
What is cross-contamination?
Cross-contamination is the transfer of microorganisms (bacteria, viruses, fungi, parasites) from one surface, object, or area to another where they don't belong.
In the context of home cleaning, this typically means:
Transferring pathogens from bathrooms to kitchens
Spreading toilet bacteria to other surfaces throughout the home
Moving germs from high-contamination areas (toilets) to low-contamination areas (countertops, tables)
Carrying microorganisms between different homes on the same day
Why cross-contamination is dangerous
The health risks are significant:
Gastrointestinal illness: E. coli, Salmonella, Norovirus, and other pathogens from fecal matter cause vomiting, diarrhea, and serious illness—especially dangerous for young children, elderly, pregnant women, and immunocompromised individuals.
Skin infections: Staphylococcus aureus (including antibiotic-resistant MRSA) can cause skin infections, boils, and more serious systemic infections.
Respiratory infections: Viruses like influenza, common cold, and SARS-CoV-2 (Covid-19) can spread through contaminated surfaces touching faces, food preparation areas, or commonly touched objects.
Food poisoning: Kitchen cross-contamination with pathogens from bathrooms or raw food residue creates serious food safety risks.
Secondary infections: Open cuts, wounds, or compromised skin exposed to contaminated surfaces can lead to infections.
The high-risk areas in your home
Not all areas of your home pose equal contamination risk. Understanding this hierarchy is key to developing effective cleaning protocols.
Zone 1: Highest contamination (toilets)
Why it's high-risk:
Direct contact with fecal matter and urine
Aerosolized particles from flushing (toilet plume)
Handles, seats, and bowls harbour dangerous pathogens
Floors around toilets exposed to splatter and aerosolized matter
What should never touch other areas:
Toilet brushes
Cloths used on toilet bowl, seat, or base
Tools used to clean around toilet base
Mops used on bathroom floors
Zone 2: High contamination (bathrooms)
Why it's high-risk:
Body fluids: urine, feces (splatter), vomit, blood
High moisture = bacteria and mould growth
Sink drains contain biofilm with various pathogens
Floors contaminated from toilet aerosol, shower runoff, tracked particles
What should stay in bathrooms:
Bathroom-specific cloths
Bathroom floor mops
Cleaning tools for tubs, sinks, counters
Anything that touches bathroom floors
Zone 3: Moderate contamination (kitchens)
Why it requires caution:
Raw food contamination (meat, poultry, eggs)
Sink drains with food debris and biofilm
Garbage bins and areas
High-touch surfaces (handles, switches)
Why it needs protection:
Food preparation happens here
Cross-contamination directly leads to foodborne illness
Counters, cutting boards, and tables need to be truly hygienic
What should stay in kitchens:
Kitchen-specific cloths
Tools for counters, appliances, floors
Separate equipment from bathrooms
Zone 4: Low contamination (living areas)
Why it's lower risk:
Less exposure to body fluids
Lower moisture (less bacterial growth)
Primarily dust, dirt, and general grime
Why it still needs protection:
Vulnerable to contamination from bathrooms and kitchens if protocols aren't followed
People touch surfaces, then touch faces and food
Children play on floors and put hands/toys in mouths
How cross-contamination happens during cleaning
Most people assume professional cleaners follow protocols that prevent spreading germs. Unfortunately, many don't — often because they're rushing, untrained, or their employer prioritizes speed over safety.
Using the same cloth in different spaces
What happens:
The cleaner wipes a toilet with a cloth
That same cloth also wipes down the bathroom counter
Now the same cloth moves to bedroom, wiping nightstands and door handles
The same cloth finishes in the kitchen, wiping counters and other surfaces
The result: Fecal bacteria from the toilet are now on every surface touched by that cloth, including where you will prepare food.
Why cleaners do this: Using one cloth is faster than switching between designated cloths. Fewer cloths to launder. Less organization required.
The solution: Ensure that all cloths, brushes, and scrubbers are designated for use only in specific contamination zones. Ensure that all cloths, brushes, and scrubbers are cleaned and disinfected between uses.
Contaminated vacuums
What happens:
A vacuum is used on a bathroom floor (which is now exposed to fecal particles, urine splatter, body fluids)
The same vacuum immediately cleans a bedroom carpet
Then cleans the living room
The vacuum is never cleaned between services
Tomorrow, this vacuum goes to another client's home
The result: Bathroom contaminants are aerosolized and spread through every carpeted and hard floor surface. Your bedroom carpet now contains particles from the bathroom floor — and possibly from someone else's bathroom.
Why cleaners do this: Cleaning vacuums is time-consuming. Many services never even consider it necessary.
The solution: Ensure the contact points of the vacuum (cord, wheels, hose, handle, attachments) are disinfected between contamination zones and at the end of every service.
Dirty mop buckets
What happens:
A mop bucket is filled with water and cleaning solution
The mop cleans the bathroom floor first
Mop is returned to bucket (which is now contaminated with bathroom bacteria)
The same mop and water is used to clean the kitchen floor
By the end of the service, the water is visibly dirty and full of dangerous pathogens
The result: Kitchen floor is mopped with bathroom-contaminated water. When you walk from the kitchen to other rooms, you’ll track those pathogens throughout the home.
Why cleaners do this: Changing mop water multiple times takes time. Many cleaners are taught to use one bucket for the entire house.
The solution (between zones):
Empty mop bucket water and disinfect bucket
Remove dirty mop head from service and replace with clean one
Refill mop bucket with clean water
Ensure that mop bucket and all mop heads are cleaned and disinfected before their next use.
Unwashed hands
What happens:
Cleaner cleans toilet
Cleaner doesn't change gloves before moving to the next area
Cleaner touches door handles, countertops, faucets, etc. throughout the home
Everything the cleaner touched is now cross-contaminated with pathogens from the toilet
The result: High-touch surfaces throughout your home are contaminated with whatever was on the cleaner's hands.
Why cleaners do this: Hand-washing between tasks disrupts workflow. Gloves might not be used to "save time" or due to preference.
The solution: Make sure gloves are changed and hands are washed when moving from any area that contains dangerous pathogens (toilets, bathrooms, kitchen). Ensure that all reusable gloves are cleaned and disinfected before their next use.
Questions to ask your cleaning service
Not all cleaning services follow proper cross-contamination protocols. Here are specific questions to ask to evaluate whether they're protecting your home:
Essential questions
1. "Do you use separate cloths for different areas of the home?"
What you're looking for:
Clear "yes" with an explanation of their system
Mention of designated cloths for toilets, bathrooms, kitchens
Colour-coding or other clear organizational systems
Red flags:
Vague answers
"We rinse the cloth between areas"
"We use microfibre that doesn't spread germs" (false — microfibre spreads germs just like anything else)
Other defensive or dismissive responses
2. "How do you prevent bathroom germs from spreading to the kitchen?"
What you're looking for:
Specific protocols (separate tools, cleaning order, storage methods)
Understanding of why this matters
Details about their system
Red flags:
"We're very careful"
"We clean the kitchen first" (doesn't address equipment contamination)
"It's not really a problem"
They can't articulate specific procedures
3. "How are your cleaning tools cleaned between uses and between homes?"
What you're looking for:
Daily laundering of cloths
Equipment sanitization protocols
Vacuum cleaning process
Storage methods to prevent contamination
Red flags:
"We wash cloths weekly" (not frequently enough)
"We rinse the mop" (inadequate)
"We've never had a complaint" (doesn't answer the question)
Admission they don't clean equipment between clients
4. "Do you clean the vacuum, and if so, how often?"
What you're looking for:
After every service
A specific description of what's involved (emptying, wiping down, cleaning attachments)
Recognition that this matters
Red flags:
"When it looks dirty"
"Weekly" or "monthly" (too infrequent)
"We've never had to do that"
Being surprised by the question (shows they've never considered it)
5. "Do your staff wear gloves, and do they change gloves between areas?"
What you're looking for:
Gloves used for high-contamination tasks (toilets, bathroom floors)
Changed between zones or single-use for toilets
Hand hygiene protocols
Red flags:
No glove use
Same gloves worn entire service
Follow-up questions if you're not satisfied
"Can I observe your cross-contamination prevention during a service?"
Professional services should agree to this
You'll see exactly what happens
Actions speak louder than protocol claims
"Can you provide written documentation of your sanitation protocols?"
Established services should have documented procedures
Gives you something to reference and hold them accountable to
"What training do your staff receive on hygiene and cross-contamination?"
Professional services train staff specifically on this
"On-the-job" training often means no systematic instruction
"Are you willing to customize your service if I have specific health concerns?"
Reputable services will accommodate immunocompromised individuals or specific needs
Inflexibility suggests protocols aren't that strong to begin with
DIY cross-contamination prevention
If you clean your own home, following professional protocols protects your family just as effectively.
Set up your own zoned system
Implement colour-coded cloths:
Buy sets of cloths in different colours
Assign colours to zones (for example: red=toilet, yellow=bathroom, green=kitchen, blue=other less-contaminated areas)
Designate equipment:
If possible, use a separate mop for bathrooms vs. other areas
Or use washable mop pads and change between zones
Toilet brushes stay in their designated bathroom and never leave that space
Create storage system:
Dirty cloths go immediately into a hamper or bag
Clean cloths stored separately by colour/zone
Tools stored in a way that prevents cross-contamination
Follow proper cleaning order
Your cleaning sequence:
Dust and general cleaning (bedrooms, living room)
Kitchen (with kitchen-designated tools)
Bathrooms (with bathroom-designated tools)
Toilets last (with toilet-designated tools)
Between zones:
Wash hands
Switch to appropriate cloths/tools
Never backtrack to earlier zones with tools that were used in another zone
Proper cloth laundering
Wash contaminated cloths properly:
Hot water (60°C/140°F minimum)
Appropriate detergent
Dry completely before storage
Launder bathroom/toilet cloths separately from kitchen cloths if possible
Don't:
Let dirty cloths sit for days (bacteria multiply)
Wash contaminated cloths with regular laundry
Hand hygiene
Wash hands:
Between zones
After removing gloves
Before touching food, face, or personal items
Use gloves appropriately:
Always wear for toilet cleaning
Change between contamination zones
Remove gloves and wash hands before touching other surfaces
The bottom line: Clean shouldn't mean contaminated
You hire a cleaning service to make your home healthier, not to spread pathogens throughout it. Understanding cross-contamination helps you:
Evaluate cleaning services properly:
Ask the right questions
Recognize red flags
Choose services that actually protect your home
Understand what you're paying for:
Not just surface-level appearance
Actual hygiene and pathogen control
Professional protocols that prevent contamination
Advocate for proper practices:
You have the right to know how your home is being cleaned
Professional services should welcome questions about hygiene
Don't accept dismissive answers about contamination prevention
When you choose a cleaning service, you're inviting someone into your most intimate spaces. They should earn that trust by protecting your health, not just making things look tidy.
Ask questions. Expect standards. Demand protocols that actually prevent cross-contamination.
Because your family deserves a home that's truly clean.
Looking for cleaning that prioritize hygiene, not just appearance? As an independent cleaner and founder of EcoEthical Cleaning, I follow strict cross-contamination prevention protocols in every Toronto home I serve. Hospital-grade sanitation, zoned equipment systems, and transparency about every step. Contact me for a free, no-obligation estimate and experience cleaning done right. Proudly serving Toronto’s Harbourfront and surrounding neighbourhoods.
Sources & further reading
“Good Housekeeping”, William D. Frye
“The effects of different hygiene procedures in reducing bacterial contamination in a model domestic kitchen”, E. Røssvoll, S. Langsrud, S. Bloomfield, B. Moen, E. Heir, T. Møretrø
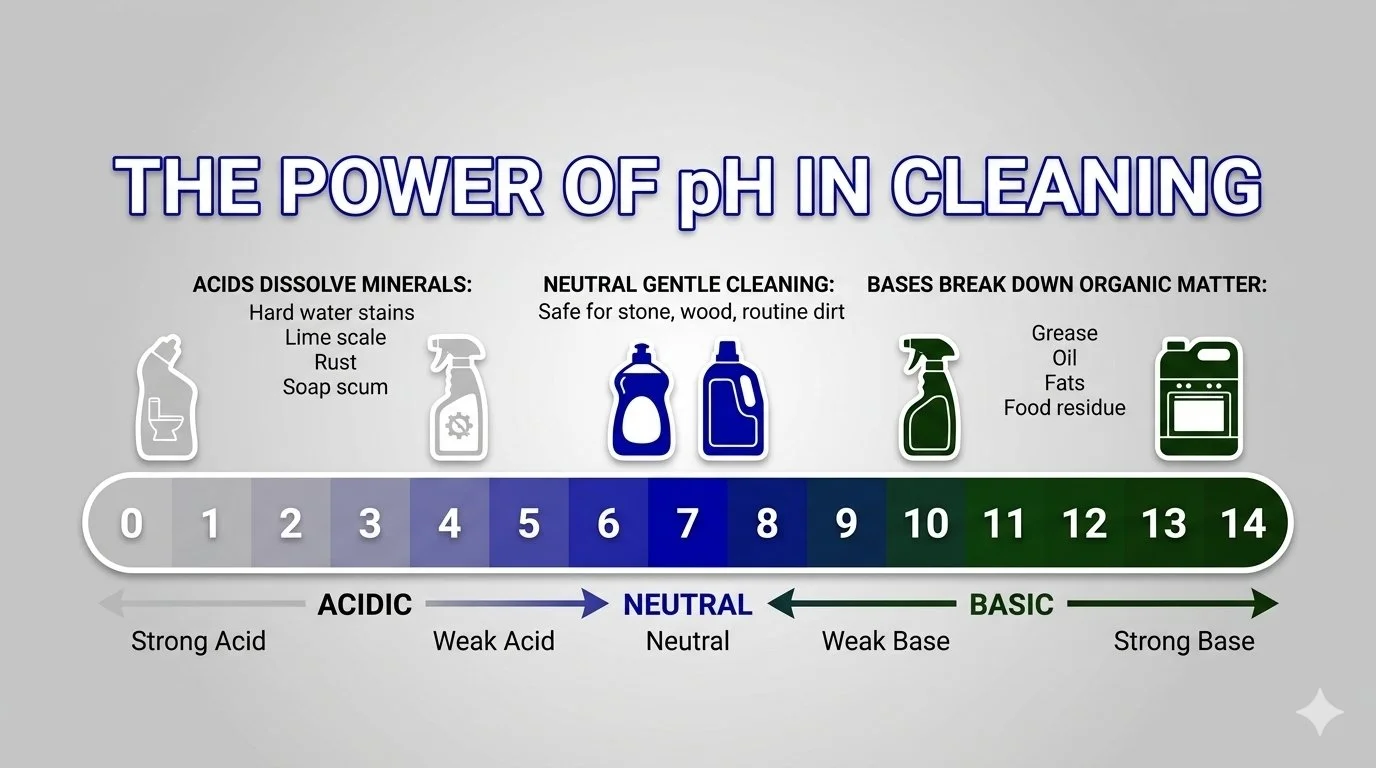
The power of pH: A guide to how acids and bases influence cleaning
Standing in the cleaning aisle, overwhelmed by dozens of products? The secret isn't buying more—it's understanding pH. Most cleaning challenges come down to chemistry: acids dissolve mineral deposits (hard water, lime scale, rust), while bases break down grease and organic matter. Using the wrong pH is like unscrewing a bolt with a hammer—you're applying force, but it's the wrong tool. Once you understand this one concept, cleaning stops being guesswork and becomes logical problem-solving. Learn which common products fall where on the pH scale, how to identify what you're cleaning, and match the right chemistry to every mess.
You're standing in the cleaning aisle, overwhelmed by dozens of products. Bathroom cleaner. Kitchen cleaner. All-purpose cleaner. Glass cleaner. Each bottle promises to tackle specific areas in your home, but you're not entirely sure why you need so many different products—or which one will actually solve your problem.
Most cleaning challenges come down to chemistry, specifically pH. Understanding this one simple concept will save you money, time, and frustration. You'll stop buying products you don't need, stop using the wrong cleaner for the job, and start actually solving problems instead of just scrubbing harder.
The secret isn't buying more products, it's understanding what you're actually trying to clean and matching it with the right chemical approach. Once you understand pH, cleaning stops being guesswork and becomes logical problem-solving.
This guide will teach you everything you need to know about pH in cleaning: what it means, why it matters, which common products fall where on the scale, and most importantly, how to identify what you're cleaning so you can choose the right product every single time.
What is pH? Understanding the scale
pH stands for "potential of hydrogen" and measures how acidic or basic a substance is on a scale from 0 to 14.
The pH scale:
0-6: Acidic (the lower the number, the stronger the acid)
7: Neutral (pure water)
8-14: Basic (the higher the number, the stronger the base)
Why this matters for cleaning: Different types of dirt, grime, and buildup respond to different pH levels. Acids dissolve certain substances. Bases dissolve others. Using the wrong pH is like trying to unscrew a bolt with a hammer — you're applying force, but it's the wrong tool for the job.
The pH scale with common household cleaners
Here's where everyday cleaning products actually fall on the pH scale. Note that a product’s pH can be found in Section 9 of their respective Safety Data Sheet.
Strong acids (pH 0-4):
Common toilet bowl cleaners (Lysol / Scrubbing Bubbles)
Oxalic acid (Bar Keeper's Friend)
Acetic acid (white vinegar)
Citric acid (lemon juice)
Weak acids (pH 4-6):
Bathroom cleaners designed for hard water (Seventh Generation / Method Daily Shower Spray)
Neutral range (pH 6-8):
Distilled water (pH 7.0 – true neutral)
Palmolive dish soap
pH-neutral cleaners (Bona Hard Surface Floor Cleaner / Zep Neutral pH Floor Cleaner / Method Hard Floor Cleaner)
Weak bases (pH 8-10):
Baking soda (sodium bicarbonate)
Borax (sodium borate)
Dawn Ultra dish soap
Strong bases (pH 11-14):
Oven cleaners (Easy Off Fume-Free / Zep
Drain cleaners (Drano Max Gel / Liquid Plumr)
Toilet bowl cleaners with bleach (Clorox)
Important note: The pH scale is logarithmic, not linear. This means each number represents a tenfold difference. pH 3 is ten times more acidic than pH 4, and one hundred times more acidic than pH 5. Small numerical differences represent huge differences in strength.
Not-so-important note (but still important to know going forward): Alkalis are bases that dissolve in water.
The chemistry behind how acids and bases actually clean
Understanding what acids and bases do at a molecular level explains why they work on different types of dirt.
What acids do
Acids donate hydrogen ionsto chemical reactions. This makes them excellent at:
Dissolving mineral deposits:
Hard water stains (calcium and magnesium carbonate)
Lime scale
Rust stains (iron oxide)
Soap scum (mineral soap residue)
Efflorescence (white mineral deposits on tile/concrete)
Why this works: Minerals are alkaline compounds. Acids react with them chemically, breaking their molecular bonds and dissolving them into solution. This is why acids work so well on hard water buildup — they're chemically breaking it down, not just scrubbing it away.
Acids also:
Brighten and restore shine to some surfaces (including ceramic, porcelain, stainless steel)
Remove tarnish from metals (brass, bronze, copper)
Neutralize alkaline residues
Kill certain bacteria
What acids DON'T do well:
Remove grease or oil
Cut through organic buildup
Dissolve proteins or fats
What bases do
Bases accept hydrogen ionsin chemical reactions. This makes them excellent at:
Breaking down organic matter:
Grease and oils
Fats (cooking residue, body oils)
Proteins (food residue, blood, organic stains)
Dirt and grime with organic components
Why this works: Bases cause a chemical reaction called saponification with fats and oils, essentially turning them into soap. This is why dish soap cuts through grease so effectively, and why oven cleaner dissolves baked-on grease.
Bases also:
Break down proteins and carbohydrates
Neutralize acidic residues
What bases DON'T do well:
Remove mineral deposits
Dissolve hard water stains
Clean rust
The neutral zone (pH 6-8)
True neutral cleaners:
Don't chemically react with most substances
Safe for almost all surfaces
Good for general dust and light dirt
Not effective for stubborn, chemically-bonded grime
When to use neutral cleaners:
Sensitive surfaces that acids or bases could damage
Routine maintenance cleaning
When you need safe, gentle cleaning
Identifying what you're actually cleaning
Before you can choose the right cleaner, you need to identify what you're trying to remove. Here's how to recognize common household messes by their characteristics:
Mineral-based buildup
Hard water stains:
Appearance: White, chalky, or cloudy deposits
Texture: Crusty, rough, difficult to scrub off
Common locations: Shower doors, faucets, sinks, toilets (waterline), tile, glass
What it is: Calcium and magnesium minerals left behind when water evaporates
Lime scale:
Appearance: White or off-white thick deposits, sometimes flaky
Texture: Very hard, almost rock-like where buildup is heavy
Common locations: Inside kettles, coffee makers, around faucet aerators, showerheads
What it is: Calcium carbonate buildup from repeated water exposure and heating
Rust stains:
Appearance: Orange, brown, or reddish stains
Texture: Can be surface-level or embedded in porous materials
Common locations: Toilets, sinks (where metal touches water), around old pipes
What it is: Iron oxide from metal corrosion or iron-rich water
Soap scum:
Appearance: White or gray filmy residue, sometimes with slight iridescence
Texture: Waxy, sticky feeling, difficult to remove with water alone
Common locations: Shower walls, tubs, shower doors, sinks
What it is: Combination of soap residue (fatty acids) + minerals from hard water. Contains both organic (soap) and inorganic (mineral) components, but the mineral component dominates
Efflorescence:
Appearance: White, powdery or crystalline deposits
Texture: Dry, powdery, easily brushed off when loose (but reappears)
Common locations: Brick, concrete, tile grout, basement walls
What it is: Salts brought to the surface through moisture evaporation
Organic/Grease-based buildup
Cooking grease and oil:
Appearance: Yellow to brown, glossy or sticky
Texture: Can be slippery (fresh buildup) or tacky (buildup that has been there a while)
Common locations: Stovetops, range hoods, backsplashes, oven interiors
What it is: Fats and oils from cooking that have condensed on surfaces
Baked-on food residue:
Appearance: Brown or black carbonized deposits
Texture: Very hard, crusty, difficult to scrape
Common locations: Oven interiors, baking sheets, pots and pans
What it is: Proteins, fats, and carbohydrates that have been repeatedly heated and carbonized
Body oils and soap residue:
Appearance: Slight film, often invisible until surface looks dull
Texture: Slightly greasy or waxy feeling
Common locations: Bathroom surfaces, tub ring, around sinks
What it is: Natural skin oils, body care products, soap residue
General dirt and grime:
Appearance: Gray or brown, dull appearance
Texture: Often slightly sticky or filmy
Common locations: Floors, walls, high-touch surfaces
What it is: Mix of dust, skin cells, oils, outdoor pollutants
Mould and mildew:
Appearance: Black, gray, green, or pink spots or patches
Texture: Can be surface-level (wipes away) or embedded (staining)
Common locations: Bathrooms, basements, window sills, anywhere with moisture
What it is: Fungal growth that thrives in moist, organic-rich environments
Mixed/Special Cases
Soap scum in hard water areas:
Contains both mineral deposits and organic soap residue
Best approach: Start with an acid to dissolve the minerals, then use a base if any organic residue remains
Or use a product specifically formulated for soap scum (contains both acid and surfactants to lift away the organic residue)
Toilet bowl rings:
Usually mineral deposits (hard water + waste minerals)
Sometimes combined with organic staining
Best approach: Acidic toilet bowl cleaner for minerals
Cloudy glassware from dishwasher:
Hard water etching (permanent damage) vs. mineral film (removable)
Test: If white vinegar removes it, it's mineral buildup. If not, it's etching.
Matching pH to the problem: An eco-friendly guide
Now that you can identify what you're cleaning, here's how to choose the right sustainable product:
For mineral deposits and hard water stains
Use acidic cleaners:
Mild hard water stains:
White vinegar -- cheap, effective, readily available
Apply, let sit 10-15 minutes, scrub, rinse
Safe for most non-porous surfaces
Toronto tip: Keep a spray bottle of vinegar in your bathroom for weekly shower door maintenance to prevent heavy mineral deposits.
Moderate buildup:
Make a paste of white vinegar and corn starch, apply, let sit for a few minutes, scrub gently, rinse thoroughly
Excellent for sinks, tubs, cookware
Mildly abrasive (helps with scrubbing action)
Heavy buildups may require multiple applications.
For rust stains:
Use a citric acid cleaner
Citric acid has the ability to “pull” rust from a surface (chelating), making it more effective than vinegar.
Important surface exceptions:
Never use acids on natural stone (marble, granite, limestone, travertine) - they will cause permanent damage through etching
Caution on metal fixtures - prolonged acid exposure can damage finishes
Test on grout - acids can break down grout sealant over time – leaving the grout vulnerable to erosion
For grease, oil, and organic buildup
Use alkaline cleaners (pH 8-14):
Light grease and daily grime:
Sustainable dish soap (my recommendation)
Dilute as directed by the product manufacturer, spray, let the solution sit for a couple of minutes, wipe clean
Moderate grease:
Sustainable all-purpose cleaner (my recommendation)
Apply, let sit as directed, scrub, rinse
Good for stovetops, kitchen surfaces, floors
Heavy baked-on grease:
Sustainable oven cleaner (my recommendation)
Follow directions carefully, including all safe handling precautions
Excellent for ovens, range hoods, barbecue grates
For mould and mildew:
Hydrogen peroxide / baking soda or a sustainable mould cleaner (my recommendation)
Address the cause of the excess moisture to prevent mould from returning
Protein-based stains:
Sustainable enzyme cleaner (my recommendation)
Use cold or lukewarm water (hot water can set protein stains)
For general/mixed Cleaning
Use neutral or mildly alkaline cleaners (pH 7-9):
Routine maintenance:
Dish soap and water (pH 7-9)
Mild all-purpose cleaners (pH 8-9)
Perfect for dust, fingerprints, light dirt
When surface sensitivity is a concern:
pH-neutral cleaners (pH 7)
Safe for wood, stone, and delicate finishes
Won't damage protective coatings
Surface-specific recommendations
Natural stone (marble, granite, limestone, travertine):
Only use pH-neutral cleaners (pH 7)
Acidic cleaners will etch the stone
Strong alkaline cleaners will strip the stone’s protective sealer
Hardwood floors:
pH-neutral for routine cleaning and slightly acidic (pH 6 or higher) for occasional deep cleaning
Alkaline cleaners can destroy the protective finish
Use minimal moisture
Stainless steel:
Neutral to slightly alkaline (pH 7-9)
Acids can damage the finish with prolonged contact
Strong alkalis can cause discolouration
Glass:
Mildly acidic (pH 4-6) for hard water stains
Use distilled water for streak-free cleaning
A diluted vinegar solution works beautifully
Ceramic tile:
Tolerates wide pH range (pH 2-11)
While the tile itself is durable, the grout surrounding it is not. Start with a mild base, and ensure the grout is properly sealed before escalating to a stronger product. Use acids only when targeting heavy mineral buildup (normally only in showers), and take precautions to prevent contact with grout.
Porcelain:
Very durable, tolerates strong acids and alkalis
Start with a mild acid or base, and only escalate if needed to minimize the risk of damaging the protective surface.
Common cleaning mistakes: Using the wrong pH
Understanding these common errors will save you hours of frustrated scrubbing:
Mistake 1: Using alkaline cleaner on mineral deposits
The scenario: You're scrubbing shower doors with an all-purpose cleaner, but the cloudy hard water stains won't budge no matter how hard you work.
Why it doesn't work: All-purpose cleaners are typically alkaline (pH 9-10). Hard water deposits are alkaline minerals. Bases don't react with bases—you're just pushing minerals around, not dissolving them.
The solution: Switch to an acidic cleaner (vinegar, citric acid). The stains will dissolve chemically with minimal scrubbing.
Mistake 2: Using acid on grease
The scenario: You try using vinegar to clean your greasy stovetop, but it just spreads the grease around and leaves a sticky mess.
Why it doesn't work: Acids don't react with fats and oils. You're just diluting the grease slightly, not breaking it down.
The solution: Use dish soap or an alkaline cleaner.
Alkalines chemically neutralize the fatty acids in the grease.
Surfactants in dish soap surround the oil molecules, "lifting" them off the stovetop so they can be rinsed away with water rather than just pushed around.
Mistake 3: Mixing acids and bases
The scenario: You hear that baking soda (base) and vinegar (acid) create a powerful cleaner, so you mix them together.
Why it doesn't work: They neutralize each other. The impressive fizzing is just carbon dioxide gas escaping as the two chemicals "cancel" each other out. Once the bubbles stop, you are left with water and a tiny amount of salt (sodium acetate). You’ve essentially turned two great cleaners into useless salt water.
The solution: Use them for their specific strengths, separately.
To scrub: Use a baking soda paste. Its high pH breaks down grease and its grit provides gentle abrasion.
To de-scale: Use vinegar. Its low pH dissolves hard water spots and soap scum.
The exception: If you have a slow drain, you can use the reaction for its mechanical energy. Pour the baking soda down first, then the vinegar, and plug the drain. The "fizzing" creates pressure that can physically dislodge hair or gunk—but it's the movement, not the chemistry, doing the work.
Mistake 4: Using acid on natural stone
The scenario: You use vinegar or acidic bathroom cleaner on marble countertops or shower tile to remove water spots.
Why it's a disaster: Acids react with calcium carbonate (which natural stone is made of), permanently etching the surface. Sadly, the damage is irreversible without professional restoration.
The solution: Only use pH-neutral cleaners on natural stone.
Mistake 5: Not letting the cleaner work
The scenario: You spray cleaner and immediately wipe, frustrated that it's not working.
Why it's inefficient: Chemical reactions take time. Spraying and immediately wiping doesn't give the cleaner time to break down the grime chemically.
The solution: Apply cleaner, let it sit (dwell time varies by product and buildup severity), then wipe. Dwell time allows the chemistry to do the work, so that your muscles don’t have to.
The right questions to ask
This is where understanding pH transforms your cleaning approach entirely.
Stop asking: "What will clean my [surface]?"
This question is too vague. It doesn't identify the actual problem.
Examples of vague questions:
"What will clean my bathtub?"
"How do I clean my glass shower door?"
"What's the best cleaner for my sink?"
Why they're too vague: The surface isn't the problem—the substance on the surface is the problem. Different substances require different solutions.
Start asking: "What will remove [substance] from my [surface]?"
This question identifies both the problem and any surface limitations.
Examples of specific questions:
"What will remove hard water stains from glass?" → Acid (vinegar or commercial descaler)
"What will remove grease from ceramic tile?" → Base (degreaser or alkaline all-purpose cleaner)
"What will remove soap scum from my acrylic tub?" → Mild acid with surfactants (a mixture of vinegar and dish soap or a specialized soap scum remover)
"What will remove water spots from marble?" → pH-neutral cleaner
The two-step thinking process:
Step 1: Identify what you're removing
Is it mineral-based? (cloudy, white, crusty) → Needs acid
Is it grease/oil-based? (sticky, greasy, brown) → Needs base
Is it general dirt? (dusty, filmy) → Neutral or mild base
Step 2: Identify surface limitations
Is the surface acid-sensitive? (grout, natural stone, some metals) → Avoid acids
Is the surface base-sensitive? (some wood finishes, soft metals like aluminum, brass, zinc) → Avoid strong bases
Is the surface generally durable? (ceramic, porcelain, glass) → Wide pH range acceptable
The answer: Choose the appropriate pH that removes the substance without damaging the material.
The substance determines the pH you need. The surface determines the pH you must avoid.
Practical application: Real-world scenarios
Let's apply this knowledge to common Toronto household cleaning challenges:
Scenario 1: Cloudy shower doors
What you see: White, hazy film on glass that won't wipe away with water
Identify the substance: Hard water mineral deposits (calcium and magnesium carbonate)
Surface considerations: Glass is durable and acid-resistant
Solution:
Use an acidic cleaner (white vinegar is cheapest, citric acid is more effective but typically costs more)
Spray generously, let sit for appropriate amount of time
Scrub with a non-abrasive sponge
Rinse thoroughly
Prevention: Squeegee doors after each shower, or spray with vinegar weekly
Scenario 2: Greasy range hood
What you see: Sticky, brown, glossy buildup that attracts dust
Identify the substance: Cooking grease and oil (organic fats)
Surface considerations: Usually stainless steel or painted metal (both tolerate alkaline)
Solution:
Use alkaline degreaser (pH 10-11)
Spray, let sit for appropriate amount of time
Wipe with a cloth or sponge
May need multiple applications for thick buildup
Rinse with hot water and dry
Prevention: Wipe weekly with alkaline cleaner before buildup becomes severe
Scenario 3: Toilet bowl ring
What you see: Brown or gray ring at water line, rough texture
Identify the substance: Mineral deposits from hard water, possibly with some organic staining
Surface considerations: Porcelain (very durable, acid-safe)
Solution:
Use acidic toilet bowl cleaner
Apply under rim and to ring, let sit for appropriate amount of time
Scrub with toilet brush
For stubborn rings: pumice stone (wet both stone and surface before use to reduce the risk of scratching the protective glaze)
Prevention: Flush daily to prevent buildup
Safety warning:Never mix a strong acid like an acidic toilet bowl cleaner with chlorine bleach! These 2 substances will react to create chlorine gas – which was literally used to kill soldiers during WWI.
Scenario 4: Soap scum on acrylic tub
What you see: White, filmy, slightly waxy buildup
Identify the substance: Soap scum (mixed: oils + hard water minerals)
Surface considerations: Acrylic can be scratched; avoid abrasives
Solution:
Use a mixture of vinegar and dish soap (I know what you’re thinking–”but the acidic vinegar will neutralize the alkaline dish soap!”--but in this case it’s the surfactants in the dish soap that are being relied on to lift the oils, not its alkalinity to dissolve them)
Prevention: Rinse tub after use, squeegee or wipe down weekly
Scenario 5: Hardwood floor dullness
What you see: Floor looks dingy, has lost shine
Identify the substance: Likely buildup of alkaline cleaner residue or dirt
Surface considerations: Hardwood finish is sensitive to both strong acids and bases
Solution:
First use pH-neutral wood floor cleaner
Damp mop only (never wet)
If residue remains, use a very dilute vinegar solution (1 part vinegar to 10 parts water), and rinse with plain water immediately
Prevention: Only use pH-neutral or manufacturer-recommended cleaners on hardwood to avoid future buildup
Scenario 6: Cloudy marble countertop
What you see: Dull, hazy appearance, possibly etching or residue
Identify the substance: Could be etching (permanent damage from acid) or alkaline residue buildup
Surface considerations: Natural stone—extremely acid-sensitive
Solution:
Clean with pH-neutral natural stone cleaner
If still dull: May be etching (requires professional restoration)
If it's residue: Dish soap and water, dry thoroughly
Prevention:Never use acidic or alkaline cleaners on marble (or any other natural stone). Only pH-neutral products.
Building a sustainable cleaning arsenal
You don't need 20 products. Here's a strategic, pH-based cleaning kit:
The Essential Four
1. Acidic cleaner:
White vinegar for biofilms and light mineral buildup
Citric acid for rust and heavy mineral buildup
Uses: Hard water stains, mineral deposits, rust, soap scum
2. Alkaline cleaner:
Sustainable all-purpose cleaner for routine cleaning and light grease buildup
Sustainable oven cleaner for heavy grease buildup
Uses: Grease, general grime, floors, most durable surfaces
3. pH-neutral cleaner:
pH neutral dish soap and water works for most needs
Consider sustainable cleaners formulated specifically for natural stone / hardwood floors
Uses: Delicate pH-sensitive surfaces, routine maintenance
4. Abrasive cleaner:
Corn starch for mild acidic cleaning
Baking soda for mild basic cleaning
Natural fibre brushes for pH neutral cleaning
Uses: Stubborn stains on durable surfaces, cookware, sinks
Safety considerations when working with pH
Understanding pH includes respecting the power of strong acids and bases.
General safety rules
Never mix cleaning products unless you know exactly what you're doing:
acid + bleach = toxic chlorine gas (fatal)
ammonia + bleach = toxic chloramine gas (fatal)
hydrogen peroxide + vinegar = peracetic acid (damages the eyes and respiratory system)
acid + base = neutralization (wastes both products, and creates potentially unwanted heat)
Wear appropriate protection:
Gloves for anything below pH 4 or above pH 10
Eye protection for spray products or anything below pH 3 or above pH 11
Ventilation for strong acids or bases (open windows, use fans)
Follow product directions:
Always follow the recommended dilution ratios
Dwell times are tested for effectiveness and safety
Following rinsing instructions help prevent surface damage
Store all cleaning products:
Separate from each other
Out of reach of children and pets
In original containers with labels
Away from heat sources
pH-specific cautions
Strong acids (pH < 3):
Can burn skin and eyes
Can corrode metals
Fumes can irritate respiratory system
Can permanently damage acid-sensitive surfaces
Strong bases (pH > 11):
Can cause severe chemical burns
More dangerous than acids of equivalent pH (bases penetrate human tissue deeper)
Can blind if splashed in eyes
The slippery feeling after touching a base is literally the base turning your skin oils into soap, and should be washed off immediately until that slippery feeling is gone
Test before using:
On new surfaces, test in inconspicuous area
Wait 24 hours to ensure no damage
This is especially important with acids on stone, grout, or metal
Toronto-specific considerations
Understanding your local water and environment helps you anticipate cleaning challenges.
Toronto's water hardness
Toronto water is moderately hard:
This means calcium and magnesium minerals are present
You will deal with hard water buildup regularly
What this means for you:
Keep acidic cleaners on hand
Expect mineral deposits on faucets, shower doors, appliances
More frequent cleaning needed in bathrooms and kitchen
Consider water softener if buildup is severe
Seasonal Humidity
Toronto's humid summers:
Increased mould and mildew risk
More organic growth in bathrooms
Keep alkaline cleaners or hydrogen peroxide ready
Increase ventilation (exhaust fans, dehumidifiers)
Toronto's dry winters:
Heating systems dry air
Dust accumulation increases
Static electricity attracts more dust to surfaces
General cleaning (neutral or mild alkaline) more important
High-rise condo living
Harbourfront and other condo-dense areas:
Sealed buildings with limited ventilation
Shared water systems (consistent water hardness across units)
Smaller spaces mean faster buildup concentration
Regular cleaning more important in confined spaces
Conclusion: From guesswork to strategy
Understanding pH transforms cleaning from trial-and-error frustration into logical problem-solving. You're no longer guessing which product might work or why something isn't cleaning despite your effort.
The simple framework:
Mineral deposits (hard water, lime scale, rust) → Acid
Grease and organic matter (cooking oil, body oils, food residue) → Base
Routine dust and light dirt → Neutral or mild base
Delicate surfaces → pH-neutral only
The right question isn't "What cleans my bathtub?"
The right question is "What removes hard water stains from ceramic?"
One identifies the surface. The other identifies both the problem and the solution.
Armed with this knowledge, you'll:
Save time by eliminating the guesswork
Save money by buying fewer products
Protect your surfaces
Get better results
The next time you face a cleaning challenge: Pause. Identify what you're trying to remove. Consider your surface. Choose the appropriate pH. Let the chemistry do the work for you.
Need help with proper surface care and cleaning in your Toronto home? At EcoEthical Cleaning, I understand the chemistry behind every surface and challenge. I choose products based on science, not marketing, ensuring your home is cleaned effectively without damage. Contact me for a free, no-obligation estimate and experience sustainable cleaning done right.
Sources & Further Reading
“The Chemistry of Cleaning”, American Cleaning Institute,
"Neutralization", LibreTexts Chemistry
"Tap Water Quality & System Reports", City of Toronto
The environmental impact of microfibre cloths
If you’ve switched to microfibre because it was marketed as a greener option, you’re not alone. Unfortunately, each microfibre wash releases plastic fibres that make their way into our waterways and ecosystems. Before you toss what you own, let’s explore what microfibre is made of, why it’s a problem, and how to move toward genuinely sustainable cleaning materials instead.
If you've been told that microfibre cloths are the sustainable cleaning solution, you're not alone. They've been marketed as reusable, effective, and even "eco-friendly" alternatives to disposable paper towels. And in some ways, they deliver — you can clean with just water, they last for years, and they genuinely work.
But here's the uncomfortable truth that's only recently come to light: microfibre cloths are shedding hundreds of thousands of tiny plastic fibres every time they are washed. These microscopic particles are flowing into our waterways, entering our food chain, and accumulating in ecosystems across the world. The very thing we thought was helping the planet is actually contributing to one of the most pressing environmental challenges we face — microplastic pollution.
Before you toss all your microfibre cloths in despair (please don't, I'll explain what to do with them later on), let's understand what's actually happening, why it matters, and what genuinely sustainable alternatives exist.
What are microfibre cloths?
Despite the natural-sounding name, microfibre is 100% synthetic plastic.
Most microfibre cloths are made from a blend of polyester (derived from petroleum) and polyamide, also known as nylon (another petroleum-based plastic). These materials are woven together to create ultra-fine fibres (typically 1/100th the diameter of a human hair) which gives microfibre its signature soft texture and cleaning ability.
While some microfibre is marketed as being "made from recycled materials," it may sound better but doesn't change the fundamental issue: it's still plastic that will shed more plastic.
Unlike cotton or other natural fibres, microfibres are plastic-based, which means they do not break down naturally in the environment.
How microfibre cloths actually work
Microfibre's cleaning power comes from its unique structure. Those ultra-fine plastic fibres create millions of tiny spaces and edges that:
Trap dirt mechanically — The fibres act like tiny hooks that grab and hold onto dust, dirt, and grime at a microscopic level. This is why you can often clean effectively with just water—the physical structure does most of the work.
Absorb moisture efficiently — The spaces between fibres allow microfibre to absorb up to seven times its weight in liquid.
Create static charge — When dry, microfibre builds up a static charge that attracts and holds dust particles, making it excellent for dusting without sprays.
Split and lift oils — Quality microfibre has "split" fibres with wedge-shaped edges that can penetrate and lift oil-based grime that would normally require soap.
It's not marketing hype, microfibre genuinely outperforms traditional cotton cloths for most cleaning tasks. The problem isn't that it doesn't work. The problem is what happens after you use it.
How microfibre cloths harm the environment
The microplastic pollution crisis
Each time a microfibre cloth is washed, it sheds thousands to hundreds of thousands of tiny synthetic fibres that enter wastewater systems. According to research published in Marine Pollution Bulletin, washing a single load of synthetic fabrics can release up to 700,000 microfibres into the water supply.
These fibres are too small for most wastewater treatment facilities to completely filter out, meaning they flow directly into rivers, lakes, and oceans. A study by Imogen Napper and Richard Thompson found that fabric type and washing conditions significantly affect microfibre release, with some materials shedding far more than others during routine washing.
For Canada, this is a particularly significant problem. The Great Lakes — which provide drinking water to millions of Canadians — are among the most contaminated bodies of water for microplastic pollution. Research by McGill University found that microplastics, including those from textiles, are present in the St. Lawrence River at levels comparable to the world's most polluted oceans.
Once in the water, these plastic fibres don't degrade — they just break down into smaller and smaller pieces, persisting in the environment for centuries.
Harm to marine life and Canada's food chain
Microfibre pollution doesn't just affect water quality; it's devastating to marine life. Small fish, plankton, and other aquatic organisms mistake microplastics for food, ingesting particles that provide no nutrition and can cause physical harm.
A study by Fisheries and Oceans Canada has shown that fish from Canadian waters contain microplastics in their digestive systems, which can lead to malnutrition, reproductive issues, and increased mortality rates.
More concerningly, microplastics bioaccumulate up the food chain. When small organisms ingest microfibres, those plastics travel through larger predators and, eventually, to humans. Since seafood is a dietary staple for many Canadians — particularly in coastal communities — this represents a direct threat to public health.
Research from Environment and Climate Change Canada indicates that microplastics have been found in table salt, drinking water, and even human feces, proving that plastic fibres have fully entered our food system. We're literally consuming the plastic pollution we've created.
Fossil fuel dependence and carbon emissions
Beyond the shedding problem, microfibre cloths contribute to climate change from the moment they're manufactured.
These cloths are derived from petroleum-based products — primarily polyester and nylon — which are made from fossil fuels. The production of these materials is energy-intensive, releasing large amounts of carbon dioxide into the atmosphere. According to Canada's Energy Regulator, the oil and gas sector accounts for a quarter of the nation's greenhouse gas emissions.
By supporting the production and use of synthetic fabrics like microfibre, we're indirectly contributing to Canada's carbon footprint. And unlike natural fibres such as cotton, hemp, or bamboo, microfibres cannot be composted or safely disposed of at the end of their life. They typically end up in landfills or incinerators, both of which contribute to environmental degradation.
Even dry use releases plastic
Microfibre cloths shed fibres even when you're using them dry. When you dust with microfibre, you're releasing plastic particles into the air in your home. These particles settle on surfaces and eventually make their way into indoor dust.
While indoor microplastic exposure is still being studied, researchers have already found microplastics in human lung tissue and blood samples. The full health implications aren't yet understood, but the trajectory isn't encouraging.
Why microfibre cloths aren't as "eco-friendly" as advertised
Many microfibre cloths are marketed as sustainable because they're reusable and reduce the need for paper towels or disposable cleaning products. While it's true that microfibre cloths reduce single-use waste, their overall environmental impact is far more damaging.
Here's why they're not a truly sustainable choice:
Plastic shedding — Each wash releases hundreds of thousands of microplastics into waterways—contributing to the estimated 35% of microplastic pollution in oceans that comes from synthetic textiles.
Non-biodegradability — They don't break down naturally and persist in the environment for centuries, continuing to fragment into smaller particles.
Petroleum-based production — They rely on fossil fuel extraction, contributing to greenhouse gas emissions and global warming.
End-of-life waste — They cannot be easily recycled or composted. Textile recycling infrastructure is limited, and mixed synthetic fabrics like microfibre are particularly difficult to process.
Invisible pollution — Unlike plastic bottles or bags that we can see and measure, microfibre pollution is invisible — which makes it easier to ignore but no less harmful.
Sustainable alternatives to microfibre cloths
The good news is that genuinely sustainable alternatives exist that clean just as effectively without the plastic pollution problem. Natural fibres have been cleaning homes effectively for centuries — we just got distracted by newer technology.
Natural fibre cloths
Cotton huck towels — These lint-free, tightly woven cotton towels are what professional window cleaners used for decades before microfibre existed. They're exceptionally absorbent, leave no streaks on glass, and can be washed hundreds of times.
Best for: Glass, mirrors, stainless steel, general wiping
Organic cotton — Biodegradable, durable, and can be washed repeatedly. Look for GOTS-certified organic cotton, which is free from harmful chemicals and pesticides.
Best for: All-purpose cleaning, kitchen surfaces
Swedish dishcloths — Made from cellulose (wood pulp) and cotton, these biodegradable cloths can absorb 15 times their weight in liquid. When they wear out after months of use, they can be composted.
Best for: Countertops, spills, general kitchen cleaning
Bamboo — A fast-growing, renewable resource that requires less water and no pesticides to grow. Bamboo cloths are naturally antibacterial, highly absorbent, and an excellent alternative to microfibre.
Best for: Bathrooms, kitchen surfaces, general cleaning
Hemp — One of the most sustainable textiles available. It requires minimal water and is naturally resistant to pests, meaning it doesn't rely on chemical treatments. Hemp cleaning cloths are exceptionally durable and biodegradable.
Best for: Heavy-duty cleaning, scrubbing
Linen — Naturally antimicrobial and highly durable, linen becomes softer and more absorbent with each wash. A bit of an investment upfront, but they'll last for years.
Best for: Kitchen surfaces, glassware, fine cleaning
Upcycled cotton rags -- Instead of purchasing new materials, consider using old t-shirts, towels, or linens as cleaning cloths. Not only does this reduce waste, but it also extends the life of existing fabrics. True sustainability isn't just about buying better; it’s about utilizing what already exists.
Best for: General cleaning, any household task
Wool — For dusting specifically, wool cloths naturally attract and trap dust particles through static electricity without synthetic fibres. Wool is compostable and does not release microplastics when washed.
Best for: Dusting furniture, electronics, delicate surfaces
Natural fibre sponges and brushes
For scrubbing tasks, consider:
Cellulose sponges — Made from wood pulp, they're biodegradable and work just as well as synthetic sponges
Coconut fibre scrubbers — Tough enough for stuck-on food without scratching surfaces
Natural bristle brushes — Perfect for grout, tile, and detail cleaning
Making the switch: Practical tips
Start with what you replace most often — If you're constantly reaching for microfibre for glass cleaning, replace those first with cotton huck towels. Test what works for your routine.
Use what you already have — Before buying anything new, repurpose old cotton t-shirts, towels, and linens. Cut them into cleaning-sized squares.
Designate cloths by task — Just like with microfibre, assign specific natural-fibre cloths to specific jobs (bathrooms, kitchen, dusting). This prevents cross-contamination and keeps things organized.
Adjust your technique slightly — Natural fibres work a bit differently than microfibre. You might need to:
Rinse and wring cloths more frequently during use
Use slightly more water for some tasks
Dampen cotton cloths before dusting (rather than using them dry)
Switch to a dry cloth for final buffing on glass
Wash properly — Natural fibres are easier on the environment, but you still want them to last:
Wash in warm or hot water
Avoid fabric softener (it reduces absorbency)
Hang dry when possible to extend their life
No special care needed—they're far more forgiving than synthetic materials
What if you already own microfibre cloths?
Don't throw them away — that just sends more plastic to the landfill immediately. Instead:
Use them until they wear out — The environmental damage from washing them is already happening, but manufacturing new products (whether microfibre or natural alternatives) also has an environmental cost. Get your use out of what you own.
Reduce microplastic shedding when washing them:
Wash in cold water (reduces fibre release)
Use liquid detergent instead of powder (less agitation)
Wash full loads (less friction between items)
Consider a microfibre-catching laundry bag like Guppyfriend or Cora Ball — they can capture many microplastics before they reach waterways
If you use a laundry filter, dispose of captured fibres by placing them in a sealed non-recyclable bag and adding to your household trash
Air dry instead of machine drying when possible
Repurpose for non-washing tasks — Use old microfibre for garage cleaning, car detailing, or other jobs where you won't wash them frequently.
Replace gradually with natural alternatives — As microfibre cloths wear out, replace them with natural fibre options. This spreads out the cost and lets you test what works best for your cleaning routine.
How Canadians can take action
If you're concerned about the environmental impact of microfibre cloths, here are practical steps you can take today:
Switch to sustainable alternatives — Opt for natural fibre cloths instead of microfibre. Even switching half your cleaning cloths makes a difference.
Use a laundry filter — If you must continue using microfibre, consider installing a microfibre filter in your washing machine to capture plastic fibres before they enter wastewater.
Support microplastic research and advocacy — Organizations like Ocean Wise and Oceana Canada are actively working to combat microplastic pollution. Consider supporting their work or staying informed about their initiatives.
Spread awareness — Educate friends and family about the environmental costs of microfibre products. Most people genuinely don't know about this issue. Sharing information facilitates change.
Support businesses making better choices — Choose cleaning services and products that prioritize natural materials over synthetics. Consumer demand drives industry change.
Advocate for better infrastructure — Contact your local representatives about improving wastewater treatment facilities to better filter microplastics, and support policies that address plastic pollution at the source.
Final thoughts: Progress over perfection
Here's the thing about sustainable living: it's complicated, and there's rarely a perfect solution. Microfibre cloths seemed like the right choice when we first learned about them. The fact that we're now discovering they have serious environmental downsides doesn't mean we failed — it just means our understanding evolved, and we're now responding to new information.
The goal isn't to shame anyone for using microfibre or to create anxiety about every cleaning choice. It's to make informed decisions with the information we now have.
Natural fibre cleaning cloths are a genuinely better alternative for the environment. They work beautifully for most cleaning tasks, they're biodegradable, and they don't shed plastic into our water systems. For the vast majority of home cleaning, you truly don't need synthetic materials.
Will switching your cleaning cloths single-handedly save the Great Lakes? No. But microplastic pollution is a massive problem that requires action at every level — from individuals to industries. Your choices do contribute to demand, and demand shapes what manufacturers produce and what becomes normalized.
Plus, there's something quietly satisfying about cleaning with simple, natural materials that humans have used effectively for centuries. Cotton, linen, and cellulose work. They've always worked. We just got enticed by technology that seemed more advanced.
If you're ready to make the switch, start small. Replace one type of cleaning cloth. See how it works. Adjust your routine. Then replace another. Before long, you'll have a cleaning kit that's genuinely sustainable — not just marketed that way.
Every small change helps in the fight against plastic pollution. Are you ready to make the switch?
Need help with sustainable, microfibre-free cleaning solutions for your home? As an independent cleaner and the founder of EcoEthical Cleaning, I understand the science behind every cleaning method and choose approaches that protect both your surfaces and our environment. Contact me for a free, no-obligation estimate and experience professional cleaning that's both effective and responsible. I serve Toronto’s Harbourfront-CityPlace district and surrounding areas.
Sources & further reading
Katie Okamoto, "Your Laundry Sheds Harmful Microfibers. Here's What You Can Do About It," Wirecutter, New York Times, August 5, 2021
Imogen E. Napper, Richard C. Thompson, "Release of synthetic microplastic plastic fibres from domestic washing machines: Effects of fabric type and washing conditions," Marine Pollution Bulletin, ScienceDirect, October 12, 2016
"Provincial and Territorial Energy Profiles," Canada Energy Regulator, September 10, 2024
"Science assessment of plastic pollution," Environment and Climate Change Canada, October 2020
McGill University research on microplastics in the St. Lawrence River
Fisheries and Oceans Canada studies on microplastics in Canadian fish populations
For more information on combating microplastic pollution:
Why social media cleaning hacks are often wrong (and how to spot the bad advice)
You've seen them: viral cleaning hacks promising miracle results with common household items. But here's the uncomfortable truth—many of these tips don't work, and some can permanently damage your home. The problem isn't just uninformed creators; it's that social media's structure incentivizes engagement over accuracy. Algorithms reward novelty and controversy, not truth. Creators need constant content to earn money, which leads to untested methods going viral. Before trying that trending hack, learn to spot logical fallacies, understand basic chemistry, and apply rational inquiry. Your surfaces—and your wallet—will thank you.
You're scrolling through Instagram at 11 PM when you see it: a video of someone mixing dish soap, vinegar, and baking soda into a bottle, claiming it's the "ultimate all-purpose cleaner that professionals don't want you to know about." The comments are filled with fire emojis and people tagging their friends. It has 2.3 million views. It must work, right?
Not necessarily. In fact, probably not.
Welcome to the world of "cleanfluencers"—social media personalities who've built massive followings by sharing cleaning tips, hacks, and product recommendations. Some are knowledgeable professionals sharing genuinely helpful advice. But many are content creators who've discovered that cleaning videos get exceptional engagement, regardless of whether the advice actually works or could even damage your home.
The problem isn't just that bad cleaning advice wastes your time and money. It's that some of these viral hacks can make cleaning problems worse, permanently damage surfaces, or create dangerous chemical reactions that put your health at risk. And the very structure of social media—the algorithms, the monetization, the pressure to constantly create content—incentivizes quantity over accuracy.
If you've ever tried a viral cleaning hack that didn't work, damaged something, or left you wondering "wait, should I really be mixing those chemicals?", this article is for you. I’ll dig into how social media cleaning content actually works, why misinformation spreads so easily, and most importantly, how to tell the difference between legitimate advice and viral nonsense.
Let's start by understanding the landscape.
The cleanfluencer ecosystem: Where the content lives
Cleaning content has exploded across virtually every social media platform, but each one has its own flavour and format that shapes what gets shared.
TikTok: The viral hack factory
TikTok is ground zero for viral cleaning hacks, and it's easy to see why. The platform's algorithm is designed to surface engaging content to massive audiences quickly, regardless of the creator's follower count. A single video can go from zero to millions of views overnight.
What's trending: Quick transformations (often sped up), satisfying before-and-after reveals, "secret" product combinations, dramatic reactions to results, and controversial takes that spark debate in comments.
The format influence: TikTok videos max out at 10 minutes but perform best under 60 seconds. This creates pressure to oversimplify, skip important context (like safety warnings or surface compatibility), and prioritize visual drama over practical accuracy.
Popular cleanfluencers promote: Miracle product combinations (often chemically questionable), "forbidden" cleaning methods, extreme cleaning scenarios, and product "dupes" that supposedly work better than expensive alternatives.
Instagram reels: TikTok's slightly more polished cousin
Instagram Reels borrowed TikTok's format and many of the same trends have migrated over. The main difference is Instagram's slightly older, more affluent demographic.
What's trending: Aesthetic cleaning routines, product recommendations with affiliate links, home organization combined with cleaning, and luxury cleaning product showcases.
The format influence: Similar time constraints to TikTok, with added pressure for visual polish. This often means content is more styled but not necessarily more accurate.
Popular cleanfluencers promote: "Clean girl aesthetic" routines, expensive cleaning products positioned as investments, cleaning as self-care, and curated product collections.
YouTube: Long(er)-form content (but not always better)
YouTube allows for longer, more detailed content, which theoretically should mean more accurate information. Sometimes it does. Often it doesn't.
What's trending: Deep cleaning videos, product testing and reviews, cleaning routines, and "satisfying" cleaning compilations.
The format influence: Longer videos need to maintain engagement, which often leads to dramatic thumbnail promises ("I DIDN'T CLEAN MY OVEN FOR 5 YEARS"), clickbait titles, and stretched-out content with important information buried or omitted.
Popular cleanfluencers promote: Viral products (often the same ones being pushed on TikTok), cleaning product hauls, sponsored content disguised as genuine recommendations, and elaborate cleaning systems.
Facebook: Where misinformation gets shared by your aunt
Facebook cleaning content tends to be less about individual influencers and more about viral posts that get shared repeatedly through groups and personal networks.
What's trending: Text-based "miracle" cleaning recipes, before-and-after photos (often without methodology), cleaning group recommendations (some good, many questionable), and nostalgia-based cleaning methods ("my grandmother always did this").
The format influence: Facebook’s older demographic relies on different trust signals. People are more likely to trust advice that seems to come from peers or has been "tested" by their social network, even without verification.
Popular content promotes: DIY cleaner recipes (accuracy varies wildly), old wives' tales presented as proven methods, and products positioned as "chemical-free" alternatives.
Pinterest: The recipe card graveyard
Pinterest is where cleaning "recipes" go to be saved, reshared, and rarely fact-checked. It's a visual search engine where content gets divorced from its source and recirculated endlessly.
What's trending: Printable cleaning schedules, DIY cleaner recipes, infographics about cleaning methods, and "natural" cleaning solutions.
The format influence: Content is optimized for saving and sharing, not accuracy. Once a pin goes viral, it continues circulating regardless of whether it's been debunked.
Popular content promotes: All-purpose DIY cleaners (many chemically ineffective), cleaning "systems" and schedules, essential oil cleaning solutions, and visual before-and-after comparisons.
The economics of cleanfluencing: Why accuracy takes a back seat
Understanding why so much cleaning misinformation exists requires understanding how social media creators make money. The incentive structures don't reward accuracy, they reward engagement and volume.
How cleanfluencers actually make money
Creator fund payments (TikTok, YouTube): Platforms pay creators based on views and engagement. More videos = more views = more money. The accuracy of those videos? Not factored into payment.
Affiliate commissions:When a creator links to a product and you buy it, they earn a percentage (typically 3-10%). This creates incentive to recommend products whether they work well or not—the commission is the same either way.
Sponsored content: Brands pay creators directly to feature products. These deals can range from a few hundred dollars to tens of thousands for top creators. The creator's job is to make the product look good, not to provide unbiased assessment.
Ad revenue (YouTube): Longer videos with more ads generate more revenue. This incentivizes stretching content, adding drama, and creating series rather than comprehensive single videos.
Product lines and partnerships: Successful cleanfluencers often launch their own cleaning products or cleaning tools, creating financial incentive to drive followers toward those products specifically.
Course and e-book sales: Many cleanfluencers sell cleaning courses, guides, or systems—positioning themselves as experts, regardless of actual credentials.
The content treadmill problem
Social media algorithms reward consistency and frequency. Creators who post daily or multiple times per week get more algorithmic promotion than those who post weekly or monthly. This creates enormous pressure to constantly generate new content.
Here's the problem: there are only so many legitimate, tested, safe cleaning methods. Once you've covered the basics, you need to either:
Repeat yourself (which gets boring and hurts engagement)
Go deeper with proper research (time-consuming and doesn't guarantee virality)
Start making things up or sharing untested methods (fast, novel, and more likely to go viral)
Guess which option most creators choose?
The virality trap
Not all content performs equally. Social media algorithms prioritize content that generates engagement—comments, shares, saves, and watch time. What generates engagement?
Content that works moderately well: Gets a polite "thanks for sharing" and a few saves.
Content that's shocking, controversial, or seemingly revolutionary: Gets massive engagement as people debate, share with friends, and express surprise.
This creates perverse incentives. A video showing the correct way to clean hardwood floors (barely-damp mop, pH-neutral cleaner) might get 10,000 views. A video claiming you can clean hardwood floors with a mixture of vinegar, olive oil, and lemon juice (don't do this!) might get 5 million views because it's novel, surprising, and sparks debate in the comments.
The algorithm doesn't care that the second video will damage people's floors. It only cares that more people are engaging with it.
The credibility problem
Here's an unsettling truth: you don't need credentials, training, or expertise to become a cleanfluencer. You just need a camera and a willingness to create content.
Some popular cleaning content creators are former professional cleaners or have relevant education. Many are not. Some are simply people who like cleaning and started sharing videos. Some actively misrepresent their expertise to build authority.
The platforms don't verify credentials or fact-check content (except in narrow cases like medical or electoral misinformation). There's no quality control. Terrible advice and excellent advice look exactly the same in your feed—it's up to you to tell the difference.
The echo chamber effect
Once a creator builds an audience, they're surrounded by followers who trust them. Negative feedback gets filtered out (comments can be deleted, critics can be blocked), and the creator receives constant positive reinforcement regardless of content accuracy.
This creates an environment where creators can genuinely believe they're providing good advice even when they're not. They see thousands of comments saying "this worked great!" (often from people who haven't actually tried it, or who can't yet see the long-term damage), and dismiss the occasional "this damaged my countertop" comment as user error.
The bottom line
The economic model of social media content creation rewards:
Volume over accuracy
Novelty over effectiveness
Engagement over truth
Entertainment over education
This doesn't mean all cleanfluencers are intentionally spreading misinformation. Many believe they're helping. But the system they operate within actively incentivizes the spread of questionable advice, and that's what we need to understand to protect ourselves.
Common logical fallacies in viral cleaning content
Now that we understand why misinformation spreads, let's talk about how to spot it. Viral cleaning content relies heavily on logical fallacies—errors in reasoning that make bad arguments seem convincing. Here are the most common ones you'll encounter.
Appeal to nature ("it's natural, so it's better")
What it sounds like: "This all-natural cleaner uses only ingredients you can pronounce!" or "Why use harsh chemicals when vinegar and essential oils work just as well?"
Why it's a fallacy: "Natural" doesn't mean safe, effective, or appropriate. Arsenic is natural. So is poison ivy. Many synthetic cleaning products are safer and more effective than natural alternatives for specific tasks. The issue isn't whether something is natural or synthetic—it's whether it works safely for the intended purpose.
Example in the wild: A TikTok video promoting essential oil cleaning spray for disinfection. Essential oils smell nice, but they're not EPA-approved disinfectants and won't kill dangerous bacteria or viruses. Claiming they're "better because they're natural" is both misleading and potentially dangerous—especially if you have pets.
Appeal to tradition ("my grandmother did this")
What it sounds like: "This is how people cleaned before all these chemicals existed" or "Old-fashioned methods are always better."
Why it's a fallacy: Traditional methods aren't inherently better. We've developed new approaches because old ones often weren't effective or were unnecessarily labour-intensive. Yes, some traditional methods work well. Others persist despite being suboptimal. Tradition alone isn't evidence of effectiveness.
Example in the wild: Posts claiming you should clean everything with vinegar because "that's what people used to do." While vinegar has legitimate uses, it's not appropriate for all surfaces.
Anecdotal evidence ("it worked for me")
What it sounds like: "I've been doing this for years and never had a problem" or "Everyone in the comments says this worked for them!"
Why it's a fallacy: Individual experiences don't constitute reliable evidence. People might not notice slow damage, might be using different surfaces or products than you, might have different definitions of "clean," or might be experiencing placebo effect. Thousands of anecdotes still aren't the same as controlled testing.
Example in the wild: A viral post about using bleach on grout with hundreds of comments saying "this worked great!" Missing context: bleach can break down grout over time, but the damage isn't immediately visible. The people celebrating success might discover deteriorating grout years later without connecting it to the method.
False equivalence ("it's just like...")
What it sounds like: "If it can clean your toilet, imagine what it can do for your sink!" or "This removes stains from clothes, so it'll work on upholstery too."
Why it's a fallacy: Different surfaces have different properties, tolerances, and cleaning requirements. A method that works on one surface can damage another. Materials aren't interchangeable just because they seem similar.
Example in the wild: Videos suggesting you can clean natural stone countertops the same way you clean laminate. Stone is porous and acid-sensitive; many cleaners safe for laminate will permanently damage stone.
Cherry-picking ("look at this amazing result!")
What it sounds like: Before-and-after photos showing dramatic improvements, without mentioning failed attempts, time required, or special circumstances.
Why it's a fallacy: Showing only successes while hiding failures creates false impression of reliability. Maybe this method worked once out of ten tries. Maybe the "before" photo was staged to look worse. Maybe important context was omitted.
Example in the wild: A dramatic before-and-after of a "miracle" grout cleaner, without mentioning that the grout was sealed beforehand, the creator used professional-grade equipment, and it took four hours of work.
Appeal to authority (misrepresented)
What it sounds like: "Professional cleaners use this" or "This is what experts recommend" (without citing actual sources or when the creator isn't actually a professional).
Why it's a fallacy: Vague appeals to unnamed authorities aren't evidence. Even when sources are cited, they might be misrepresented or taken out of context. Credentials matter, but they need to be verifiable and relevant.
Example in the wild: A creator claiming "professional cleaners swear by this mixture" when promoting a homemade solution that most professionals would never use because better alternatives exist.
Hasty generalization ("this cleans everything")
What it sounds like: "The only cleaner you'll ever need!" or "Use this on literally any surface in your home."
Why it's a fallacy: No single cleaner is appropriate for every surface. Different materials require different approaches. Universal claims are almost always overstated.
Example in the wild: Videos promoting a single DIY mixture for cleaning everything from windows to hardwood floors to granite countertops. In reality, what's safe for glass might damage wood, and what's fine for sealed surfaces might etch stone.
Correlation implies causation ("I did this and that happened")
What it sounds like: "I started using this method and my surfaces look better than ever!" without considering other factors.
Why it's a fallacy: Just because two things happened together doesn't mean one caused the other. Maybe they also started cleaning more frequently. Maybe they replaced old sponges. Maybe seasonal humidity changed. Maybe they’re simply paying more attention now.
Example in the wild: Someone credits their DIY cleaner for improved results when they've also switched to better cloths and started cleaning twice as often. The improvement might have nothing to do with the cleaner itself.
Conspiracy thinking ("they don't want you to know this")
What it sounds like: "Big Cleaning doesn't want you to know about this simple solution" or "The cleaning industry hates this one simple trick."
Why it's a fallacy: Implying there's a conspiracy to hide effective methods positions questionable advice as "secret knowledge" while dismissing legitimate criticism as industry protection. It's a rhetorical shield against fact-checking.
Example in the wild: Videos claiming that mixing dish soap, vinegar, and baking soda is a "secret" that cleaning product companies don't want you to know—when actually, this mixture is chemically ineffective (the acid and base neutralize each other) and professionals don't use it because it doesn't work.
Recognizing fallacies in the wild
These fallacies rarely appear alone. A typical viral cleaning video might combine appeal to nature ("all-natural ingredients!"), anecdotal evidence ("worked perfectly for me!"), hasty generalization ("cleans everything!"), and conspiracy thinking ("they don't want you to know!") all in 60 seconds.
Learning to recognize these patterns helps you evaluate claims more critically, regardless of how many views or likes they have.
How to apply rational inquiry to cleaning hacks
Now that you can spot logical fallacies, let's talk about how to actually evaluate cleaning advice using rational inquiry—a systematic approach to determining what's likely true versus what's likely nonsense.
Step 1: Consider the source
Ask yourself:
Does this person have relevant credentials or professional experience?
Do they disclose potential conflicts of interest (sponsorships, affiliates, their own products)?
Do they cite sources for their claims or just present personal opinion?
What's their content history? Are they primarily an entertainer or educator?
Do they acknowledge limitations and risks, or only promote benefits?
Red flags:
No identifiable expertise in cleaning, chemistry, or materials science
Every video promotes products with affiliate links
Claims of being a "professional" without specifics about experience
Credential misrepresentation ("I worked in a cleaning company" could mean they were a receptionist)
Defensive or dismissive responses to legitimate questions
Green flags:
Verifiable professional experience (business name, years in industry)
Transparent about sponsorships and conflicts of interest
Cites specific sources (studies, manufacturers, industry standards)
Acknowledges when they don't know something
Discusses trade-offs and limitations of methods
Step 2: Understand the chemistry
You don't need a chemistry degree, but understanding basic principles helps immensely:
Acids and bases neutralize each other. Mixing vinegar (acid) with baking soda (base) creates mostly water and carbon dioxide. The bubbling looks impressive but actually reduces cleaning effectiveness. If a video promotes this combination as a miracle cleaner, the creator doesn't understand basic chemistry.
Not all cleaners are interchangeable. Surfactants (like dish soap) work differently than solvents (like alcohol) which work differently than abrasives (like baking soda) which work differently than oxidizers (like bleach). Different cleaning problems require different approaches.
"Natural" chemicals are still chemicals. Vinegar is acetic acid. Baking soda is sodium bicarbonate. Essential oils are complex chemical compounds. Being derived from nature doesn't change their chemical properties or make them universally safe.
Some chemical reactions are dangerous. Mixing bleach with vinegar or ammonia creates toxic gases. Combining certain cleaners can damage surfaces or create hazardous fumes. "Experiment and see what works" is dangerous advice.
pH matters for surfaces. Acidic cleaners (vinegar, lemon juice) will etch natural stone, damage grout sealant, and can strip wood finishes. Alkaline cleaners can damage some metals and finishes. The right cleaner depends on the surface.
Step 3: Think about surface compatibility
Before trying any cleaning method, ask:
What material am I cleaning? Natural stone? Sealed or unsealed wood? Laminate? Stainless steel? Glass? Ceramic? The answer determines what will be safe to use.
Does it have a protective coating? Many surfaces have finishes, sealants, or coatings that can be damaged even when the underlying material is durable. Abrasives can dull glossy paint. Acids and bases can strip sealants. Solvents can damage many finishes.
How hard is the surface? If a method involves abrasion (like Magic Erasers or powdered cleaners), is the abrasive softer or harder than the surface? Harder abrasives will scratch.
Is the surface porous or non-porous? Porous surfaces (unsealed stone, unfinished wood, grout) absorb liquids and can be damaged by too much moisture or stained by coloured cleaners.
What does the manufacturer recommend? If your flooring, countertops, or appliances came with care instructions, those should be your starting point. Warranty-voiding methods should raise red flags.
Step 4: Look for verifiable evidence
Strong evidence includes:
Peer-reviewed studies
Manufacturer testing and specifications
Industry standards and recommendations (from organizations like IICRC, ISSA, or BSCAI)
Repeated validation from independent sources
Long-term results documentation (not just immediate before-and-after)
Weak evidence includes:
"Everyone says this works" (appeal to popularity)
Before-and-after photos without methodology
Testimonials without verification
Viral spread without fact-checking
Claims without sources
Questions to ask:
Can I find this method recommended by multiple credible sources?
Do professional cleaners actually use this technique?
Are there any professional organizations or manufacturers that endorse this?
What happens if I search for "<method name> + damage" or "<method name> + doesn't work"?
Are there any long-term studies or tests of this method?
Step 5: Consider what's being left out
Viral content optimizes for engagement, not completeness. What important information might be missing?
Common omissions:
Safety warnings (ventilation, chemical reactions, protective equipment)
Surface compatibility limitations ("works great!" ...on what exactly?)
Time requirements (sped-up video hides that it took two hours)
Special conditions (their water is soft; yours is hard)
Product specifications (not all “dish soap" is identical)
Failure rate (how often does this not work?)
Long-term effects (it looks good now, how about in a week?)
Cost analysis (is this actually cheaper than the alternatives?)
Skill requirements (is this only easier for someone with lots of experience?)
Red flag questions:
Why isn't this person showing themselves doing this in real-time?
Why are there no cautionary statements about what not to do?
Why don't they specify which surfaces this works on?
Why isn't there any mention of what could go wrong?
Step 6: Test conservatively (if you decide to try it)
If a method seems plausible after your evaluation, test it cautiously:
Start with an inconspicuous area. Look for a hidden spot inside a cabinet, behind furniture, or in a low-traffic area. Never start with the most visible surface.
Use the mildest version first. If they recommend concentrated vinegar, try it diluted first. If they say scrub hard, try gentle pressure first.
Wait and observe. Immediate results aren't the only concern. Check again in 24 hours, one week, and one month for delayed damage like discolouration, dullness, or deterioration.
Document your test. Take photos before, immediately after, and during follow-up checks (under the same lighting conditions). This helps you notice subtle changes.
Stop at the first sign of problems. If you notice any dulling, discolouration, texture change, or surface damage, stop immediately. Don't assume it will get better or that you're "doing it wrong."
Compare to known-good methods. Test both the viral method and a conventional approach. Which actually works better? Is the viral method really superior, or just novel?
Step 7: Update your conclusions as you learn
Rational inquiry isn't about being right immediately—it's about being willing to change your mind when evidence warrants it.
Be willing to admit:
"I thought this would work, but it didn't"
"This seemed safe, but it caused damage"
"The viral video made this look easy, but it's actually complicated"
"I was wrong to recommend this to friends"
Keep learning:
Pay attention to long-term results of methods you've tried
Notice if professional cleaners avoid methods that are popular online
Stay updated on product recalls or safety warnings
Be skeptical of your own confirmation bias (wanting something to work because it's convenient or popular)
This process sounds like a lot of work, and sometimes it is. But it gets faster with practice, and it's far less work than repairing damaged surfaces or dealing with ineffective cleaning methods.
Case study: The viral dawn + vinegar shower cleaner
Let's apply everything we've discussed to one of the most viral cleaning hacks online: the Dawn dish soap and vinegar mixture for cleaning soap scum in showers.
The claim
Across TikTok, Instagram, and Pinterest, you'll find thousands of posts claiming that mixing equal parts Dawn dish soap with white vinegar creates an incredible shower cleaner that removes soap scum effortlessly. The promise: spray it on, wait 30 minutes, wipe off, and your shower will be spotless without scrubbing.
Step 1: Consider the source
What we find:
This hack appears across thousands of accounts, from professional cleaners to home accounts
Most posts don't explain why this works, just that it does
Many include affiliate links to spray bottles or cleaning supplies
Some sources have cleaning experience; many don't
Almost none discuss limitations or risks
Initial assessment: The widespread sharing suggests some people find it effective, but lack of expertise in many sources and absence of risk discussion is concerning.
Step 2: Understand the chemistry
Dawn dish soap is a surfactant that breaks down oils and grease. This is why it's excellent for dishes—it lifts away food oils.
White vinegar is acetic acid (typically around a 5% concentration), which can dissolve mineral deposits and cut through some types of buildup.
When combined: The acid (vinegar) and the surfactant (Dawn) don't neutralize each other the way an acid and base would, so theoretically both components could work in the mixture. The surfactant helps the vinegar spread and cling to surfaces, and the acid helps break down soap scum (which often contains mineral deposits).
Chemical plausibility: Unlike the baking soda + vinegar combination, this mixture isn't chemically nonsensical. The components can work together.
Concerns:
Vinegar is acidic and can damage certain surfaces
The mixture doesn't have any controlled ratio or standardized formulation
Different brands of dish soap have different formulations
"Wait 30 minutes" means prolonged acid exposure to surfaces
Step 3: Think about surface compatibility
Where this might be safe:
Ceramic tile (glazed)
Porcelain fixtures
Glass shower doors
Where this could cause damage:
Natural stone (marble, travertine, limestone, slate)—acid will etch
Grout —acid can break down both the sealant and binder of grout, making it more brittle
Some metal finishes (brushed nickel, chrome, oil-rubbed bronze)
Acrylic shower surrounds (the acid can dull the finish over time)
Key realization: Most viral posts don't specify which surfaces are safe. They present this as universal, but it's not appropriate for all shower types.
Step 4: Look for verifiable evidence
What we find:
Lots of anecdotal "this worked for me!" testimonials
Before-and-after photos (though cleaning methodology isn't always clear)
Some professional cleaners endorse modified versions
No manufacturer recommendations to combine these products
Some reports of damage to grout and stone surfaces
Mixed reviews on effectiveness—works well for some, not at all for others
Assessment: Evidence is mostly anecdotal. Success seems highly dependent on water hardness, shower surfaces, and severity of soap scum buildup.
Step 5: Consider what's being left out
Common omissions in viral posts:
No mention that this will damage natural stone
No mention that this works best on fresh soap scum, not years of buildup
No comparison to commercial soap scum removers
No discussion of grout sealant degradation with repeated use
No mention that different water types affect results
Why this matters: People try this on marble showers, expecting it to remove years of neglect, and wind up with damaged stone.
Step 6: The reality check
When we apply rational inquiry, here's what we learn:
What's accurate:
This mixture CAN remove soap scum from appropriate surfaces
The chemistry makes sense
It's less toxic than some commercial cleaners
For mild soap scum on safe surfaces, it can work reasonably well
What's overstated:
It's not a miracle solution—commercial soap scum removers often work better
It doesn't work "without scrubbing" for anything beyond light buildup
It's not safe for all shower surfaces
It's not a "professional secret"—professionals typically use variations of this approach daily
What's missing:
Surface safety warnings
Proper ventilation requirements
Realistic expectations about scrubbing needs
Long-term effects on grout sealant
Comparison to purpose-made products
Step 7: The informed conclusion
Is this hack completely wrong? No. It can work for certain applications.
Is it presented accurately online? No. It's oversold, limitations are hidden, and risks are ignored.
Should you use it? Maybe, with important caveats:
Safe for ceramic tile (keep if off grout) and glass shower doors
Effective for mild-to-moderate soap scum
Still requires scrubbing for tough buildup
Test in inconspicuous area first
Never use on natural stone showers
Not dramatically better than quality commercial cleaners
Can destroy unsealed grout and degrade grout sealant with frequent use
Better approach: For ceramic tile and glass showers, a quality commercial soap scum remover is often more effective, faster-acting, and formulated to be safe for typical bathroom surfaces. If you prefer DIY, this mixture can work—but understand its limitations and use it appropriately.
The lesson
Even when a viral hack has some legitimate basis, the way it's presented online often strips away crucial context, overstates benefits, and hides risks. Your job isn't to reject everything from social media—it's to evaluate it critically and understand what you're really doing.
Final thoughts: Becoming a smarter consumer of cleaning content
Social media has democratized information sharing, and that's brought both benefits and problems. Anyone can share cleaning tips—which means both expert professionals and complete amateurs have equal voices. The algorithm doesn't distinguish between them.
In my opinion, this isn’t going to change anytime soon. Platforms will continue to prioritize engagement over accuracy. Cleanfluencers will keep creating content under the same economic pressures. Viral misinformation will continue to spread as long as controversy and novelty gets more views than careful, measured advice.
What can change is how you engage with this content.
Remember these key principles:
Virality doesn't equal validity. A video with 10 million views isn't more accurate than one with 10,000. It's just more engaging—and sometimes misinformation is more engaging than truth.
Entertainment and education aren't the same thing. Enjoy satisfying cleaning videos for what they are, but don't assume dramatic transformations represent realistic, safe methods.
Credentials matter. A professional cleaner's advice generally carries more weight than a home content creator's, though neither is infallible. Look for verifiable expertise.
If it sounds too good to be true, it probably is. "One ingredient cleans everything!" No, it doesn't. "This miracle method professionals don't want you to know!" They're probably not using it because it doesn't work well.
Your surfaces are not worth risking. Replacing damaged countertops, refinishing floors, or repairing etched stone is expensive. When in doubt, err on the side of caution and use methods with established track records.
Chemical reactions are real. Mixing random products together is not "experimenting"—it's potentially creating dangerous situations or ineffective solutions. Understand what you're combining and why.
Context matters enormously. What works for someone with soft water might not work with hard water. What's safe for their floors might damage yours. Surface compatibility isn't optional information.
The good news is that you don't need to become a cleaning expert or chemistry major. You just need to think critically, ask good questions, and be willing to research before trying something that could cause harm or waste your time.
Professional cleaning isn't about secrets or tricks. It's about understanding surfaces, choosing appropriate methods and products, and applying them correctly. That knowledge comes from experience, training, and yes—sometimes from social media, when the source is credible and the advice is sound.
The next time you see a viral cleaning hack, you'll know how to evaluate it. That's real power—not the power to remove a stain in 10 seconds, but the power to distinguish what actually works from what just looks impressive in a 60-second video.
And that's worth more than any cleaning hack.
Tired of sorting through conflicting cleaning advice? EcoEthical Cleaning strives to bring professional expertise and planet-safe, science-based methods to every job. Contact me for a free, no-obligation estimate. Proudly serving Toronto’s Harbourfront and surrounding neighbourhoods.
Sources & further reading
"Does Influencer Marketing Really Pay Off?", Harvard Business Review
"Fallacies", Stanford Encyclopedia of Philosophy
"Use household chemicals safely", Health Canada
“Cleaning products—working safely”, Canadian Centre for Occupational Health and Safety