
How to care for precious metal objects & surfaces in your home sustainably
Your gold jewellery, silver candlesticks, copper cookware, and brass fixtures deserve proper care–but most commercial metal polishes are loaded with harsh chemicals. Here's how you can keep precious metal surfaces gleaming using safe, sustainable products that won't harm your family or the environment.
If you've ever reached for a bottle of commercial silver polish and stopped to read the ingredients label, you may have put it right back on the shelf. Many conventional metal cleaners contain ammonia, phosphates, and synthetic compounds that are hard on skin, harsh on the environment, and when rinsed down the drain contribute to water pollution.
The good news is that you don't need any of that. Whether you're maintaining antique silverware passed down through your family, keeping copper cookware in your kitchen gleaming, or preserving the brass hardware on your condo door, there are effective, gentle, and planet-friendly ways to get the job done.
This guide covers everything you need to know about caring for common precious and decorative metals — gold, silver, copper, and brass — using sustainable products and methods that are safe for your household and the environment.
Why your choice of metal cleaner matters
Precious and decorative metals are porous and reactive. That means the products you use to clean them don't just sit on the surface – they interact with the metal at a chemical level. Harsh commercial polishes can accelerate oxidation over time, leave behind residues that dull the finish, or strip protective patinas that actually help preserve older pieces.
Beyond the objects themselves, there's the question of what happens after cleaning. When chemical-laden rinse water makes its way into the sewer system, it can affect local waterways, including Lake Ontario, which serves as the source of drinking water for millions of people in the Greater Toronto Area.
Choosing sustainable, biodegradable cleaning products isn't just an ethical preference – it's a practical one. Natural cleaning agents tend to be gentler on metals, are safer for households with children or pets, and are far less likely to cause the kind of surface damage that leads to costly repairs or replacements down the road.
Caring for gold
What to know
Pure gold (24 karat) is highly resistant to tarnish, but most gold objects in your home are alloyed with other metals like copper or silver to increase their durability. It's these alloys that can tarnish or dull over time, not the gold itself.
What to use
The safest and most effective sustainable method for cleaning gold at home is a simple warm water soak with a small amount of plant-based dish soap. Add a few drops to a bowl of warm (not hot) water, submerge the gold piece for 10–15 minutes, then gently scrub with a soft natural-bristle brush (a repurposed toothbrush with natural fibres works beautifully) and rinse thoroughly.
What to avoid
Avoid ultrasonic cleaners for pieces with set gemstones, as vibrations can loosen settings. Steer clear of chlorine bleach entirely — it can break down gold alloys and cause permanent discolouration. And despite what you may have read online, toothpaste is too abrasive for regular gold cleaning.
Storing gold
Store gold pieces individually in soft cloth pouches or lined boxes to prevent scratching. Keeping pieces separated also reduces the frequency with which they need to be cleaned.
Caring for silver
What to know
Silver tarnishes as a result of a chemical reaction with sulphur compounds in the air — a process called oxidation. Tarnish appears as a yellowish or dark grey film and is entirely natural. It does not damage the silver itself, but it does affect appearance.
What to use
One of the most effective and surprisingly eco-friendly methods for removing silver tarnish involves items you likely already have at home: baking soda, aluminum foil, and boiling water. Line a baking dish or sink with aluminum foil (shiny side up), lay your silver pieces on top, sprinkle generously with baking soda, and pour boiling water over everything. The electrochemical reaction transfers the tarnish from the silver to the foil – no scrubbing required! Rinse thoroughly and buff dry with a soft, natural cotton or linen cloth.
What to avoid
Commercial dip-style silver polishes work quickly but are among the harshest products available for home metal care. Many contain thiourea, a compound that is toxic to aquatic organisms. Repeated use of dip polishes can also erode the fine details in ornate silverware over time.
Avoid rubber gloves when handling silver, as rubber can actually accelerate tarnishing.
How to store
The best sustainable strategy for silver is prevention. Silverware without wood components is best stored by wrapping in buffered acid-free tissue. Unbleached cotton flannel is a great sustainable alternative that will help protect any wood on your silver pieces. Both options will slow the oxidation process significantly. Silica gel packets placed near silver in display cabinets can also help manage humidity levels and reduce tarnishing–and can be refreshed by adding to a low heat (200 degrees fahrenheit (90 celcius)) for a couple of hours.
Silver cloth can also be used as an extra layer of protection.
Caring for copper
What to know
Copper is one of the most beautiful and functional metals you'll find in a home, appearing in everything from cookware and bakeware to decorative bowls, planters, and architectural accents. Over time, copper develops a green or blue-green patina called verdigris, which – unlike rust – is not structurally damaging and is actually prized in many decorative applications. Whether you want to restore the bright orange-red shine or preserve a natural patina is entirely a matter of preference.
What to use
Important note: Many copper items are lacquered to prevent tarnishing, which can be damaged by acidic cleaning methods and should only be cleaned with soap and water. If unsure, one way to test for lacquered copper is to briefly apply a mild acid to its surface. If it doesn’t change colour, then it is lacquered and the methods described below should not be used to clean it.
The most classic and effective natural copper cleaner is a mixture of salt and either lemon juice or white vinegar. The mild acid in the lemon or vinegar dissolves the copper oxide that causes tarnish, while the salt provides gentle mechanical abrasion.
Apply the mixture with a soft cloth, rub gently in circular motions, rinse thoroughly with warm water, and dry immediately to prevent water spots.
For copper cookware with stubborn spots, a paste of flour, salt, and white vinegar (equal parts) applied and left for 10 minutes before rinsing is particularly effective. Ketchup (yes, really) also works well due to its acetic acid content, and it's a fun option to have on hand.
What to avoid
Never use steel wool or abrasive scrubbing pads on copper, as these will leave permanent scratches. Avoid letting copper cookware soak in water for extended periods, as this can cause surface pitting. And be cautious about cleaning copper with a patina you want to preserve–acids will remove it.
How to store
After cleaning and drying copper thoroughly, apply a very thin coat of beeswax or food-grade mineral oil to create a protective barrier that slows re-oxidation. This is particularly useful for decorative copper pieces that aren't washed regularly.
Caring for brass
What to know
Brass–an alloy of copper and zinc–is common in homes as door hardware, light fixtures, decorative objects, and musical instruments. Like copper, brass tarnishes over time, developing a dark, dull surface layer. It's worth noting that much modern "brass" hardware is actually brass-plated steel or zinc, which responds differently to cleaning than solid brass.
What to use
Unlacquered brass
The same lemon-and-salt or vinegar-and-salt method that works for unlacquered copper is equally effective on solid, unlacquered brass. For a gentler everyday clean, warm water with a small amount of plant-based dish soap and a soft natural-bristle brush is sufficient. For heavily tarnished pieces, a mixture of lemon juice and a cream of tartar – applied, left for a few minutes, then rinsed – produces excellent results.
Lacquered brass
Like copper, many modern brass fixtures are lacquered to protect the finish and slow tarnishing. Lacquered brass should only ever be cleaned with warm water and a soft cloth. Any acidic or abrasive cleaner will damage the lacquer coating and cause uneven tarnishing underneath. If the lacquer on your fixtures is already peeling or damaged, it may be worth having it professionally stripped and either re-lacquered or left as living, unlacquered brass.
What to avoid
Avoid ammonia-based cleaners on brass entirely, as they can cause permanent discolouration. Do not use rough scrubbing pads. And as with copper, always dry brass thoroughly after cleaning to prevent water spotting.
General sustainable tips for all precious metals
A few principles apply across the board when it comes to sustainable metal care at home:
Always dry metals thoroughly after cleaning. Water left on metal surfaces accelerates oxidation and tarnishing.
Use soft, natural-fibre cloths for buffing and drying. Unbleached cotton, linen, and wool felt are all excellent choices that won't scratch or leave synthetic fibre residue.
Wear cotton gloves when handling polished silver and gold pieces. The oils on your hands can leave prints that accelerate tarnishing.
Clean metal objects less frequently but more thoroughly. Over-cleaning, even with gentle methods, causes wear over time. Develop a regular but measured routine.
Look for locally made, certified natural metal polishes when choosing a commercial option. Several Toronto and Ontario-based producers offer beeswax-based and plant-derived products that are effective and environmentally responsible.
Dispose of cleaning solutions responsibly. Even natural cleaning rinse water, particularly from heavy tarnish removal, should be diluted before going down the drain.
What to look for in a sustainable metal cleaning product
If you prefer to purchase a ready-made metal cleaner rather than making your own, here's what to look for on the label:
Plant-derived or mineral-based ingredients with recognisable names
No phosphates, ammonia, sodium hypochlorite (bleach), or synthetic fragrances
Biodegradable formula — look for third-party certification where possible
Recyclable or compostable packaging
Produced by a Canadian or local Ontario company when possible, to reduce transportation emissions
As the founder of EcoEthical Cleaning, I've built my practice around the same principles outlined in this guide — using only thoughtfully chosen, sustainable products that protect both your home and our shared environment here in Toronto. Whether it's the care of precious surfaces or a thorough top-to-bottom clean, every service I provide across the Harbourfront District and surrounding neighbourhoods is fragrance-free, biodegradable, and delivered with attention to the details other cleaners overlook.
If you're ready to experience cleaning that's as conscientious as it is thorough, reach out today for a free, no-obligation estimate.
Complete guide to oven cleaning: The chemistry, the methods, and how to protect your investment
Oven cleaning requires understanding chemistry, appliance construction, and warranty protection. Learn the science behind how alkaline cleaners work through saponification, why self-cleaning ovens need different care than standard models, what components you can safely remove, and which cleaning methods protect your investment. This comprehensive guide covers everything Toronto homeowners need to know about maintaining their ovens without voiding warranties or causing damage.
Oven cleaning sits at the intersection of chemistry, appliance care, and household safety. Whether you own a self-cleaning model or a standard oven, understanding how different cleaning methods work — and more importantly, what can damage your appliance — makes the difference between maintaining your investment and voiding your warranty.
This comprehensive guide explains the science behind oven cleaning products, clarifies the critical differences between self-cleaning and non-self-cleaning ovens, and provides detailed guidance on what you can safely clean and what components should never be removed or exposed to certain chemicals.
Understanding oven construction and warranty considerations
Before discussing cleaning methods, it’s important to understand what you're working with, and what's at stake if you damage it.
What's covered by oven warranties
Most oven warranties cover functional components like heating elements, igniters, thermostats, burners, control boards, and oven sensors. However, warranties typically exclude cosmetic items including racks, hinges, shelves, door glass, and interior thermal shells.
More importantly, warranties can become void when:
Commercial oven cleaners are used on self-cleaning oven interiors
Unauthorized repair providers service the appliance
Components are improperly removed or modified
Cleaning products damage heating elements or sensors
The oven hasn't been properly maintained per manufacturer guidelines
Self-cleaning vs. non-self-cleaning ovens: fundamental differences
The construction of your oven determines what cleaning methods are safe to use.
Self-cleaning ovens have:
Special heat-resistant porcelain enamel coating on interior walls
Reinforced door locks that engage during cleaning cycles
Additional insulation to contain extreme heat
Temperature sensors that monitor the cleaning cycle
Non-self-cleaning ovens have:
Standard porcelain enamel or painted interior finish
Basic door seals without high-temperature locks
Standard insulation
Cannot withstand the extreme temperatures of a self-clean cycle
This fundamental construction difference means that self-cleaning ovens require different care than standard ovens, particularly regarding what chemicals you can use.
Newer vs. older ovens: removable components
Oven design has evolved significantly, affecting what you can safely remove for cleaning.
Older ovens (pre-2010):
Heating elements typically bolt to the oven back
Can usually be carefully unbolted and moved forward for cleaning behind them
Oven racks were heavy-duty steel, designed for high heat
Door often removable via simple hinge clips
Simpler electronic controls, easier to avoid during cleaning
Newer ovens (2010-present):
Many have hidden heating elements beneath the oven floor
"Continuous clean" or catalytic liners that shouldn't be scrubbed
Specialized racks with coatings that can't handle self-clean cycle heat
More complex door removal systems
Sensitive electronic control panels and displays
What should NOT be removed without professional help:
Heating elements - bake (lower) or broil (upper) elements
Temperature sensors
Door gaskets or seals
Control panel components
Interior light covers (unless the manual specifically states they are removable)
Catalytic liner panels
Removing components you shouldn't can void warranties and create safety hazards. When in doubt, consult your oven's manual or contact the manufacturer.
The chemistry of oven cleaning: how products actually work
Understanding the science behind oven cleaning helps you choose appropriate methods and avoid damaging your appliance.
The problem: baked-on grease and carbonized food
When you cook, especially at high temperatures, fats and oils polymerize — they transform from liquid oils into hard, solid substances bonded to oven surfaces. This process intensifies each time you use the oven, creating layers of increasingly difficult buildup.
Additionally, sugars caramelize and proteins denature, creating carbonized deposits that resist simple soap and water.
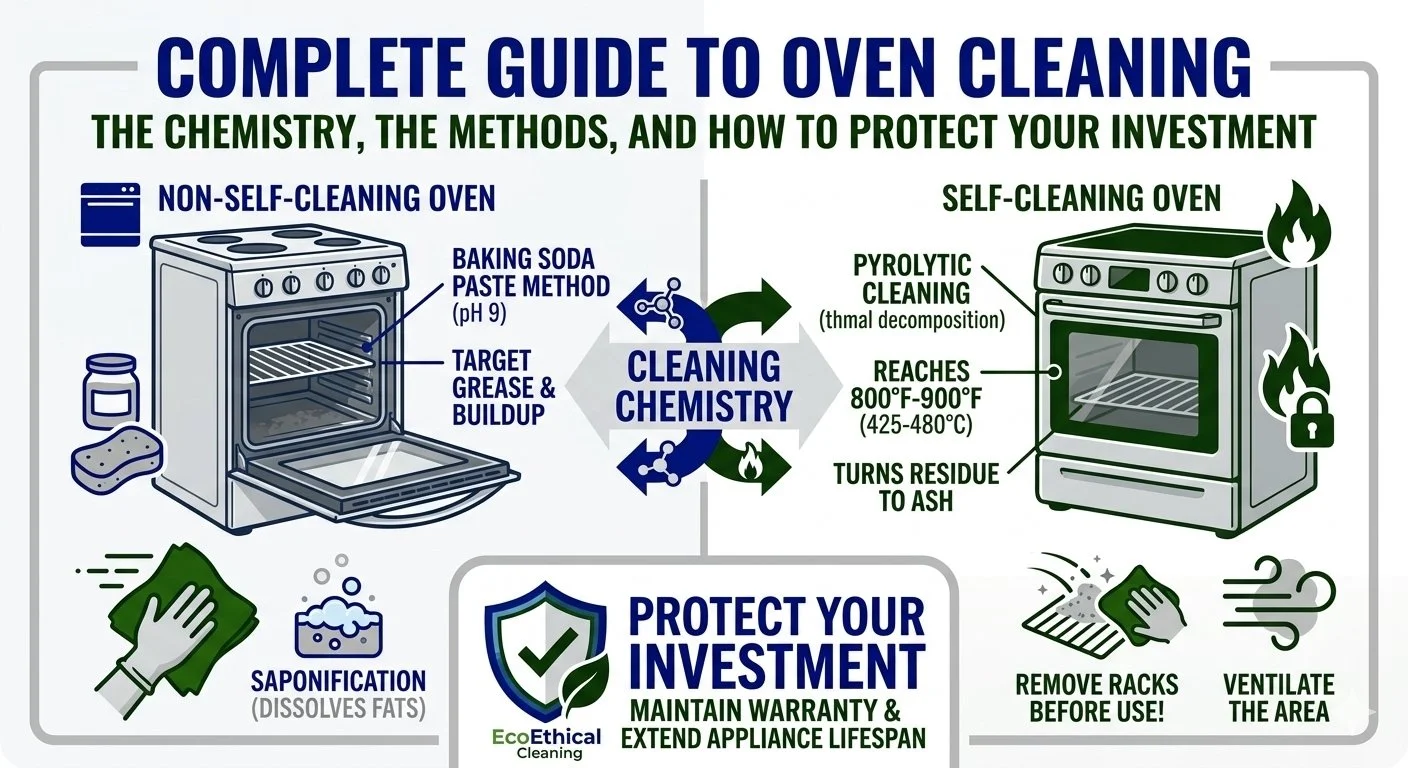
How alkaline cleaners work: saponification
Most commercial oven cleaners contain sodium hydroxide (NaOH), also known as caustic soda or lye. The primary cleaning action is saponification — converting fats and oils into soap.
When sodium hydroxide contacts grease, it causes a chemical reaction that transforms the baked-on fats into water-soluble soap-like substances. The reaction works because sodium hydroxide is highly alkaline (pH 14), and this extreme alkalinity breaks apart the molecular bonds in fats.
The process involves:
Hydroxide ions (OH⁻) break down the ester bonds in fats
This produces fatty acid salts and glycerol
The resulting soap is water-soluble and easily wiped away
The same reaction works on proteins and carbonized material, though less effectively than on fats.
Why this matters: Understanding saponification explains why alkaline cleaners work so effectively, but also why they're dangerous. The same chemical property that dissolves baked-on grease can also damage human skin and certain oven components.
Why oven cleaners require specific pH levels
Commercial oven cleaners maintain pH levels between 11 and 14:
pH 11-12: Effective for light to moderate buildup
pH 13-14: Required for severe, carbonized buildup
The higher the pH, the more aggressive the cleaner — but also the more dangerous to humans and potentially damaging to certain oven finishes.
The role of solvents in oven cleaners
Beyond alkaline ingredients, commercial oven cleaners contain organic solvents like:
Ethylene glycol: Helps dissolve polar molecules
Methylene chloride: Dilutes greasy grime
Monoethanolamine: Acts as a surfactant, helping the solution spread evenly
These solvents attack different components of oven soil than alkaline cleaners do, providing comprehensive cleaning action.
How high-heat pyrolytic cleaning works
Self-cleaning ovens use pyrolysis (thermal decomposition) to clean. When oven temperatures reach 800-900°F (425-480°C), organic materials (food, grease, carbon deposits) burn off and reduce to ash.
The chemistry:
Organic compounds break down at high temperature
Carbon bonds rupture, releasing carbon dioxide and water vapour
What remains is fine white or grey ash (primarily calcium carbonate and metal oxides)
This ash is easily wiped away with a damp cloth
Why this method works: Pyrolysis achieves what chemical cleaners cannot — complete breakdown of carbonized material. However, it requires specialized oven construction to safely contain these extreme temperatures.
How steam cleaning works
Steam-clean cycles use water and moderate heat (around 250-400°F / 120-200°C) to soften baked-on food.
The process:
Water placed in the oven bottom vaporizes
Steam condenses on cooler oven surfaces
Moisture penetrates and softens dried food particles
Softened debris can be wiped away
Limitation: Steam cleaning is effective only for light, recent soiling — not for carbonized, long-term buildup.
Self-cleaning ovens: proper use and protection
Self-cleaning ovens require specific care to maintain their specialized coating and ensure safe operation.
How the self-clean cycle works
The self-clean cycle heats the oven to approximately 800°F to 900°F (425-480°C) for 1.5 to 3 hours, depending on the soil level. At these temperatures, food residue incinerates into ash. The oven door automatically locks when internal temperature reaches 600°F (315°C) to prevent oxygen from entering the cavity and causing fire. The door remains locked until the oven cools to a safe temperature.
What NEVER to use in self-cleaning ovens
Commercial oven cleaners (containing sodium hydroxide): Never use commercial oven cleaners inside a self-cleaning oven's interior. Residue from oven cleaners will damage the inside of the oven during a self-cleaning operation. The extreme heat of the self-clean cycle causes oven cleaner residue to emit dangerous fumes and permanently damage the special porcelain enamel coating.
Even cleaners marketed as "safe for self-cleaning ovens" should be used with caution and rinsed completely before running a self-clean cycle.
Why this damages the oven: The porcelain enamel in self-cleaning ovens is formulated specifically for high-heat cleaning. Chemical residues alter this coating's properties, causing:
Discolouration and staining
Coating breakdown and flaking
Reduced effectiveness of future self-clean cycles
Release of toxic fumes during cleaning
Abrasive scrubbers: Metal scrapers, steel wool, and wire brushes damage the interior walls and make the self-cleaning process less effective. The porcelain enamel coating, once scratched, loses its smooth, non-stick properties and allows food to adhere more easily.
Remove the oven racks
Removing oven racks before self-clean cycles is crucial but often overlooked.
The intense heat of self-cleaning cycles can warp, discolour, and permanently damage oven racks. More critically, racks can expand and contract during the cycle, potentially damaging or completely ruining the porcelain oven cavities that the racks slide into — the grooves on the oven's side walls.
Exception: Some newer ovens have racks specifically designed to remain in place during self-clean cycles. Check your manual — if the racks aren't explicitly labelled "self-clean safe," remove them.
How to clean racks separately:
Remove racks before starting self-clean cycle
Soak them in hot water with dish soap, or place them in an air-tight bag and spray with a food-safe degreaser, and let sit for 4-6 hours
Scrub with non-abrasive brush or sponge
For stubborn buildup: create paste of baking soda and water, apply, let sit overnight, then scrub
Proper preparation for self-clean cycles
Before starting a self-clean cycle:
Remove everything:
All oven racks (unless the oven manual specifies they're self-clean safe)
Oven thermometer
Any cookware, foil, or liners
Food debris large enough to catch fire
Wipe up heavy spills: The self-clean cycle works best on baked-on residue, not large spills or chunks of food. Clean up everything you can manually, and let the self-clean cycle handle the rest.
Ensure ventilation:
Turn on range hood and set to highest setting
Open windows in kitchen and adjacent rooms
Consider using an air purifier during the cycle
Keep children and pets away from the kitchen
Never leave completely unattended: Check periodically for excessive smoke or unusual smells that might indicate a problem.
After the self-clean cycle
Once the cycle completes and the oven has cooled (the door will unlock automatically):
Wipe away white or grey ash with a damp cloth
Clean the door and areas around the gasket with mild detergent
The gasket itself should only be wiped gently, never scrubbed
Inspect for any damage to interior surfaces
How often to use self-clean cycles
Self-cleaning cycles should be used 2-3 times per year maximum. Overuse of the self-cleaning function may wear out heating elements or damage thermal fuses — the safety devices that prevent overheating.
Between self-clean cycles, spot-clean with baking soda paste or mild detergent to reduce buildup.
Steam-clean cycles: A gentler alternative
Many newer ovens offer steam-clean cycles as a less intensive option.
When to use steam clean:
Light, recent spills
Routine maintenance between deep cleans
When self-clean cycle isn't warranted
The process:
Add 1 cup of water to the oven bottom (or follow manual's specific instructions)
Start steam-clean cycle (usually 20-60 minutes)
After cycle completes, wipe interior with damp cloth
For stubborn spots, rub detergent into residue before starting cycle
Benefits:
Faster than self-clean (under 1 hour vs. 3+ hours)
Uses less energy
Lower temperatures mean less smoke and fumes
Safer for more frequent use
Limitations:
Only effective for light soiling
Won't handle carbonized, baked-on buildup
May require multiple cycles for moderate messes
Non-self-cleaning ovens: safe manual cleaning methods
Non-self-cleaning ovens require different approaches — and fortunately, you have more flexibility in product choices.
The safest, most eco-friendly method: baking soda paste
Baking soda (sodium bicarbonate) is mildly alkaline and works through a gentler version of the same chemical process as commercial cleaners — it breaks down fats and food residues without harsh corrosiveness.
The formula:
Mix ½ cup baking soda with 3 tablespoons water
Adjust ratio to create spreadable paste (consistency of toothpaste)
Application process:
Remove oven racks and set aside
Spread paste over entire interior, avoiding heating elements
Pay special attention to particularly greasy areas
Let sit overnight (12+ hours) to allow chemical reaction to complete
Use damp cloth to wipe away dried paste
Repeat if necessary for stubborn spots
Why this works: Baking soda's alkalinity (pH around 9) is sufficient to begin saponification of fats without the dangerous corrosiveness of sodium hydroxide cleaners. The longer dwell time compensates for its lower chemical strength.
When commercial cleaners are appropriate
For non-self-cleaning ovens with severe buildup, commercial cleaners may be necessary. However, choose carefully and use safely.
If using commercial oven cleaner:
Read and follow manufacturer’s instructions
Choose products with lower caustic soda content when possible (to minimize risks to personal safety, the oven, and the environment)
Always wear rubber gloves and safety goggles
Ensure excellent ventilation (open windows, use fans)
Keep children and pets away from the area
Follow product dwell time precisely — don't leave on longer than directed
Rinse thoroughly with clean water
Consider wearing a carbon filter mask if sensitive to fumes
Application for commercial cleaners:
Protect surrounding areas with newspaper or drop cloth
Remove everything from oven
Apply cleaner evenly, avoiding heating elements and sensors
Close oven door and let sit for time specified on label
Wipe away cleaner with damp sponges or cloths
Rinse multiple times with clean water
Turn oven on low (around 200°F / 95°C) for 10-15 minutes to burn off any remaining residue
Air out kitchen thoroughly
What to avoid on standard ovens
Even though non-self-cleaning ovens are more tolerant of various cleaners, some things still cause damage:
Never use:
Steel wool or metal scrapers (scratch the finish)
Harsh abrasive powders (damage enamel coating)
Bleach (doesn't break down grease effectively and is too harsh)
Ammonia (fumes are dangerous, less effective than alkaline cleaners)
Cleaning oven doors and glass
Oven door glass requires special attention because grease and condensation accumulate on both interior and exterior surfaces.
For exterior glass:
Glass cleaner or vinegar-water solution (1:1 ratio)
Wipe with clean, soft cloth
Buff dry for streak-free finish
For interior glass:
Create baking soda paste
Apply to glass, avoiding rubber gasket
Let sit 15-30 minutes
Scrub gently with non-abrasive sponge
Wipe clean with damp cloth
For between-the-glass cleaning: consult manual for disassembly instructions
Never scrub the door gasket (the rubber seal around the door). Clean it only by wiping gently with a damp cloth. Aggressive cleaning damages the seal, affecting oven efficiency and safety.
What you can and cannot remove for cleaning
Knowing what's safe to remove prevents warranty voidance and safety hazards.
Safe to remove (with care):
Oven racks: All models allow rack removal. To remove:
Wait for oven to cool completely
Pull rack forward until it stops
Lift front of rack slightly while pulling
Guide rack out of oven
Oven door (many models): Many oven doors can be removed for easier cleaning, but the process varies significantly by brand and model.
Common removal process:
Open door to first stop position (about 45 degrees)
Locate hinge locks or clips on both sides
Move locks to unlocked position
Close door slightly
Lift door up and out
Critical: Always consult your specific oven's manual before attempting door removal. Improper removal can damage hinges or cause the door to fall.
Never remove or disturb:
Heating elements: Both bake elements (bottom) and broil elements (top) are wired directly to the oven's electrical system. Clean around elements, not by removing them.
Temperature sensor: Usually a thin metal probe extending into the oven cavity. This controls oven temperature accuracy. Bending, removing, or cleaning it aggressively can make your oven temperature unreliable.
Door gasket: The rubber or silicone seal around the door should never be removed. Clean only by gentle wiping.
Catalytic liners: Some ovens have special self-cleaning panels on the side walls. These should never be removed or scrubbed—they're designed to clean themselves during oven operation.
Light cover: While some models allow light cover removal, many don't. Check your manual. Forcing removal can crack the cover or damage the mounting system.
Cleaning heating elements safely
You cannot remove heating elements for cleaning, but you can clean around them:
Wait for oven to cool completely
Wipe elements gently with damp cloth
Don't scrub or use chemicals directly on elements
Clean the area beneath and around elements carefully
If food has baked onto elements, run oven at 350°F (175°C) for 30 minutes—this will burn off most residue
Why elements burn clean: Heating elements reach temperatures high enough to carbonize food debris during normal operation. Most buildup burns off on its own.
Maintenance practices that protect your oven
Proper maintenance extends oven lifespan and maintains warranty coverage.
After each use:
Wipe up spills immediately: Fresh spills clean easily. Once they’ve been baked on, they become increasingly difficult to remove with each use of the oven.
Use the oven light to monitor cooking: Opening the door during cooking causes temperature fluctuation and potential spillovers. Use the oven light and window instead.
Place baking sheets under potentially messy dishes: Casseroles, pies, and dishes with liquid ingredients should sit on baking sheets to catch any overflow.
Weekly:
Wipe down interior with damp cloth and mild detergent
Clean door glass inside and out
Wipe control panel with damp cloth (never spray cleaner directly on controls)
Check that vents aren't blocked by grease or debris
Monthly:
Deep-clean oven racks
Check door seal for damage or gaps
Clean beneath and around oven (pull-out drawer or storage area)
Test that oven reaches correct temperature with oven thermometer
Quarterly:
Run self-clean cycle (if applicable)
Or perform thorough manual cleaning with baking soda
Inspect heating elements for damage
Check that oven light works
What voids warranties:
Understanding warranty restrictions helps you avoid costly mistakes:
Actions that void most oven warranties:
Using commercial oven cleaners in self-cleaning oven interiors
Lining oven bottom with aluminum foil (interferes with heat distribution and can damage heating elements)
Making unauthorized modifications or repairs
Failing to follow manufacturer's maintenance guidelines
Using the oven for purposes other than cooking (like storage or space heating)
Physical damage from impacts or dropping items
Always register your oven warranty and keep proof of purchase. If you need repairs, use only authorized service providers to maintain warranty validity.
Special considerations
Hard water and mineral buildup
Water hardness affects steam-clean cycles. Minerals in the water can leave deposits on oven surfaces after steam cleaning.
Prevention:
Use distilled water instead of tap water for steam-clean cycles
Wipe down oven thoroughly after steam-clean cycles
If mineral deposits appear (white, chalky residue), remove with vinegar-water solution
Winter considerations
Cold winters mean:
More oven use for holiday cooking
Kitchen ventilation challenges (can't always open windows)
Temperature fluctuations affecting oven performance
Winter oven care:
Plan self-clean cycles for mild days when you can ventilate properly
Consider breaking large self-clean jobs into smaller, more manageable sessions
Use range hood faithfully to capture moisture and prevent condensation
Small kitchen ventilation
Many condos and older homes have limited kitchen ventilation. This complicates oven cleaning, particularly self-clean cycles.
Solutions:
Run bathroom fan in addition to range hood during self-clean cycles
Use air purifiers with activated carbon filters
Schedule self-clean cycles when you can be away for a few hours but return to ventilate
Consider steam-clean cycles more frequently as alternative to less-frequent self-clean cycles
When to call professionals
Some oven cleaning situations require expert help.
Situations requiring professional oven cleaning:
Extreme buildup from years of neglect
Post-renovation cleaning (construction dust and debris)
Self-clean cycle has failed to clean adequately
Strong, persistent odours that won't clear
You have physical limitations preventing safe manual cleaning
You don't have time for the potentially hours long process manual cleaning requires
Situations requiring appliance repair:
Self-clean cycle won't start or complete
Door won't unlock after self-clean cycle
Heating elements visibly damaged or not glowing red
Error codes appearing on display
Oven not reaching correct temperature
The following situations require immediate professional attention:
Gas smell
Electrical issues or sparking
Choosing a professional oven cleaning service
Look for services that:
Use eco-friendly, non-toxic cleaning methods
Are fully insured
Understand the difference between self-cleaning and standard ovens
Remove oven racks and clean them separately
Protect your floors and surrounding areas
Offer satisfaction guarantees
Creating a sustainable oven cleaning routine
Effective oven maintenance doesn't require harsh chemicals or expensive products.
A sustainable approach:
Tier 1: Prevention (after each use)
Wipe up fresh spills immediately with a damp cloth
Use baking sheets to catch overflow
Keep oven interior as clean as possible through mindful cooking
Tier 2: Light maintenance (every 2-4 weeks)
Quick wipe-down with baking soda paste for any visible blemishes
Clean the door glass inside and out
10-minutes of routine maintenance will keep your oven reasonably clean
Tier 3: Deep cleaning (whenever heavier, baked-on deposits appear)
Run the self-clean cycle (for self-cleaning ovens)
Or do an overnight baking soda paste treatment (for standard ovens)
Deep-clean oven racks separately
Thorough door glass cleaning
Tier 4: Professional help (as needed)
For moves, major buildup, or thorough restoration
Particularly valuable before holidays when oven use increases and free time is limited
This tiered approach prevents buildup, reduces the need for harsh chemicals, and extends oven lifespan.
Common oven cleaning mistakes to avoid
Learning from others' mistakes saves you time, money, and potential oven damage.
Using self-clean cycle with racks inside
This is the most common error. The extreme heat warps metal racks and damages the porcelain coating on rack guides. Damage is permanent and reduces rack lifespan significantly.
Not allowing proper cool-down time
After self-clean cycles, ovens remain extremely hot—sometimes for hours. Forcing the door open risks:
Burns from escaping heat
Damage to door lock mechanism
Injury from sudden release of super-heated air
Wait until the oven automatically unlocks.
Mixing cleaning chemicals
Never mix different cleaning products, especially:
Ammonia + bleach = toxic chloramine gas
Vinegar + bleach = toxic chlorine gas
Commercial oven cleaner + anything else = unpredictable, dangerous reactions
Use one product at a time, rinse thoroughly between products if switching.
Spraying cleaners directly on controls
Liquid seeping into electronic controls can cause these components to fail. Always spray cleaner onto a cloth, then wipe the controls.
Forgetting to rinse thoroughly
Chemical residue left in ovens causes:
Fumes during cooking
Strange tastes in food
Potential health concerns
Damage to oven components from repeated heating of chemical residue
Always rinse multiple times with clean water, then run oven briefly to burn off any remaining traces.
Using commercial cleaners in self-cleaning ovens
This causes permanent damage to the special coating and creates dangerous fumes during the next self-clean cycle.
Lining oven bottom with foil
Many people line oven bottoms with foil to catch spills. This:
Blocks air circulation
Causes uneven heating
Can damage heating elements
Voids most warranties
Use baking sheets on the rack below your food instead.
Conclusions:
Effective oven cleaning requires understanding three key things:
The chemistry of how cleaners work
Your specific oven type and its limitations
What methods protect rather than damage your appliance
For self-cleaning ovens:
Never use commercial oven cleaners inside the cavity
Remove racks before self-clean cycles
Use the feature 2-3 times annually at most
Spot-clean between cycles with baking soda paste and a good rinse afterwards
For standard ovens:
Baking soda paste is safest and most eco-friendly
Commercial cleaners work for severe buildup but require careful use
Clean regularly to prevent extreme buildup
Consider professional help for move-in/move-out situations
For all ovens:
Consult your manual before removing any components
Never remove heating elements or temperature sensors
Maintain regular cleaning to prevent warranty-voiding neglect
Use appropriate products for your oven type
The goal isn't a sterile oven — it's an appliance that functions efficiently, cooks food without imparting strange tastes or odours, and lasts its expected 15-20 year lifespan. Chemical-free methods like baking soda achieve this without harsh fumes, environmental impact, or risk to your oven's specialized coatings.
As the founder of EcoEthical Cleaning, I understand that oven cleaning is one of those tasks many Toronto homeowners prefer to delegate. I use eco-friendly methods appropriate for your specific oven type, protect removable components, and never use chemicals that might void warranties or damage specialized coatings.
Whether you tackle oven cleaning yourself or hire professionals, understanding the science and safety considerations ensures you make informed decisions that protect your investment and your household.
Need professional oven cleaning in Toronto that respects your appliance and your health? EcoEthical Cleaning provides thorough, eco-friendly oven cleaning services throughout the Harbourfront District and surrounding neighbourhoods. Contact me for a free, no obligation estimate.
The "magic" behind melamine: What to know about Magic Erasers
Magic Erasers seem to work like, well, magic—removing stubborn scuff marks and stains with just water. But here's the truth: there's no magic involved. These white sponges are made from melamine foam, which works through abrasion—essentially acting as very fine sandpaper. While they're brilliant for certain tasks, they can also damage glossy finishes, strip protective coatings, and dull polished surfaces. Understanding what Magic Erasers actually are and how they work will help you use them effectively without accidentally ruining your walls, appliances, or furniture. The real magic? Knowing when not to reach for one.
If you've ever used a Magic Eraser to remove a stubborn scuff mark and watched it disappear like, well, magic — you've probably wondered what sorcery is actually happening. These unassuming white sponges seem to defy the laws of cleaning, removing marks that resist everything else you've tried. No chemicals needed. Just water and a bit of elbow grease.
But here's the thing: there's no magic involved. What's actually happening is both interesting and important to understand. Magic Erasers aren't cleaning in the traditional sense at all — they're essentially very fine sandpaper that's abrading away the top layer of whatever you're cleaning. Sometimes that's exactly what you need. Other times? You're slowly destroying your surfaces without realizing it.
If you've been using Magic Erasers on everything in your home, or if you're curious about what these miracle sponges actually are and whether they're safe for all of your surfaces, this deep dive will answer all your questions. I'll explore what melamine foam is, how it actually works, its environmental impact, and most importantly — which surfaces you should never, ever use it on.
What are Magic Erasers? A brief history
Magic Erasers are the brand name for cleaning sponges made from melamine foam, originally developed by the German company BASF in 1984. The foam was initially created for industrial applications — primarily as thermal insulation and soundproofing material in construction and automotive industries. It wasn't until the early 1990s that Japan realized this industrial foam had remarkable cleaning properties when wet.
Procter & Gamble (the company behind Mr. Clean) gave it an inspired name, and launched the Magic Eraser in 2003. The product became an instant phenomenon, generating hundreds of millions in sales and spawning countless generic melamine foam competitors.
The genius of the Magic Eraser wasn't inventing something new — it was recognizing that an existing industrial material could solve a common household problem. Marketing it as "magic" certainly didn't hurt either.
What makes them different from regular sponges?
Unlike traditional cleaning sponges made from cellulose or polyurethane, Magic Erasers are made from melamine resin that's been foamed into an extremely porous, open-cell structure. Under a microscope, melamine foam looks like a three-dimensional network of incredibly hard, thin strands — almost like a rigid spider web made of plastic.
This structure is what gives Magic Erasers their unique properties:
Extreme porosity: About 99% of the sponge is air, with only 1% being actual melamine material. This creates millions of microscopic edges and surfaces.
Hardness: Melamine resin is significantly harder than typical sponge materials, which is why it can abrade surfaces.
Microstructure: Each strand in the foam acts like a tiny abrasive fibre, collectively creating a very fine "sandpaper" effect.
Water activation: When dampened, the foam becomes slightly more flexible while maintaining its abrasive properties, making it effective without being overly aggressive.
It's essentially a highly engineered abrasive cleaning tool disguised as a soft, innocent-looking sponge.
How Magic Erasers actually clean: The science of abrasion
Magic Erasers don't clean through chemistry — they clean through physics. Specifically, through a process called mechanical abrasion.
What is abrasion?
Abrasion is the process of wearing away material through friction and scraping. It's the same principle behind sandpaper, nail files, and exfoliating scrubs. When you rub an abrasive material against a surface, you're physically removing microscopic layers of that surface.
Think of it this way: if you have a mark on a piece of wood, you could either dissolve it with a chemical cleaner (which breaks down the stain molecules) or you could sand away the top layer of wood that contains the mark. Magic Erasers take the second approach.
How melamine foam abrades surfaces
When you wet a Magic Eraser and rub it against a surface, here's what's actually happening at a microscopic level:
The foam compresses: Water makes the melamine foam slightly more pliable, allowing it to conform to the surface you're cleaning.
Millions of hard edges engage: Those microscopic melamine strands I mentioned earlier? Each one has sharp edges that act like tiny cutting tools.
Material is abraded away: As you scrub, these edges physically scrape away the top layer of material — whether that's a scuff mark, dried food, crayon, marker, or even a thin layer of paint or finish.
Abraded material fills the sponge: The removed material (along with dirt and grime) gets trapped in the sponge's porous structure, which is why Magic Erasers disintegrate and turn grey as you use them — they're literally filling up with whatever you're removing.
The surface appears "clean": Once the marked or stained layer is removed, the clean layer underneath is revealed. It looks like magic, but you've actually just sanded away the problem.
Why water matters
You might notice that Magic Erasers work much better when damp. This isn't because water is doing any cleaning — it's because:
Water lubricates the abrasive action, making it more efficient
It softens the foam slightly, allowing better surface contact
It helps carry away abraded material from the surface
It prevents the foam from crumbling too quickly
The water itself isn't dissolving or breaking down stains. It's just facilitating the mechanical abrasion process.
What this means for your surfaces
Understanding that Magic Erasers work through abrasion is crucial because it fundamentally changes how you should think about using them. You're not applying a cleaner that will evaporate and leave surfaces unharmed — you're removing material from your surfaces.
Sometimes this is perfectly fine. Light mineral buildup on a glass shower door? A Magic Eraser is softer than glass, so mineral deposits can be abraded away without risk of damaging the glass. But using a Magic Eraser on a glossy finish? You're abrading away the gloss itself, leaving behind a dull spot.
This is why Magic Erasers seem to work miracles on some surfaces and create disasters on others.
The environmental impact of melamine foam
Now that we understand what Magic Erasers are and how they work, let's talk about their environmental footprint. Spoiler: it's not great, and the problems span from manufacturing to disposal.
Manufacturing: The chemical process
Melamine foam is produced through a chemical process that combines melamine resin with formaldehyde and other compounds. Here's why this matters:
Petroleum-based product: Melamine is synthesized from urea, which is typically derived from natural gas or petroleum. This ties Magic Erasers to fossil fuel extraction and all its associated environmental impacts.
Energy-intensive production: Creating melamine resin requires high temperatures and significant energy input, contributing to greenhouse gas emissions.
Chemical concerns: The manufacturing process involves formaldehyde, a known carcinogen. While the finished foam contains minimal formaldehyde (it mostly reacts during production), the manufacturing process creates environmental and worker safety concerns.
Water and resource use: Industrial chemical production requires substantial water and generates chemical waste that must be properly managed.
While companies like BASF have improved the environmental efficiency of melamine foam production over the years, it remains a resource-intensive, petrochemical-based product.
During use: Microplastic pollution
As you use a Magic Eraser, it disintegrates. Those tiny pieces aren't just disappearing — they're contributing to microplastic pollution.
Melamine is plastic: Despite its sponge-like appearance, melamine resin is a thermoset plastic. It doesn't biodegrade.
Particles wash down drains: As the foam breaks apart during use, microscopic and small visible particles flow down your drain with rinse water. These particles are too small for most wastewater treatment plants to filter effectively.
They enter waterways: Those melamine particles end up in rivers, lakes, and oceans, where they persist indefinitely.
They contribute to microplastic accumulation: Like microfibre cloth, melamine foam adds to the growing burden of microplastics in aquatic ecosystems.
Disposal: Landfill burden
When a Magic Eraser is worn out (which happens quickly — they're designed to only be used a few times), where does it go?
Not recyclable: Melamine foam cannot be recycled through standard municipal recycling programs. The material doesn't fit into any recyclable plastic category.
Not biodegradable: In a landfill, melamine foam will persist for hundreds of years. It doesn't break down into harmless components — it just fragments into smaller pieces over time.
Volume considerations: Because Magic Erasers are 99% air, they take up disproportionate landfill space relative to their actual mass. While they compress somewhat, they still contribute to landfill volume.
No circular economy: Unlike materials that can be composted, recycled, or repurposed, used Magic Erasers are essentially one-way tickets to permanent waste.
The broader picture
When you consider the full lifecycle — resource extraction, manufacturing, shipping, brief use period, and permanent disposal — Magic Erasers have a significant environmental footprint relative to their utility.
For occasional use on specific challenging stains, this might be an acceptable trade-off. But many people use Magic Erasers as their primary cleaning tool for routine tasks that could be handled with reusable cloths and appropriate cleaners — essentially generating plastic waste unnecessarily.
This doesn't mean Magic Erasers should never be used, but understanding their environmental cost will help you make more informed decisions about when they're truly the best tool for the job.
Understanding the Mohs Scale: Which surfaces are safe?
Understanding the Mohs Hardness Scale will help you avoid expensive mistakes with your Magic Eraser.
What is the Mohs Scale?
The Mohs Hardness Scale, developed in 1812 by German mineralogist Friedrich Mohs, ranks materials from 1 (softest) to 10 (hardest) based on their scratch resistance. The principle is simple: a harder material can scratch a softer material, but not vice versa.
Here's the scale for reference:
Talc (softest)
Gypsum
Calcite
Fluorite
Apatite
Orthoclase feldspar
Quartz
Topaz
Corundum
Diamond (hardest)
Melamine foam ranks approximately 3-4 on the Mohs scale. This means it's harder than gypsum but softer than most stones and harder minerals.
The Scratch Rule
Key takeaway: Magic Erasers can scratch any surface softer than approximately 3-4 on the Mohs scale.
If what you're cleaning is softer than melamine foam, the Magic Eraser will abrade it. If it's harder, the Magic Eraser will wear away without damaging the surface (though it still might remove their protective coatings or finishes — more on this below).
Surfaces that are safe for Magic Eraser use
These materials are generally harder than melamine foam or have matte finishes where light abrasion won't be noticeable:
Ceramic tile (unglazed or matte): Ceramic rates around 5-7 on the Mohs scale, making it harder than melamine. Matte or textured tiles can handle Magic Erasers well.
Porcelain: Similar to ceramic but denser, porcelain is safe from scratching by melamine foam.
Natural stone (most types): Granite (6-7), quartzite (7), and other hard stones are safe. However, polished finishes can be dulled — more on this below.
Concrete and cement: These are harder than melamine and can be cleaned safely with Magic Erasers.
Glass: Glass rates 5.5 on the Mohs scale, so it won't be scratched by Magic Erasers.
Stainless steel (unpolished): Stainless steel is harder than melamine, though you can dull brushed finishes if you scrub against the grain.
Bathtubs and showers (most): Porcelain, ceramic, and fiberglass tubs can generally handle Magic Erasers. They're effective at removing soap scum and hard water stains.
Surfaces to avoid
These materials are either softer than melamine foam or have finishes that will be damaged by abrasion:
Painted walls: The Magic Eraser will dull the shine of glossy sheens, creating noticeable matte spots. Matte finishes rely on microscopic peaks and valleys to scatter light across their surface. Magic Erasers will remove these peaks and valleys, causing light to instead be reflected — ruining the matte effect.
Wood furniture and floors (finished): Even if the wood itself is relatively hard, the finish (polyurethane, varnish, wax) is softer and will be abraded away, leaving dull spots and potentially exposing bare wood.
Stainless steel appliances (polished): While you won't scratch the steel itself, you could destroy the polished finish, leaving visible dull streaks.
Car exteriors: Automotive paint and clear coats are definitely softer than melamine foam. Using a Magic Eraser on your car will remove clear coat and dull the finish — an expensive mistake.
Acrylic and plastic surfaces: Most plastics are softer than melamine foam. This includes acrylic bathtubs, plastic laminate countertops, phone screens, eyeglasses, and plastic appliance surfaces.
Granite and marble (polished): While the stone itself is hard enough, the polished finish can be dulled by abrasion. You might not scratch the stone, but you'll create matte spots in the shine.
Leather and vinyl: Both materials will be damaged by the abrasive action. You'll remove colour and protective coatings.
Non-stick cookware: Magic Erasers will absolutely destroy non-stick coatings. Never use them on Teflon or ceramic non-stick surfaces.
Fiberglass (gelcoat finishes): While fiberglass itself might withstand Magic Erasers, gelcoat finishes (common on bathtubs and boats) will be dulled or damaged.
Screens and displays: Phone screens, TV screens, monitor screens — all are coated with materials softer than melamine foam. You'll scratch them.
Stone countertops with sealant: Even if the stone is hard enough, you'll abrade away the protective sealant, leaving the stone vulnerable to future staining.
The finish problem
Here's a critical nuance: even on surfaces that are theoretically hard enough to resist scratching, Magic Erasers can still cause damage by removing protective finishes, polishes, or coatings.
Think of it this way: your granite countertop might be hard (6-7 on Mohs scale), but the sealant protecting it could be much softer. The stainless steel on your appliances is hard, but the polished finish could be more vulnerable. The wood floor is protected by polyurethane, which is softer than the wood itself.
Magic Erasers don't discriminate — they abrade whatever they touch, including protective layers you can't see.
How to test safely
If you're unsure whether a Magic Eraser is safe for a particular surface, always test in an inconspicuous area first:
Choose a hidden spot (inside a cabinet, behind furniture, low on a wall)
Dampen the Magic Eraser and use light pressure
Scrub a small area (2-3 inches)
Dry the area completely and examine it in good lighting
Look for dullness, scratches, or changes in sheen
Wait 24 hours and check again (some damage becomes more apparent when fully dry)
If you see any change in appearance, don't use the Magic Eraser on visible areas of that surface.
When Magic Erasers are a suitable last-resort
Despite all these warnings, Magic Erasers do have legitimate uses when other sustainable methods have been unsuccessful. The key is using them strategically on appropriate surfaces for appropriate tasks.
Ideal use cases
Crayon and marker on hard surfaces: On ceramic tile, porcelain, or glass, Magic Erasers remove crayon and permanent marker better than almost anything else.
Soap scum on shower doors and tile: The abrasive action cuts through built-up soap scum on glass shower doors and ceramic tile without harsh chemicals.
Hard water stains on glass: Magic Erasers excel at removing mineral deposits from glass surfaces where abrasion won't cause visible damage.
Adhesive residue on appropriate surfaces: Sticky residue from labels, tape, or stickers comes off easily with Magic Erasers.
Grout cleaning: White grout between tiles can be brightened with Magic Erasers (though a proper grout brush and cleaner is often more effective and less wasteful).
Rubber sole marks on floors: Those black streaks on tile or linoleum floors from shoe soles can be removed with a Magic Eraser, although the risk of damage to the floor’s protective sealant is high.
Smart usage tips
If you're going to use Magic Erasers, use them wisely:
Use the lightest pressure possible: Don't scrub aggressively. Let the abrasive action do the work with gentle pressure.
Keep them damp, not soaking: A damp Magic Eraser is more effective and lasts longer than a dripping wet one.
Work in small sections: This gives you better control and helps you notice if any damage is occurring.
Stop if you see shine changes: If a surface is becoming duller or shinier where you're cleaning, stop immediately—you're damaging the finish.
Consider alternatives first: Before reaching for a Magic Eraser, ask yourself if a less abrasive method might work. Often the right cleaner and a clean cloth will handle the job without generating plastic waste or risking surface damage.
Cut them into smaller pieces: A full Magic Eraser is often more than you need. Cutting them into quarters makes them last longer and reduces waste.
Better alternatives for most cleaning tasks
The truth is, for the vast majority of cleaning tasks, you don't need Magic Erasers at all. Here are some sustainable, surface-safe alternatives:
For general cleaning
Baking soda paste: Mix baking soda with a small amount of water to create a paste. This provides gentle abrasion (baking soda ranks about 2.5 on Mohs scale — softer than melamine) for cleaning without the plastic waste. Works beautifully on sinks, tubs, and tile.
White vinegar: For hard water stains, soap scum, and mineral deposits, vinegar's acidity often works better than abrasion — and it's reusable and biodegradable. Just exercise caution when using vinegar (or any acid for that matter) around surfaces prone to acid damage (grout, natural stone, and wood to name a few).
Plant-based dish soap and warm water: Never underestimate the cleaning power of good old-fashioned surfactants. A quality dish soap and a natural-fibre cloth handle most household cleaning tasks effectively.
For specific problems
Scuff marks on walls: Try a damp cloth first. For stubborn scuffs, a damp cloth with a tiny bit of baking soda often works. I personally recommend investing in a powder-sprayer (often used in salons/barbers) and filling it with baking soda — so that you always have a quick burst on hand.
Crayon and marker: Rubbing alcohol (grain alcohol is an excellent, sustainable alternative) on a cloth removes most marker. For crayon, try a bit of mayonnaise or vegetable oil (it dissolves the wax), followed by a soap and water cleanup.
Adhesive residue: Rubbing alcohol, vegetable oil, or commercial adhesive removers dissolve sticky residue without abrasion.
Soap scum: A mixture of white vinegar and dish soap in a spray bottle, left to sit for 10 minutes, cuts through soap scum on most surfaces without scrubbing.
Hard water stains on glass: Vinegar soaks work wonders. For extreme buildup, a clean razor blade held at a low angle safely removes deposits from glass without scratching.
The reusable approach
For genuinely sustainable cleaning that doesn't generate plastic waste:
Natural-fibre scrub brushes for grout and textured surfaces
Cellulose sponges for general scrubbing
Coconut fibre scrubbers for tough jobs on appropriate surfaces
Cotton cloths with appropriate cleaners for most tasks
Pumice stones for toilet bowl rings and extreme mineral buildup (on porcelain only)
These tools do require appropriate cleaners (unlike the "just add water" appeal of Magic Erasers), but they last much longer, generate far less waste, and don't contribute to microplastic pollution.
Final thoughts: The magic is understanding, not mystery
Magic Erasers are a brilliant example of marketing meeting materials science. By rebranding industrial melamine foam as a household cleaning miracle, Procter & Gamble (Mr. Clean) created a product category that generates hundreds of millions in annual sales.
But understanding what's really happening when a Magic Eraser is used helps you:
Protect your surfaces from unintended damage
Use them strategically only when appropriate
Consider the environmental impact in your purchasing decisions
Explore better alternatives for most cleaning tasks
Are Magic Erasers sometimes the right tool for the job? Absolutely. They excel at specific tasks on appropriate surfaces where their abrasive properties are beneficial rather than destructive.
Should they be your go-to cleaning solution for everything? Definitely not.
The real magic isn't in the sponge — it's in understanding how cleaning actually works, choosing the right tool for each job, and making informed decisions about which products deserve a place in your cleaning routine.
Next time you reach for a Magic Eraser, you'll know exactly what you're doing to your surfaces. And that knowledge — that's the real magic.
Need help with sustainable, surface-safe cleaning solutions for your home? As an independent cleaner and the founder of EcoEthical Cleaning, I understand the science behind every cleaning method and choose approaches that protect your surfaces and the environment. Contact me for a free estimate and experience professional cleaning that's both effective and responsible. I serve Toronto’s Harbourfront-CityPlace district and surrounding areas.
Sources & further reading
“Mr. Clean”, Wikipedia
"The Mohs Hardness Scale" International Gem Society
"Microplastics: more than a drop in the ocean" Environment and Climate Change Canada