

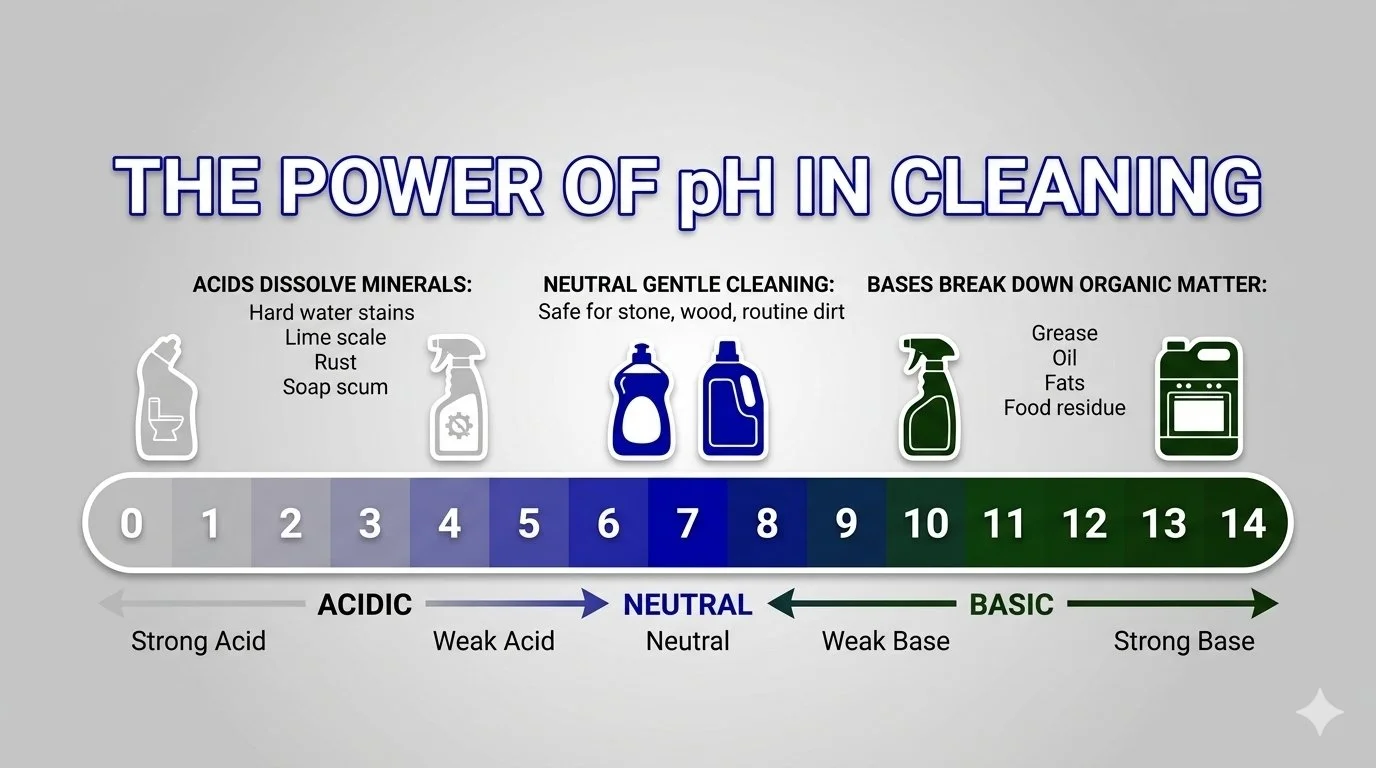
The power of pH: A guide to how acids and bases influence cleaning
Standing in the cleaning aisle, overwhelmed by dozens of products? The secret isn't buying more—it's understanding pH. Most cleaning challenges come down to chemistry: acids dissolve mineral deposits (hard water, lime scale, rust), while bases break down grease and organic matter. Using the wrong pH is like unscrewing a bolt with a hammer—you're applying force, but it's the wrong tool. Once you understand this one concept, cleaning stops being guesswork and becomes logical problem-solving. Learn which common products fall where on the pH scale, how to identify what you're cleaning, and match the right chemistry to every mess.
You're standing in the cleaning aisle, overwhelmed by dozens of products. Bathroom cleaner. Kitchen cleaner. All-purpose cleaner. Glass cleaner. Each bottle promises to tackle specific areas in your home, but you're not entirely sure why you need so many different products—or which one will actually solve your problem.
Most cleaning challenges come down to chemistry, specifically pH. Understanding this one simple concept will save you money, time, and frustration. You'll stop buying products you don't need, stop using the wrong cleaner for the job, and start actually solving problems instead of just scrubbing harder.
The secret isn't buying more products, it's understanding what you're actually trying to clean and matching it with the right chemical approach. Once you understand pH, cleaning stops being guesswork and becomes logical problem-solving.
This guide will teach you everything you need to know about pH in cleaning: what it means, why it matters, which common products fall where on the scale, and most importantly, how to identify what you're cleaning so you can choose the right product every single time.
What is pH? Understanding the scale
pH stands for "potential of hydrogen" and measures how acidic or basic a substance is on a scale from 0 to 14.
The pH scale:
0-6: Acidic (the lower the number, the stronger the acid)
7: Neutral (pure water)
8-14: Basic (the higher the number, the stronger the base)
Why this matters for cleaning: Different types of dirt, grime, and buildup respond to different pH levels. Acids dissolve certain substances. Bases dissolve others. Using the wrong pH is like trying to unscrew a bolt with a hammer — you're applying force, but it's the wrong tool for the job.
The pH scale with common household cleaners
Here's where everyday cleaning products actually fall on the pH scale. Note that a product’s pH can be found in Section 9 of their respective Safety Data Sheet.
Strong acids (pH 0-4):
Common toilet bowl cleaners (Lysol / Scrubbing Bubbles)
Oxalic acid (Bar Keeper's Friend)
Acetic acid (white vinegar)
Citric acid (lemon juice)
Weak acids (pH 4-6):
Bathroom cleaners designed for hard water (Seventh Generation / Method Daily Shower Spray)
Neutral range (pH 6-8):
Distilled water (pH 7.0 – true neutral)
Palmolive dish soap
pH-neutral cleaners (Bona Hard Surface Floor Cleaner / Zep Neutral pH Floor Cleaner / Method Hard Floor Cleaner)
Weak bases (pH 8-10):
Baking soda (sodium bicarbonate)
Borax (sodium borate)
Dawn Ultra dish soap
Strong bases (pH 11-14):
Oven cleaners (Easy Off Fume-Free / Zep
Drain cleaners (Drano Max Gel / Liquid Plumr)
Toilet bowl cleaners with bleach (Clorox)
Important note: The pH scale is logarithmic, not linear. This means each number represents a tenfold difference. pH 3 is ten times more acidic than pH 4, and one hundred times more acidic than pH 5. Small numerical differences represent huge differences in strength.
Not-so-important note (but still important to know going forward): Alkalis are bases that dissolve in water.
The chemistry behind how acids and bases actually clean
Understanding what acids and bases do at a molecular level explains why they work on different types of dirt.
What acids do
Acids donate hydrogen ionsto chemical reactions. This makes them excellent at:
Dissolving mineral deposits:
Hard water stains (calcium and magnesium carbonate)
Lime scale
Rust stains (iron oxide)
Soap scum (mineral soap residue)
Efflorescence (white mineral deposits on tile/concrete)
Why this works: Minerals are alkaline compounds. Acids react with them chemically, breaking their molecular bonds and dissolving them into solution. This is why acids work so well on hard water buildup — they're chemically breaking it down, not just scrubbing it away.
Acids also:
Brighten and restore shine to some surfaces (including ceramic, porcelain, stainless steel)
Remove tarnish from metals (brass, bronze, copper)
Neutralize alkaline residues
Kill certain bacteria
What acids DON'T do well:
Remove grease or oil
Cut through organic buildup
Dissolve proteins or fats
What bases do
Bases accept hydrogen ionsin chemical reactions. This makes them excellent at:
Breaking down organic matter:
Grease and oils
Fats (cooking residue, body oils)
Proteins (food residue, blood, organic stains)
Dirt and grime with organic components
Why this works: Bases cause a chemical reaction called saponification with fats and oils, essentially turning them into soap. This is why dish soap cuts through grease so effectively, and why oven cleaner dissolves baked-on grease.
Bases also:
Break down proteins and carbohydrates
Neutralize acidic residues
What bases DON'T do well:
Remove mineral deposits
Dissolve hard water stains
Clean rust
The neutral zone (pH 6-8)
True neutral cleaners:
Don't chemically react with most substances
Safe for almost all surfaces
Good for general dust and light dirt
Not effective for stubborn, chemically-bonded grime
When to use neutral cleaners:
Sensitive surfaces that acids or bases could damage
Routine maintenance cleaning
When you need safe, gentle cleaning
Identifying what you're actually cleaning
Before you can choose the right cleaner, you need to identify what you're trying to remove. Here's how to recognize common household messes by their characteristics:
Mineral-based buildup
Hard water stains:
Appearance: White, chalky, or cloudy deposits
Texture: Crusty, rough, difficult to scrub off
Common locations: Shower doors, faucets, sinks, toilets (waterline), tile, glass
What it is: Calcium and magnesium minerals left behind when water evaporates
Lime scale:
Appearance: White or off-white thick deposits, sometimes flaky
Texture: Very hard, almost rock-like where buildup is heavy
Common locations: Inside kettles, coffee makers, around faucet aerators, showerheads
What it is: Calcium carbonate buildup from repeated water exposure and heating
Rust stains:
Appearance: Orange, brown, or reddish stains
Texture: Can be surface-level or embedded in porous materials
Common locations: Toilets, sinks (where metal touches water), around old pipes
What it is: Iron oxide from metal corrosion or iron-rich water
Soap scum:
Appearance: White or gray filmy residue, sometimes with slight iridescence
Texture: Waxy, sticky feeling, difficult to remove with water alone
Common locations: Shower walls, tubs, shower doors, sinks
What it is: Combination of soap residue (fatty acids) + minerals from hard water. Contains both organic (soap) and inorganic (mineral) components, but the mineral component dominates
Efflorescence:
Appearance: White, powdery or crystalline deposits
Texture: Dry, powdery, easily brushed off when loose (but reappears)
Common locations: Brick, concrete, tile grout, basement walls
What it is: Salts brought to the surface through moisture evaporation
Organic/Grease-based buildup
Cooking grease and oil:
Appearance: Yellow to brown, glossy or sticky
Texture: Can be slippery (fresh buildup) or tacky (buildup that has been there a while)
Common locations: Stovetops, range hoods, backsplashes, oven interiors
What it is: Fats and oils from cooking that have condensed on surfaces
Baked-on food residue:
Appearance: Brown or black carbonized deposits
Texture: Very hard, crusty, difficult to scrape
Common locations: Oven interiors, baking sheets, pots and pans
What it is: Proteins, fats, and carbohydrates that have been repeatedly heated and carbonized
Body oils and soap residue:
Appearance: Slight film, often invisible until surface looks dull
Texture: Slightly greasy or waxy feeling
Common locations: Bathroom surfaces, tub ring, around sinks
What it is: Natural skin oils, body care products, soap residue
General dirt and grime:
Appearance: Gray or brown, dull appearance
Texture: Often slightly sticky or filmy
Common locations: Floors, walls, high-touch surfaces
What it is: Mix of dust, skin cells, oils, outdoor pollutants
Mould and mildew:
Appearance: Black, gray, green, or pink spots or patches
Texture: Can be surface-level (wipes away) or embedded (staining)
Common locations: Bathrooms, basements, window sills, anywhere with moisture
What it is: Fungal growth that thrives in moist, organic-rich environments
Mixed/Special Cases
Soap scum in hard water areas:
Contains both mineral deposits and organic soap residue
Best approach: Start with an acid to dissolve the minerals, then use a base if any organic residue remains
Or use a product specifically formulated for soap scum (contains both acid and surfactants to lift away the organic residue)
Toilet bowl rings:
Usually mineral deposits (hard water + waste minerals)
Sometimes combined with organic staining
Best approach: Acidic toilet bowl cleaner for minerals
Cloudy glassware from dishwasher:
Hard water etching (permanent damage) vs. mineral film (removable)
Test: If white vinegar removes it, it's mineral buildup. If not, it's etching.
Matching pH to the problem: An eco-friendly guide
Now that you can identify what you're cleaning, here's how to choose the right sustainable product:
For mineral deposits and hard water stains
Use acidic cleaners:
Mild hard water stains:
White vinegar -- cheap, effective, readily available
Apply, let sit 10-15 minutes, scrub, rinse
Safe for most non-porous surfaces
Toronto tip: Keep a spray bottle of vinegar in your bathroom for weekly shower door maintenance to prevent heavy mineral deposits.
Moderate buildup:
Make a paste of white vinegar and corn starch, apply, let sit for a few minutes, scrub gently, rinse thoroughly
Excellent for sinks, tubs, cookware
Mildly abrasive (helps with scrubbing action)
Heavy buildups may require multiple applications.
For rust stains:
Use a citric acid cleaner
Citric acid has the ability to “pull” rust from a surface (chelating), making it more effective than vinegar.
Important surface exceptions:
Never use acids on natural stone (marble, granite, limestone, travertine) - they will cause permanent damage through etching
Caution on metal fixtures - prolonged acid exposure can damage finishes
Test on grout - acids can break down grout sealant over time – leaving the grout vulnerable to erosion
For grease, oil, and organic buildup
Use alkaline cleaners (pH 8-14):
Light grease and daily grime:
Sustainable dish soap (my recommendation)
Dilute as directed by the product manufacturer, spray, let the solution sit for a couple of minutes, wipe clean
Moderate grease:
Sustainable all-purpose cleaner (my recommendation)
Apply, let sit as directed, scrub, rinse
Good for stovetops, kitchen surfaces, floors
Heavy baked-on grease:
Sustainable oven cleaner (my recommendation)
Follow directions carefully, including all safe handling precautions
Excellent for ovens, range hoods, barbecue grates
For mould and mildew:
Hydrogen peroxide / baking soda or a sustainable mould cleaner (my recommendation)
Address the cause of the excess moisture to prevent mould from returning
Protein-based stains:
Sustainable enzyme cleaner (my recommendation)
Use cold or lukewarm water (hot water can set protein stains)
For general/mixed Cleaning
Use neutral or mildly alkaline cleaners (pH 7-9):
Routine maintenance:
Dish soap and water (pH 7-9)
Mild all-purpose cleaners (pH 8-9)
Perfect for dust, fingerprints, light dirt
When surface sensitivity is a concern:
pH-neutral cleaners (pH 7)
Safe for wood, stone, and delicate finishes
Won't damage protective coatings
Surface-specific recommendations
Natural stone (marble, granite, limestone, travertine):
Only use pH-neutral cleaners (pH 7)
Acidic cleaners will etch the stone
Strong alkaline cleaners will strip the stone’s protective sealer
Hardwood floors:
pH-neutral for routine cleaning and slightly acidic (pH 6 or higher) for occasional deep cleaning
Alkaline cleaners can destroy the protective finish
Use minimal moisture
Stainless steel:
Neutral to slightly alkaline (pH 7-9)
Acids can damage the finish with prolonged contact
Strong alkalis can cause discolouration
Glass:
Mildly acidic (pH 4-6) for hard water stains
Use distilled water for streak-free cleaning
A diluted vinegar solution works beautifully
Ceramic tile:
Tolerates wide pH range (pH 2-11)
While the tile itself is durable, the grout surrounding it is not. Start with a mild base, and ensure the grout is properly sealed before escalating to a stronger product. Use acids only when targeting heavy mineral buildup (normally only in showers), and take precautions to prevent contact with grout.
Porcelain:
Very durable, tolerates strong acids and alkalis
Start with a mild acid or base, and only escalate if needed to minimize the risk of damaging the protective surface.
Common cleaning mistakes: Using the wrong pH
Understanding these common errors will save you hours of frustrated scrubbing:
Mistake 1: Using alkaline cleaner on mineral deposits
The scenario: You're scrubbing shower doors with an all-purpose cleaner, but the cloudy hard water stains won't budge no matter how hard you work.
Why it doesn't work: All-purpose cleaners are typically alkaline (pH 9-10). Hard water deposits are alkaline minerals. Bases don't react with bases—you're just pushing minerals around, not dissolving them.
The solution: Switch to an acidic cleaner (vinegar, citric acid). The stains will dissolve chemically with minimal scrubbing.
Mistake 2: Using acid on grease
The scenario: You try using vinegar to clean your greasy stovetop, but it just spreads the grease around and leaves a sticky mess.
Why it doesn't work: Acids don't react with fats and oils. You're just diluting the grease slightly, not breaking it down.
The solution: Use dish soap or an alkaline cleaner.
Alkalines chemically neutralize the fatty acids in the grease.
Surfactants in dish soap surround the oil molecules, "lifting" them off the stovetop so they can be rinsed away with water rather than just pushed around.
Mistake 3: Mixing acids and bases
The scenario: You hear that baking soda (base) and vinegar (acid) create a powerful cleaner, so you mix them together.
Why it doesn't work: They neutralize each other. The impressive fizzing is just carbon dioxide gas escaping as the two chemicals "cancel" each other out. Once the bubbles stop, you are left with water and a tiny amount of salt (sodium acetate). You’ve essentially turned two great cleaners into useless salt water.
The solution: Use them for their specific strengths, separately.
To scrub: Use a baking soda paste. Its high pH breaks down grease and its grit provides gentle abrasion.
To de-scale: Use vinegar. Its low pH dissolves hard water spots and soap scum.
The exception: If you have a slow drain, you can use the reaction for its mechanical energy. Pour the baking soda down first, then the vinegar, and plug the drain. The "fizzing" creates pressure that can physically dislodge hair or gunk—but it's the movement, not the chemistry, doing the work.
Mistake 4: Using acid on natural stone
The scenario: You use vinegar or acidic bathroom cleaner on marble countertops or shower tile to remove water spots.
Why it's a disaster: Acids react with calcium carbonate (which natural stone is made of), permanently etching the surface. Sadly, the damage is irreversible without professional restoration.
The solution: Only use pH-neutral cleaners on natural stone.
Mistake 5: Not letting the cleaner work
The scenario: You spray cleaner and immediately wipe, frustrated that it's not working.
Why it's inefficient: Chemical reactions take time. Spraying and immediately wiping doesn't give the cleaner time to break down the grime chemically.
The solution: Apply cleaner, let it sit (dwell time varies by product and buildup severity), then wipe. Dwell time allows the chemistry to do the work, so that your muscles don’t have to.
The right questions to ask
This is where understanding pH transforms your cleaning approach entirely.
Stop asking: "What will clean my [surface]?"
This question is too vague. It doesn't identify the actual problem.
Examples of vague questions:
"What will clean my bathtub?"
"How do I clean my glass shower door?"
"What's the best cleaner for my sink?"
Why they're too vague: The surface isn't the problem—the substance on the surface is the problem. Different substances require different solutions.
Start asking: "What will remove [substance] from my [surface]?"
This question identifies both the problem and any surface limitations.
Examples of specific questions:
"What will remove hard water stains from glass?" → Acid (vinegar or commercial descaler)
"What will remove grease from ceramic tile?" → Base (degreaser or alkaline all-purpose cleaner)
"What will remove soap scum from my acrylic tub?" → Mild acid with surfactants (a mixture of vinegar and dish soap or a specialized soap scum remover)
"What will remove water spots from marble?" → pH-neutral cleaner
The two-step thinking process:
Step 1: Identify what you're removing
Is it mineral-based? (cloudy, white, crusty) → Needs acid
Is it grease/oil-based? (sticky, greasy, brown) → Needs base
Is it general dirt? (dusty, filmy) → Neutral or mild base
Step 2: Identify surface limitations
Is the surface acid-sensitive? (grout, natural stone, some metals) → Avoid acids
Is the surface base-sensitive? (some wood finishes, soft metals like aluminum, brass, zinc) → Avoid strong bases
Is the surface generally durable? (ceramic, porcelain, glass) → Wide pH range acceptable
The answer: Choose the appropriate pH that removes the substance without damaging the material.
The substance determines the pH you need. The surface determines the pH you must avoid.
Practical application: Real-world scenarios
Let's apply this knowledge to common Toronto household cleaning challenges:
Scenario 1: Cloudy shower doors
What you see: White, hazy film on glass that won't wipe away with water
Identify the substance: Hard water mineral deposits (calcium and magnesium carbonate)
Surface considerations: Glass is durable and acid-resistant
Solution:
Use an acidic cleaner (white vinegar is cheapest, citric acid is more effective but typically costs more)
Spray generously, let sit for appropriate amount of time
Scrub with a non-abrasive sponge
Rinse thoroughly
Prevention: Squeegee doors after each shower, or spray with vinegar weekly
Scenario 2: Greasy range hood
What you see: Sticky, brown, glossy buildup that attracts dust
Identify the substance: Cooking grease and oil (organic fats)
Surface considerations: Usually stainless steel or painted metal (both tolerate alkaline)
Solution:
Use alkaline degreaser (pH 10-11)
Spray, let sit for appropriate amount of time
Wipe with a cloth or sponge
May need multiple applications for thick buildup
Rinse with hot water and dry
Prevention: Wipe weekly with alkaline cleaner before buildup becomes severe
Scenario 3: Toilet bowl ring
What you see: Brown or gray ring at water line, rough texture
Identify the substance: Mineral deposits from hard water, possibly with some organic staining
Surface considerations: Porcelain (very durable, acid-safe)
Solution:
Use acidic toilet bowl cleaner
Apply under rim and to ring, let sit for appropriate amount of time
Scrub with toilet brush
For stubborn rings: pumice stone (wet both stone and surface before use to reduce the risk of scratching the protective glaze)
Prevention: Flush daily to prevent buildup
Safety warning:Never mix a strong acid like an acidic toilet bowl cleaner with chlorine bleach! These 2 substances will react to create chlorine gas – which was literally used to kill soldiers during WWI.
Scenario 4: Soap scum on acrylic tub
What you see: White, filmy, slightly waxy buildup
Identify the substance: Soap scum (mixed: oils + hard water minerals)
Surface considerations: Acrylic can be scratched; avoid abrasives
Solution:
Use a mixture of vinegar and dish soap (I know what you’re thinking–”but the acidic vinegar will neutralize the alkaline dish soap!”--but in this case it’s the surfactants in the dish soap that are being relied on to lift the oils, not its alkalinity to dissolve them)
Prevention: Rinse tub after use, squeegee or wipe down weekly
Scenario 5: Hardwood floor dullness
What you see: Floor looks dingy, has lost shine
Identify the substance: Likely buildup of alkaline cleaner residue or dirt
Surface considerations: Hardwood finish is sensitive to both strong acids and bases
Solution:
First use pH-neutral wood floor cleaner
Damp mop only (never wet)
If residue remains, use a very dilute vinegar solution (1 part vinegar to 10 parts water), and rinse with plain water immediately
Prevention: Only use pH-neutral or manufacturer-recommended cleaners on hardwood to avoid future buildup
Scenario 6: Cloudy marble countertop
What you see: Dull, hazy appearance, possibly etching or residue
Identify the substance: Could be etching (permanent damage from acid) or alkaline residue buildup
Surface considerations: Natural stone—extremely acid-sensitive
Solution:
Clean with pH-neutral natural stone cleaner
If still dull: May be etching (requires professional restoration)
If it's residue: Dish soap and water, dry thoroughly
Prevention:Never use acidic or alkaline cleaners on marble (or any other natural stone). Only pH-neutral products.
Building a sustainable cleaning arsenal
You don't need 20 products. Here's a strategic, pH-based cleaning kit:
The Essential Four
1. Acidic cleaner:
White vinegar for biofilms and light mineral buildup
Citric acid for rust and heavy mineral buildup
Uses: Hard water stains, mineral deposits, rust, soap scum
2. Alkaline cleaner:
Sustainable all-purpose cleaner for routine cleaning and light grease buildup
Sustainable oven cleaner for heavy grease buildup
Uses: Grease, general grime, floors, most durable surfaces
3. pH-neutral cleaner:
pH neutral dish soap and water works for most needs
Consider sustainable cleaners formulated specifically for natural stone / hardwood floors
Uses: Delicate pH-sensitive surfaces, routine maintenance
4. Abrasive cleaner:
Corn starch for mild acidic cleaning
Baking soda for mild basic cleaning
Natural fibre brushes for pH neutral cleaning
Uses: Stubborn stains on durable surfaces, cookware, sinks
Safety considerations when working with pH
Understanding pH includes respecting the power of strong acids and bases.
General safety rules
Never mix cleaning products unless you know exactly what you're doing:
acid + bleach = toxic chlorine gas (fatal)
ammonia + bleach = toxic chloramine gas (fatal)
hydrogen peroxide + vinegar = peracetic acid (damages the eyes and respiratory system)
acid + base = neutralization (wastes both products, and creates potentially unwanted heat)
Wear appropriate protection:
Gloves for anything below pH 4 or above pH 10
Eye protection for spray products or anything below pH 3 or above pH 11
Ventilation for strong acids or bases (open windows, use fans)
Follow product directions:
Always follow the recommended dilution ratios
Dwell times are tested for effectiveness and safety
Following rinsing instructions help prevent surface damage
Store all cleaning products:
Separate from each other
Out of reach of children and pets
In original containers with labels
Away from heat sources
pH-specific cautions
Strong acids (pH < 3):
Can burn skin and eyes
Can corrode metals
Fumes can irritate respiratory system
Can permanently damage acid-sensitive surfaces
Strong bases (pH > 11):
Can cause severe chemical burns
More dangerous than acids of equivalent pH (bases penetrate human tissue deeper)
Can blind if splashed in eyes
The slippery feeling after touching a base is literally the base turning your skin oils into soap, and should be washed off immediately until that slippery feeling is gone
Test before using:
On new surfaces, test in inconspicuous area
Wait 24 hours to ensure no damage
This is especially important with acids on stone, grout, or metal
Toronto-specific considerations
Understanding your local water and environment helps you anticipate cleaning challenges.
Toronto's water hardness
Toronto water is moderately hard:
This means calcium and magnesium minerals are present
You will deal with hard water buildup regularly
What this means for you:
Keep acidic cleaners on hand
Expect mineral deposits on faucets, shower doors, appliances
More frequent cleaning needed in bathrooms and kitchen
Consider water softener if buildup is severe
Seasonal Humidity
Toronto's humid summers:
Increased mould and mildew risk
More organic growth in bathrooms
Keep alkaline cleaners or hydrogen peroxide ready
Increase ventilation (exhaust fans, dehumidifiers)
Toronto's dry winters:
Heating systems dry air
Dust accumulation increases
Static electricity attracts more dust to surfaces
General cleaning (neutral or mild alkaline) more important
High-rise condo living
Harbourfront and other condo-dense areas:
Sealed buildings with limited ventilation
Shared water systems (consistent water hardness across units)
Smaller spaces mean faster buildup concentration
Regular cleaning more important in confined spaces
Conclusion: From guesswork to strategy
Understanding pH transforms cleaning from trial-and-error frustration into logical problem-solving. You're no longer guessing which product might work or why something isn't cleaning despite your effort.
The simple framework:
Mineral deposits (hard water, lime scale, rust) → Acid
Grease and organic matter (cooking oil, body oils, food residue) → Base
Routine dust and light dirt → Neutral or mild base
Delicate surfaces → pH-neutral only
The right question isn't "What cleans my bathtub?"
The right question is "What removes hard water stains from ceramic?"
One identifies the surface. The other identifies both the problem and the solution.
Armed with this knowledge, you'll:
Save time by eliminating the guesswork
Save money by buying fewer products
Protect your surfaces
Get better results
The next time you face a cleaning challenge: Pause. Identify what you're trying to remove. Consider your surface. Choose the appropriate pH. Let the chemistry do the work for you.
Need help with proper surface care and cleaning in your Toronto home? At EcoEthical Cleaning, I understand the chemistry behind every surface and challenge. I choose products based on science, not marketing, ensuring your home is cleaned effectively without damage. Contact me for a free, no-obligation estimate and experience sustainable cleaning done right.
Sources & Further Reading
“The Chemistry of Cleaning”, American Cleaning Institute,
"Neutralization", LibreTexts Chemistry
"Tap Water Quality & System Reports", City of Toronto
Mitigating the risk: A guide to preventing dryer fires in your home
Toronto experiences 39 dryer fires every year. Across Canada, home appliances cause over 700 residential fires annually, with 92% involving clothes dryers. The leading cause? Lint buildup. That soft, fluffy material you pull from the lint trap is highly flammable—and when it accumulates in your dryer or vent system, it creates perfect conditions for fire: fuel, heat, and oxygen. The devastating truth: 32% of dryer fires are caused by lack of cleaning and maintenance. This isn't bad luck—it's neglect. Learn the warning signs, proper maintenance schedule, and exactly how to protect your home from this completely preventable tragedy.
When was the last time you cleaned your dryer's lint trap? Yesterday? Last week? Can't quite remember?
Across Canada, home appliances account for over 700 residential fires annually, with the vast majority of fires (92 percent) involving clothes dryers. 32% of these fires are caused by a lack of cleaning and maintenance. The city of Toronto averages nearly 40 dryer fires per year.
The leading cause? Lint buildup. Something so seemingly harmless—those soft, fluffy fibres you pull off the lint screen—is directly responsible for fires that destroy homes, cause injuries, and claim lives every single year.
This isn't about being paranoid or adding another chore to your overwhelming to-do list. This is about a genuine, preventable fire hazard that exists in virtually every home with a dryer. A hazard that most people don't think twice about until it's too late.
If you use a dryer (and statistically, you probably do), you need to understand how quickly lint can go from minor maintenance issue to life-threatening emergency. More importantly, you need to know exactly how to protect your home and family.
This comprehensive guide will explain why dryer lint is so dangerous, how fires start, what warning signs to watch for, and precisely what you need to do to prevent a tragedy in your home.
Why lint is so dangerous: Understanding the fire triangle
To understand why lint poses such a serious fire risk, you need to understand the three elements required for any fire: fuel, heat, and oxygen. Remove any one of these, and fire can't exist. Unfortunately, your dryer provides all three in abundance.
Lint is highly flammable fuel
Lint consists of tiny textile fibres—cotton, polyester, wool, and synthetic materials—that shed from your clothes during the drying process. These fibres are:
Extremely combustible: Lint ignites easily and burns rapidly. The fine, fluffy structure creates enormous surface area relative to mass, allowing it to catch fire almost instantly when exposed to sufficient heat.
Fast-burning: Once ignited, lint burns quickly and intensely. What starts as a small ember can become a raging fire in seconds, not minutes.
Accumulates quickly: Every single load of laundry produces lint. Even if you clean your lint trap religiously after every load, lint still accumulates in places you can't easily see—inside the dryer cabinet, in the vent ductwork, and around mechanical components.
Contains accelerants: If you've dried clothes that had any exposure to flammable substances—cooking oils, gasoline, paint thinners, cleaning solvents—those compounds absorb into the fabric and transfer to the lint. This makes already-flammable lint even more dangerous.
Your dryer generates significant heat
Dryers operate at temperatures ranging from 120-160°F (49-71°C) under normal conditions. The heating element itself reaches much higher temperatures. When airflow is restricted by lint buildup:
Heat cannot dissipate properly: Blocked vents trap heat inside the dryer, causing temperatures to rise well above normal operating levels.
Safety mechanisms can fail: Dryers have thermostats and thermal fuses designed to shut down the appliance if it overheats. However, if these components are covered in lint or fail to detect rising temperatures quickly enough, the dryer continues running at dangerous temperatures.
Sustained heat exposure ignites lint: Given enough time at elevated temperatures, lint will ignite. It doesn't require an open flame—just sustained heat in an oxygen-rich environment.
Oxygen is abundant
Your dryer needs airflow to function—it pulls in fresh air, heats it, circulates it through wet clothes to absorb moisture, and exhausts the humid air outside. This constant air movement provides plenty of oxygen to fuel combustion once lint ignites.
When these three elements—flammable lint, excessive heat, and abundant oxygen—come together in a blocked or poorly maintained dryer, you have the perfect conditions for fire.
How dryer fires actually start
Understanding how dryer fires ignite helps illustrate why regular maintenance is so critical. Here are the most common scenarios:
Blocked vents
When dryers are not cleaned on a regular basis, lint buildup restricts airflow, and when the airflow is restricted, clothes take longer to dry.
What happens:
Lint accumulates in the exhaust duct over time
Airflow becomes progressively restricted
The dryer works harder and runs hotter to compensate
With no airflow, the heat in the heater box will continue to rise
Lint in or near the heating element reaches ignition temperature
Fire starts inside the dryer or ductwork
Why it's dangerous: Lint buildup inside a dryer can be a potential fire hazard—if lint gets inside around thermostats, motors or heating elements, it can catch fire. By the time you notice something wrong (smell smoke, see flames), the fire may already be well-established inside walls or ductwork where you can't easily access it.
Crushed ducts
How ducts get crushed:
Items are placed on top of duct or tucked in behind a dryer, flattening the flexible tube
The dryer gets pushed back too far against the wall
Improper dryer installation causes kinked or crushed exhaust hose.
What happens:
Hot, lint-laden air can't escape properly
Lint and heat build up in the restricted area
Eventually, accumulated lint ignites
Why it's dangerous: You may not realize the duct is compromised. The dryer still runs, clothes eventually dry (though it takes longer), and there's no obvious sign of problem until a fire starts.
Wrong duct material
Dryer manufacturers clearly state in their manuals to not use plastic or flexible dryer ducts between the vent and the clothes dryer, as they can be a fire hazard.
What happens:
Plastic or vinyl ductwork is installed (often by previous homeowners or landlords)
These materials are not designed to withstand sustained heat exposure
Lint accumulates more easily in flexible ducts' ridged interior
When lint ignites, the duct material itself burns
Fire spreads rapidly through flammable ductwork
Why it's dangerous: Not only does the vinyl burn very quickly but it exposes the fire to everything around it, which could set your wall on fire or whatever you have around your dryer. The duct becomes fuel for the fire rather than simply a pathway.
Contaminated laundry
Clothes or rags that have been exposed to flammable substances pose extreme risk, even after washing.
What happens:
Kitchen towel with cooking oil, shop rag with gasoline, or painter's drop cloth gets laundered
Standard detergent doesn't fully remove flammable residues
Item goes into the dryer with residual accelerants
Heat causes spontaneous combustion or significantly lowers ignition temperature
Fire starts in the drum, often very quickly
Why it's dangerous: These fires can start while you're running the dryer—you might be home, smell something off, and suddenly have an active fire in your laundry room with almost no warning.
Interior lint accumulation
Many dryer users clean the lint trap frequently and the vent regularly but aren’t aware that lint can build up inside the dryer.
What happens:
Over years of use, lint sneaks past the lint trap
It accumulates inside the dryer cabinet around mechanical components
This internal lint is exposed to heat continuously
Eventually reaches ignition temperature during normal operation
Fire starts inside the appliance
Why it's dangerous: There can be a massive amount of lint inside the dryer itself, hidden from view. You think you're maintaining the appliance properly, but a fire hazard is building unseen.
The devastating statistics: This is happening right now
Let's be clear about the scope of this problem. These aren't isolated incidents or freak occurrences—dryer fires are common, predictable, and preventable.
National and local canadian data
Apart from heating and cooking equipment, home appliances account for over 700 residential fires across Canada each year, with the vast majority of fires (92 percent) involving clothes dryers.
Statistics Canada reports that dryers and other appliances contribute to about 7% of all residential fires, with Toronto seeing an average of 39 dryer fires annually.
These numbers represent only reported fires attended by fire departments. Many smaller incidents—dryers that start smoking, small interior fires that are caught immediately, near-misses—never get reported but still represent serious risks.
The human and financial cost
While Canadian-specific casualty data is limited, U.S. statistics provide insight into the serious consequences of dryer fires:
The National Fire Protection Association (NFPA) reports that dryers and washing machines cause an average of 15,970 fires each year across the U.S., leading to an average of 10 fatalities and $200 million in property damage.
These are preventable tragedies. Every death, every injury, every destroyed home represents a maintenance task that didn't get done, a warning sign that was ignored, or information that the homeowner simply didn't have.
Why winter months are highest risk
Particularly during the colder months, when dryer usage peaks, the risk of fires caused by clogged vents and poor maintenance becomes even more pronounced.
In winter, Canadians:
Dry more loads (heavier clothes, less opportunity for outdoor line-drying)
Run dryers longer (thicker fabrics like jeans, towels, and sweaters)
May delay maintenance tasks until spring
Have windows closed, meaning fires aren't detected as quickly by smell due to lack of airflow
January consistently shows the highest incidence of dryer fires—a direct correlation with increased winter laundry loads and heavier fabrics that produce more lint.
Warning signs your dryer is a fire hazard
Your dryer will often give you warning signs before a fire starts. Recognizing these early indicators can prevent disaster.
Critical warning signs (address immediately)
Burning smell during operation:
This is your most urgent warning. If your clothing is very hot at the end of a cycle or the dryer is hot to touch, this warning sign means the vent is not exhausting properly—lint can build up and catch fire, causing a burning smell. This is a warning sign to get your vents cleaned ASAP!
If you smell burning:
Stop the dryer immediately
Unplug it
Do not use it again until it's been professionally inspected
Check for visible lint accumulation or damage
Excessive heat:
The outside of the dryer should be warm during operation, not hot to the touch. If:
The dryer exterior is too hot to comfortably rest your hand on
The laundry room becomes excessively hot during operation
Clothes are very hot at the end of the cycle
These indicate blocked airflow and dangerous overheating.
Visible smoke or sparks:
This is an active emergency. If you see smoke or sparks:
Stop the dryer immediately
Unplug it if you can do so safely
Evacuate and call 911 if you cannot quickly determine the source
Do not use the dryer again until professionally inspected
Serious warning signs (address immediately)
Significantly longer drying times: When airflow is restricted, clothes take longer to dry. This is the first indication that there is a problem.
If loads that used to take 45 minutes now take 90+ minutes, your vent system is likely compromised.
Clothes feel damp at the end of a normal cycle: This indicates insufficient airflow to properly remove moisture—the same airflow restriction that traps heat and creates fire risk.
Lint accumulation around the dryer or vent opening: Excessive lint around the dryer, on the floor, or around the exterior vent indicates that lint is escaping somewhere it shouldn't be—often due to disconnected or damaged ductwork.
The exterior vent flap doesn't open during operation: An outside vent that doesn't open when the dryer is running means air flow has been restricted due to lint buildup.
Stand outside while the dryer is running and check the exterior vent. The flap should open noticeably with strong airflow. If it barely moves or doesn't open at all, you have a serious blockage.
Excessive lint on clothing after drying: While some lint is normal, if clothes come out covered in lint or the lint trap fills up abnormally fast, it suggests airflow problems that cause lint to circulate rather than properly exhaust.
Moderate warning signs (address soon)
You can't remember the last time you cleaned the vent: If it's been more than a year—or you're not sure when it was last done—schedule a cleaning ASAP.
The dryer is more than 10 years old: Older dryers have components that may fail, allowing lint to accumulate in places it shouldn't. Have it professionally inspected.
You've never had the dryer professionally serviced: Just like your furnace or HVAC system, dryers benefit from periodic professional maintenance to clean internal components and verify safe operation.
You use dryer sheets or fabric softener regularly: Chemical residues from dryer sheets can create a film that reduces airflow. The lint trap screen may look clean but be coated with residue that blocks air.
How to properly clean your lint trap and vent system
Prevention is straightforward: keep lint from accumulating to dangerous levels. Here's exactly how to maintain your dryer safely.
After every load:
Clean the lint trap screen:
Before starting a new load, remove the lint trap from its slot
Peel off accumulated lint with your fingers
For stubborn lint, use a soft brush or vacuum attachment
Inspect the screen for any damage or residue buildup
Reinsert the screen completely before starting the dryer
Why this matters: This removes the majority of lint before it can enter the vent system. It takes 10 seconds and prevents most problems.
Check the area around the dryer: Quickly scan for lint accumulation on the floor, behind the dryer, or around the vent connection. Excessive lint in these areas indicates a problem.
Weekly: Deep clean the lint trap
Wash the lint trap screen: Even with regular lint removal, residue from dryer sheets or fabric softeners can create a film that reduces airflow.
Remove the lint screen
Wash with warm water and dish soap or laundry detergent
Use a soft brush to scrub both sides, paying attention to the mesh
Rinse thoroughly under running water
Dry completely before reinserting (run the dryer empty briefly if needed, or air dry overnight)
Test for residue buildup: Pour a small amount of water on the screen. If water pools instead of flowing through, residue is blocking airflow. Wash more thoroughly with dish soap.
Clean the lint trap slot:
With the lint screen removed, use a vacuum crevice attachment
Reach as deep into the slot as possible
Remove any lint accumulation inside the housing
Use a dryer vent brush (long, flexible brush designed for this purpose) to dislodge stubborn lint
Vacuum again to remove dislodged debris
Every 6 months: Clean the vent system
Dryer vent ducts should be cleaned at least once a year to reduce the risk of fires and carbon monoxide poisoning. Many experts recommend cleaning twice yearly—especially important for Canadian households with heavy winter usage.
DIY Vent Cleaning (for simple, short vent runs):
You'll need:
Dryer vent brush kit (available at hardware stores)
Vacuum with hose attachment
Screwdriver
Possibly pliers or wrench
Steps:
Disconnect the dryer: Unplug from electrical outlet. If gas-powered, turn off the gas supply valve.
Pull the dryer away from the wall: You need access to the vent connection at the back of the dryer.
Disconnect the vent hose: Loosen the clamp connecting the vent hose to the dryer. If corroded or damaged, replace it.
Inspect the vent hose: Look for kinks, damage, or crushing. When your dryer is too close to the wall, or when the piping has a kink, it can be hazardous. Check that the hose isn't compressed.
Clean the vent hose: Use the vent brush to scrub the interior, working from both ends. Vacuum out dislodged lint.
Clean the dryer's vent opening: At the back of the dryer where the vent connects, use a brush and vacuum to remove lint buildup.
Clean the ductwork to exterior: Insert the vent brush into the duct leading to outside. Work it back and forth, rotating as you go. Some kits have extendable handles or attachments for drills. Work from inside, then repeat from the exterior vent if accessible.
Clean the exterior vent: Remove the exterior vent cover if possible. Clean lint from the cover, flap, and opening. External venting creates pre-built "homes" for nest builders—when the duct is clogged with a nest, the lint can't blow past, increasing the danger of a dryer fire. Check for bird nests, rodent nests, or other blockages.
Vacuum everything: Use the vacuum to clean up all dislodged lint from both ends.
Inspect for damage: Check the entire visible duct system for holes, disconnections, or damage. Check that the duct is made of rigid metal—if you find plastic or vinyl ductwork, replace it immediately with rigid or semi-rigid metal ducting.
Reassemble: Reconnect the vent hose, ensuring tight, secure connections. Restore gas or electrical connections. Push the dryer back into place, being careful not to crush the vent hose.
Test operation: Run the dryer on air-only or low heat for a few minutes. Go outside and verify strong airflow from the exterior vent.
When to call a professional:
Your vent run is longer than 8-10 feet
The vent has multiple bends or turns
The vent runs through walls, ceilings, or attics where you can't access it
You're physically unable to move the dryer or access connections
You discover damage that needs repair
You're uncomfortable with any part of this process
One advantage to hiring an experienced professional is they likely have seen just about every make and model of dryer. They will likely have the appropriate brush and equipment to effectively do the job.
Professional vent cleaning typically costs $100-200 and includes:
Complete duct cleaning from dryer to exterior
Inspection for damage, improper installation, or code violations
Verification of proper airflow
Often includes cleaning interior dryer components
Peace of mind that it's done thoroughly and safely
Annually: Professional interior cleaning
It's a good idea to have the interior of the dryer checked periodically. If you haven't been cleaning your vents and you're just listening to this now, in all likelihood, it's probably a mess inside your dryer. To be safe you should be looking inside or having a qualified technician look inside and cleaning out what's in there because that is just going to continue to build up over time.
Professional interior cleaning involves:
Opening the dryer cabinet (not something most homeowners can or should do)
Removing lint from around the drum, motor, heating element, and other components
Inspecting for worn parts or potential failures
Cleaning areas the lint trap doesn't catch
Verifying safety systems (thermostats, thermal fuses) are functioning
This is especially important for:
Dryers more than 5 years old
Dryers that have never been professionally serviced
After purchasing a used dryer or moving into a home with an existing dryer
If you've experienced any warning signs
Cost typically ranges from $100-150 and can extend your dryer's life while significantly reducing fire risk.
Additional safety measures every homeowner should take
Beyond regular cleaning, these practices further reduce your dryer fire risk:
Use the right duct material
Cheap plastic external venting can be inviting for nest builders and is a fire hazard. Only flexible transition ducts that are listed by UL or another approved product safety testing agency should be used.
What to use:
Rigid metal ductwork (aluminum or galvanized steel) for the main vent run
Semi-rigid metal duct for the short connection from dryer to wall (if rigid isn't feasible)
UL-listed flexible metal duct only for the final connection (4 feet maximum)
What to NEVER use:
White plastic or vinyl ductwork (highly flammable)
Foil duct tape (deteriorates over time)
Excessively long or convoluted duct runs
The National Building Code of Canada provides guidelines: Dryer ducts must be made of rigid metal, extending to the building's exterior with a backdraft damper to prevent re-entry of air.
If you have plastic ductwork, replace it immediately.
Don't overload the dryer
Overloading:
Produces more lint per cycle
Restricts airflow through the drum
Causes the dryer to run longer (more heat exposure)
Prevents clothes from tumbling freely (less efficient drying)
Increases wear on the appliance
Follow the manufacturer's load size recommendations. A good rule: fill the drum no more than 3/4 full, leaving room for clothes to tumble.
Be extremely cautious with contaminated laundry
There are materials that are not to be dried in a clothes dryer—look at the product labels and instructions for washing and drying. There are certain plastics, rubbers, and synthetic foam materials that should not be dried in the dryer.
Never put these in the dryer:
Anything that has contacted gasoline, paint thinner, or other solvents
Rags used with stains, oils, or finishing products
Mops or cleaning cloths used with flammable cleaning products
Anything with foam rubber backing
Items labeled "air dry only"
For items that have contacted cooking oils or grease:
Wash in the hottest water safe for the fabric
Use extra detergent
Run through an extra rinse cycle
Consider line-drying instead of machine drying
If you must machine dry, use low heat and monitor closely
Cooking oils can spontaneously combust when subjected to heat, even after washing. Multiple washing cycles may be needed to fully remove oils from fabrics.
Install proper safety devices
Smoke detectors: Install a smoke detector in the area where the dryer is located so homeowners are alerted as soon as a fire starts. If natural gas powers the dryer, use a combination smoke/carbon monoxide detector.
Test monthly and replace batteries annually (or install 10-year sealed battery units).
Lint alarm (optional but recommended): Devices are available that monitor airflow and alert you when the vent becomes restricted. These provide early warning before fire risk becomes critical. Cost: $30-100.
ABC fire extinguisher: Keep a properly rated fire extinguisher in or near your laundry room. Know how to use it BEFORE you need it. Inspect annually and replace as needed.
Never run the dryer unsupervised
Don't run the dryer before bed or when no-one is home.
Why this matters:
If a fire starts, you can respond immediately
Early detection dramatically reduces damage
You can prevent the fire from spreading
You can safely evacuate family members if needed
Best practices:
Run the dryer only when you're home and awake
Stay on the same floor of the house
Be alert to unusual sounds or smells
Never leave the house with the dryer running
Never go to bed with a load running
Many dryer fires start during or shortly after the cycle ends when residual heat can ignite accumulated lint.
Switch from dryer sheets to dryer balls
Dryer sheets and liquid fabric softeners leave residue on the lint trap that reduces airflow and creates buildup inside the dryer.
Better alternatives:
Wool dryer balls (reduce drying time, soften naturally, no residue)
Add white vinegar to the rinse cycle of your washer (natural softener, no dryer residue)
Skip fabric softener entirely (many modern fabrics don't need it)
If you do use dryer sheets, wash your lint trap screen weekly (as described above) to remove residue buildup.
Regular inspection schedule
Create a simple maintenance schedule:
After every load: Clean lint trap
Weekly: Wash lint trap screen, clean trap slot
Every 3 months: Visual inspection of vent connections, exterior vent
Every 6 months: Full vent system cleaning (DIY or professional)
Annually: Professional interior dryer inspection and cleaning
Set calendar reminders. Most smartphone calendar apps allow recurring tasks—set them up and get automatic reminders.
What to do if your dryer catches fire
Despite best efforts, fires can still occur. Knowing how to respond can prevent tragedy.
If you smell smoke or see flames
Immediate actions:
Stop the dryer immediately - Hit the off button or pull the plug if you can reach it safely
Close the dryer door - Don't open it if there are flames inside (oxygen feeds fire)
Evacuate everyone from the home
Call 911 from outside or a neighbour's home
Do NOT attempt to fight the fire unless it's very small, contained, and you have a fire extinguisher AND you've been trained to use it AND you have a clear exit path
If using a fire extinguisher:
Only if the fire is small (smaller than a garbage can)
Stand between the fire and your exit
Use P.A.S.S. method: Pull pin, Aim at base of fire, Squeeze handle, Sweep side to side
If the fire doesn't go out immediately or grows, evacuate and wait for fire department
What NOT to do:
Don't open the dryer door if you see flames (adds oxygen)
Don't use water on an electrical or dryer fire (electrocution risk)
Don't waste time trying to save belongings
Don't go back inside for any reason once you've evacuated
If there's heavy smoke but no visible flames
Turn off the dryer
Evacuate everyone
Call 911
Wait for fire department
Smoke means something is burning. Even if you don't see flames, fire may be inside the dryer cabinet, in walls, or in ductwork. Let professionals handle it.
After a dryer fire
Do not use the dryer again until it has been:
Inspected by fire department or fire marshal
Professionally cleaned and repaired
Verified safe by a qualified appliance technician
Even small fires can damage safety components, wiring, or create hidden fire hazards. Using a dryer after a fire without proper inspection risks another fire.
Document everything for insurance:
Take photos of damage
Keep all receipts for repairs or replacement
Get copies of fire department reports
Follow your insurance company's claims process
The bottom line: Dryer lint fires are preventable
Here's what you need to remember:
Dryer lint fires are common. Toronto alone experiences an average of 39 dryer fires annually. Across Canada, home appliances account for over 700 residential fires each year, with the vast majority (92 percent) involving clothes dryers.
They're caused by neglect, not bad luck. 32% of dryer fires are caused by lack of cleaning and maintenance. This isn't about defective appliances or freak accidents—it's about basic maintenance that doesn't get done.
They're preventable. Simply put, the leading cause of dryer fires is the failure to clean them. Clean your lint trap after every load. Clean your vent system twice yearly. Have your dryer professionally inspected annually. Follow safety guidelines. That's it.
The consequences of ignoring this are severe. Homes destroyed. Families displaced. Injuries. Deaths. All from something as mundane and preventable as lint buildup.
You likely spent thousands of dollars on your dryer. You probably spend hours every week doing laundry. But if you're not maintaining the appliance properly, you're gambling with your family's safety and your home's security.
Take action today:
Clean your lint trap right now (seriously, go do it)
Check when you last cleaned your vent system (if you can't remember, it's overdue)
Schedule professional vent cleaning if it's been more than 6 months
Inspect your duct material (replace immediately if plastic or vinyl)
Set up recurring calendar reminders for ongoing maintenance
Share this information with family, friends, and neighbours
The ten minutes it takes to properly maintain your dryer could literally save your life and your home. That's not hyperbole—that's reality backed by statistics and fire department data from across Canada.
Don't become another statistic. Don't wait until you smell smoke or see flames. Don't assume "it won't happen to me."
Take dryer lint seriously. Maintain your appliance. Protect your home and family.
It's that simple, and that important.
Need help maintaining a safe, clean home? At EcoEthical Cleaning, I'm committed to educating my clients about all aspects of home safety and maintenance. While I don't provide the specialized service of professional dryer vent cleaning, I do ensure your home's most essential lint collection points are addressed. For thorough, eco-friendly house cleaning, including proper cleaning of dryer lint screens and appliance drums, contact me for a free, no-obligation estimate. Serving Toronto's Harbourfront District and surrounding areas.
Sources & further reading
“Home Dryer Fires”, National Fire Protection Association (NFPA)
"Clothes Dryer Fires in Residential Buildings", U.S. Fire Administration
“What to know about portable fire extinguishers”, Canadian Centre for Occupational Health and Safety (CCOHS)